# Dashboard
Source: https://docs.prompteus.com/features/dashboard
Monitor your Neurons' performance, usage, and cost savings through the Prompteus dashboard.
The Prompteus dashboard provides real-time insights into your Neurons' performance, usage metrics, and cost savings. This guide explains how to interpret the dashboard metrics and use them to optimize your Neurons.
## Dashboard Overview
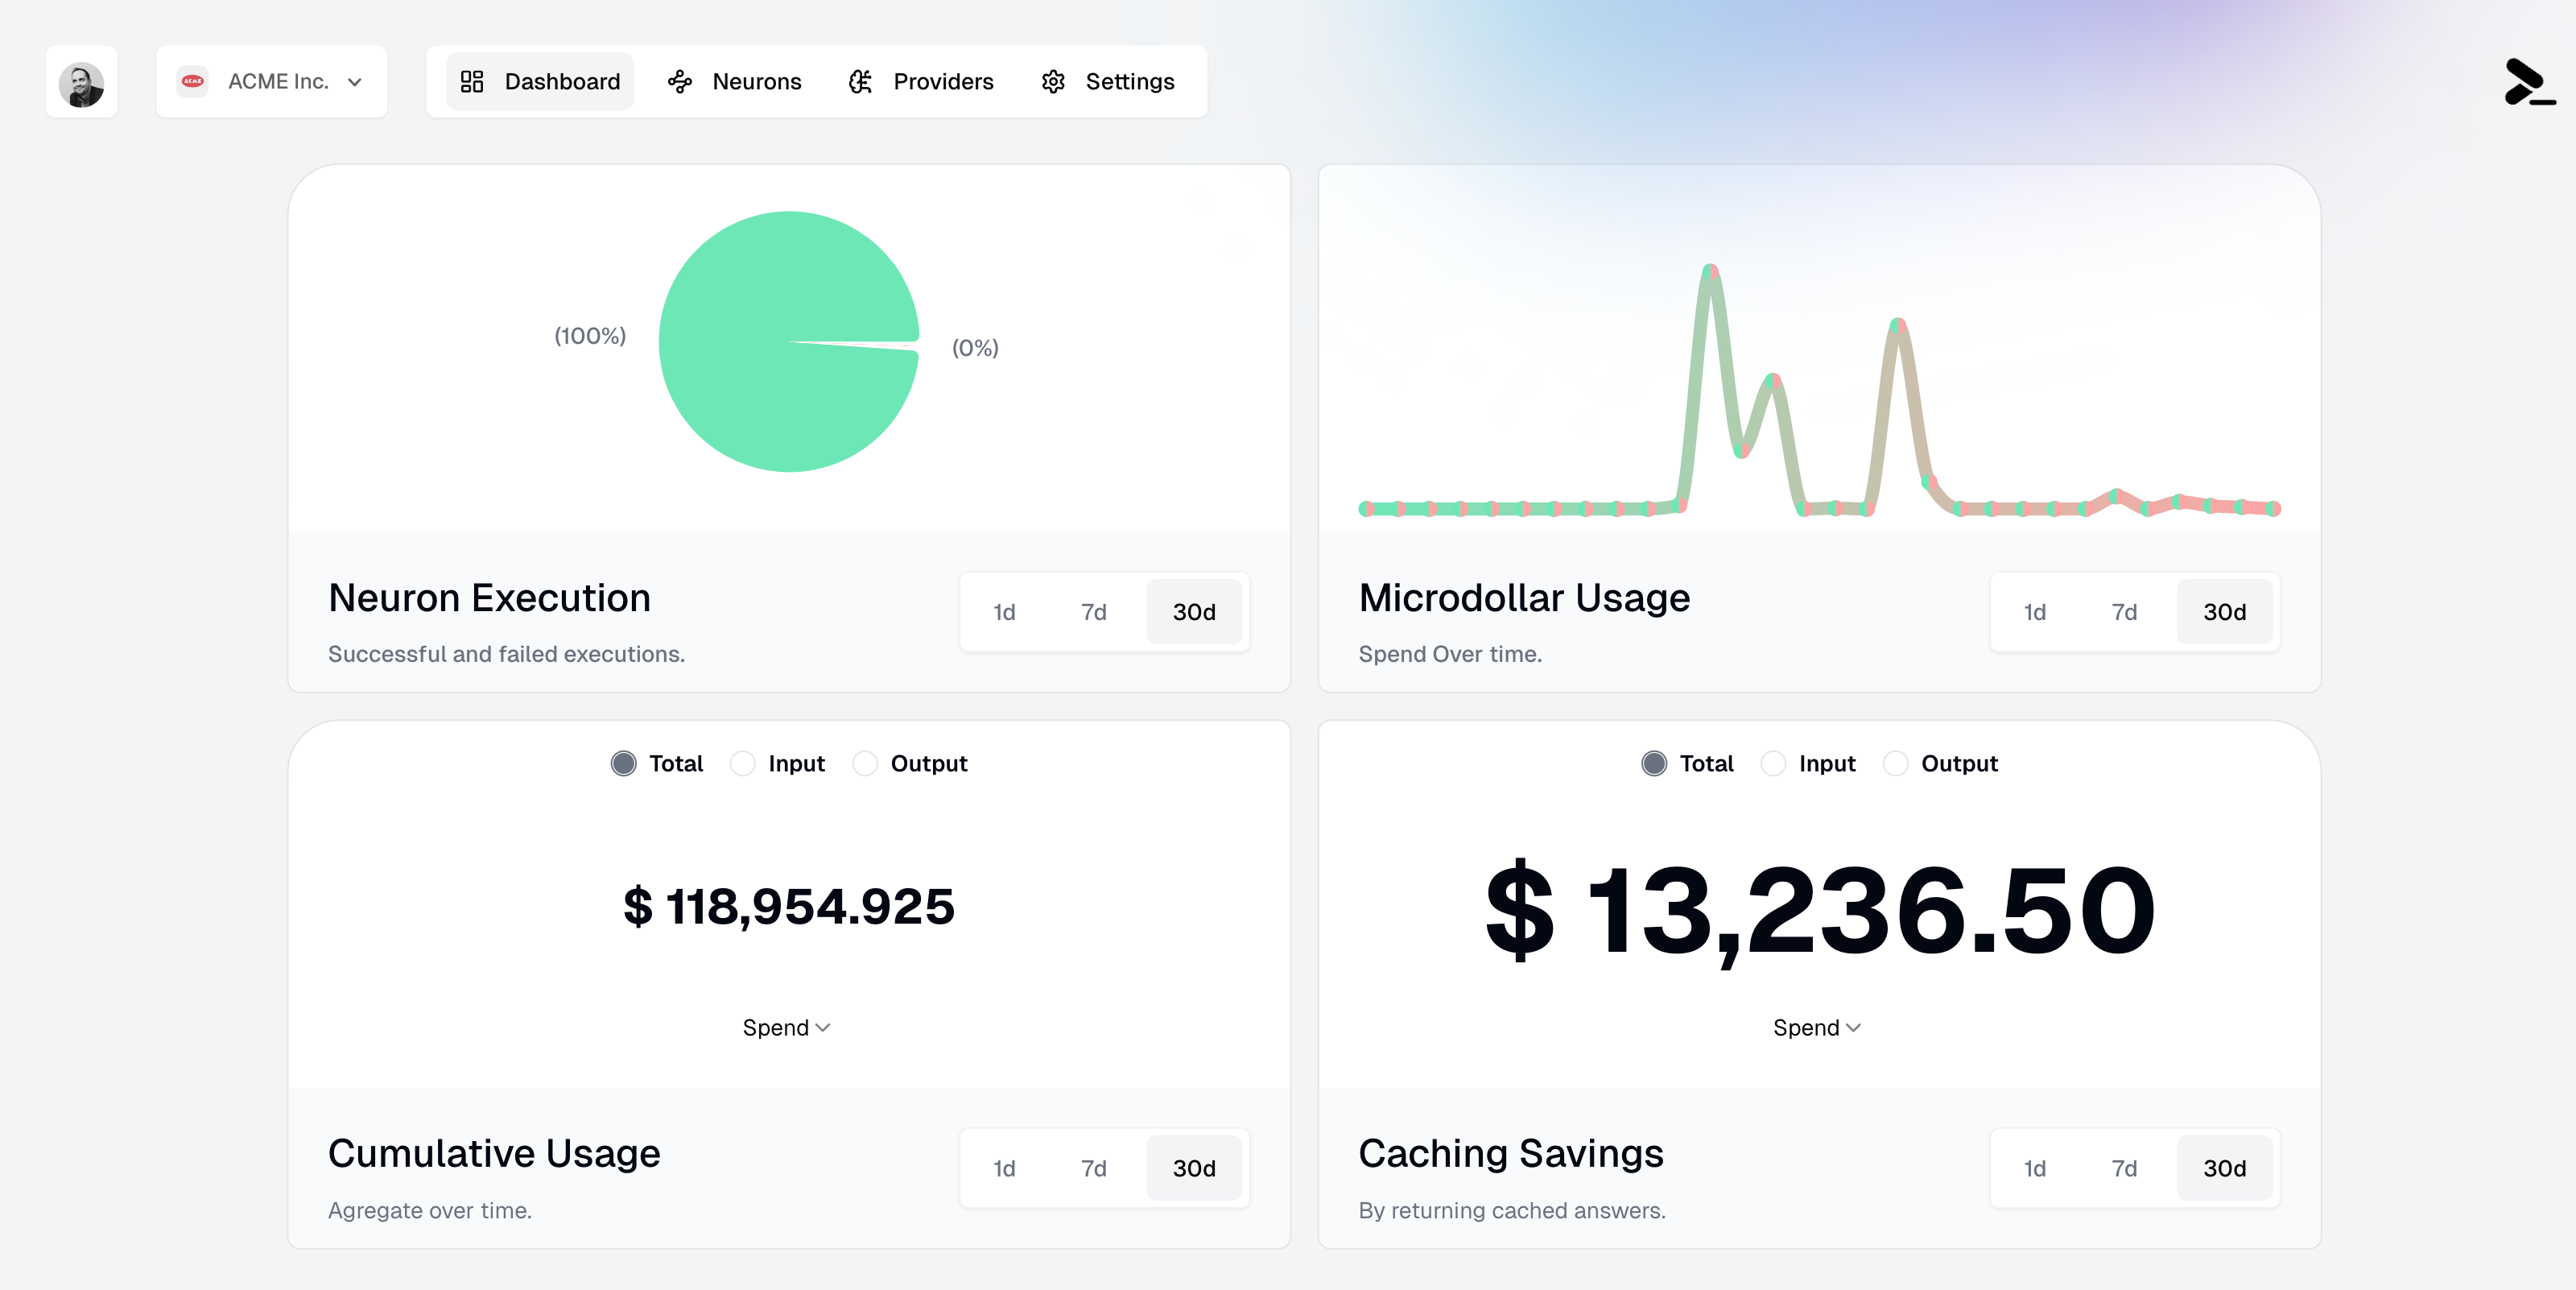 The dashboard consists of four main panels that give you a comprehensive view of your Neurons' performance and costs:
### Neuron Execution
The Neuron Execution panel shows the success rate of your Neuron executions through a pie chart visualization. It displays:
* Successful executions (green)
* Failed executions (if any, in red)
* Time range filters: 1d, 7d, and 30d
This metric helps you monitor the reliability of your Neurons and quickly identify if there are any issues that need attention.
### Microdollar Usage
The Microdollar Usage panel shows your spending over time. A microdollar (μ\$) is one millionth of a dollar, allowing for precise tracking of API costs at a very granular level. The graph shows:
* Usage patterns over time
* Spending spikes and trends
* Time range filters: 1d, 7d, and 30d
Microdollars (μ\$) are used to track costs with high precision. For example:
* μ\$1,000,000 = \$1.00
* μ\$100,000 = \$0.10
* μ\$1,000 = \$0.001
### Cumulative Usage
The Cumulative Usage panel tracks your total resource consumption, with options to view:
* Total tokens processed
* Input tokens
* Output tokens
* Total spend
* Time range filters: 1d, 7d, and 30d
For better readability, the dashboard automatically switches between dollars (\$) and microdollars (μ\$) based on the amount:
* Large amounts (≥ \$1.00) are shown in dollars (e.g., \$118,954.925)
* Small amounts (\< \$1.00) are shown in microdollars (e.g., μ\$100,000)
This helps you understand your overall usage patterns and plan capacity accordingly.
### Caching Savings
The Caching Savings panel shows how much you've saved through [caching](/neurons/settings/caching). It displays:
* Total amount saved through cache hits
* Savings over time graph
* Time range filters: 1d, 7d, and 30d
Like the Cumulative Usage panel, this panel also automatically switches between dollars and microdollars for better readability:
* Significant savings are displayed in dollars (e.g., \$13,236.50)
* Smaller savings are displayed in microdollars (e.g., μ\$13,236)
The automatic unit switching between dollars (\$) and microdollars (μ\$) helps you quickly understand the scale of usage and savings:
* Microdollars (μ\$) provide precision for small amounts
* Dollars (\$) offer familiarity for larger amounts
* The switch happens automatically at the \$0.0001 threshold
## Using Dashboard Insights
Here are some ways to use dashboard insights effectively:
1. **Monitor Performance**
* Track success rates to ensure your Neurons are functioning properly
* Identify patterns in failed executions through [detailed execution logs](/neurons/logging)
* [Configure rate limiting](/neurons/settings/rate-limiting) based on usage patterns
2. **Optimize Costs**
* Monitor microdollar usage to identify expensive operations
* Track caching savings to validate your [caching strategy](/neurons/settings/caching)
* Adjust [access controls](/neurons/settings/access-control) if you notice unexpected usage patterns
3. **Capacity Planning**
* Use cumulative usage data to forecast future needs
* Identify peak usage periods
* Plan for scaling based on growth trends
# MCP Servers
Source: https://docs.prompteus.com/features/mcp-servers
Connect remote MCP Servers to access Resources and Tools in your Neurons.
MCP Servers, and specifically the use of remote MCP servers, are nascent
technology subject to rapid and frequent change.
## Introduction
[Model Context Protocol (MCP)](https://modelcontextprotocol.io/introduction) is an open protocol that standardizes how applications provide context to LLMs.
The MCP Servers feature in Prompteus allows users to import and configure remotely hosted MCP Servers over the [Streamable HTTP transport](https://modelcontextprotocol.io/specification/2025-03-26/basic/transports#streamable-http) to access and use [Resources](https://modelcontextprotocol.io/docs/concepts/resources) and [Tools](https://modelcontextprotocol.io/docs/concepts/tools) in your Neurons.
Specification around remote MCP Servers are [still in
development](https://modelcontextprotocol.io/quickstart/server#why-claude-for-desktop-and-not-claude-ai).
In the MCP [General architecture](https://modelcontextprotocol.io/introduction#general-architecture), Prompteus is an MCP Host, and Neurons (and more specifically, the Call AI Model node) within Prompteus are MCP Clients.
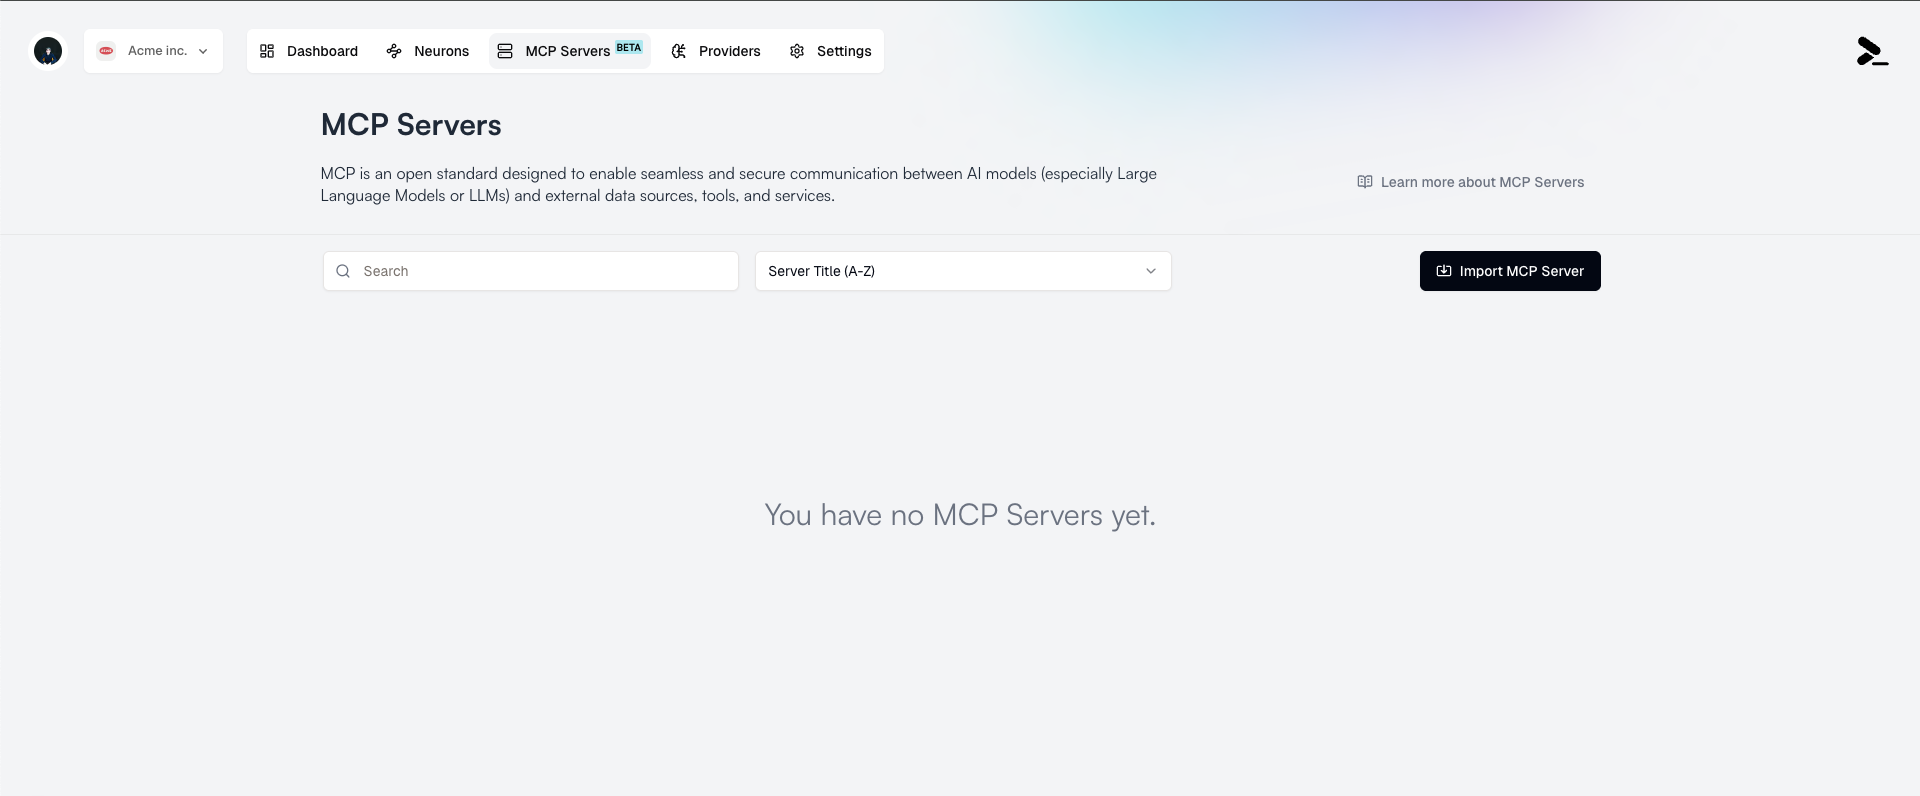
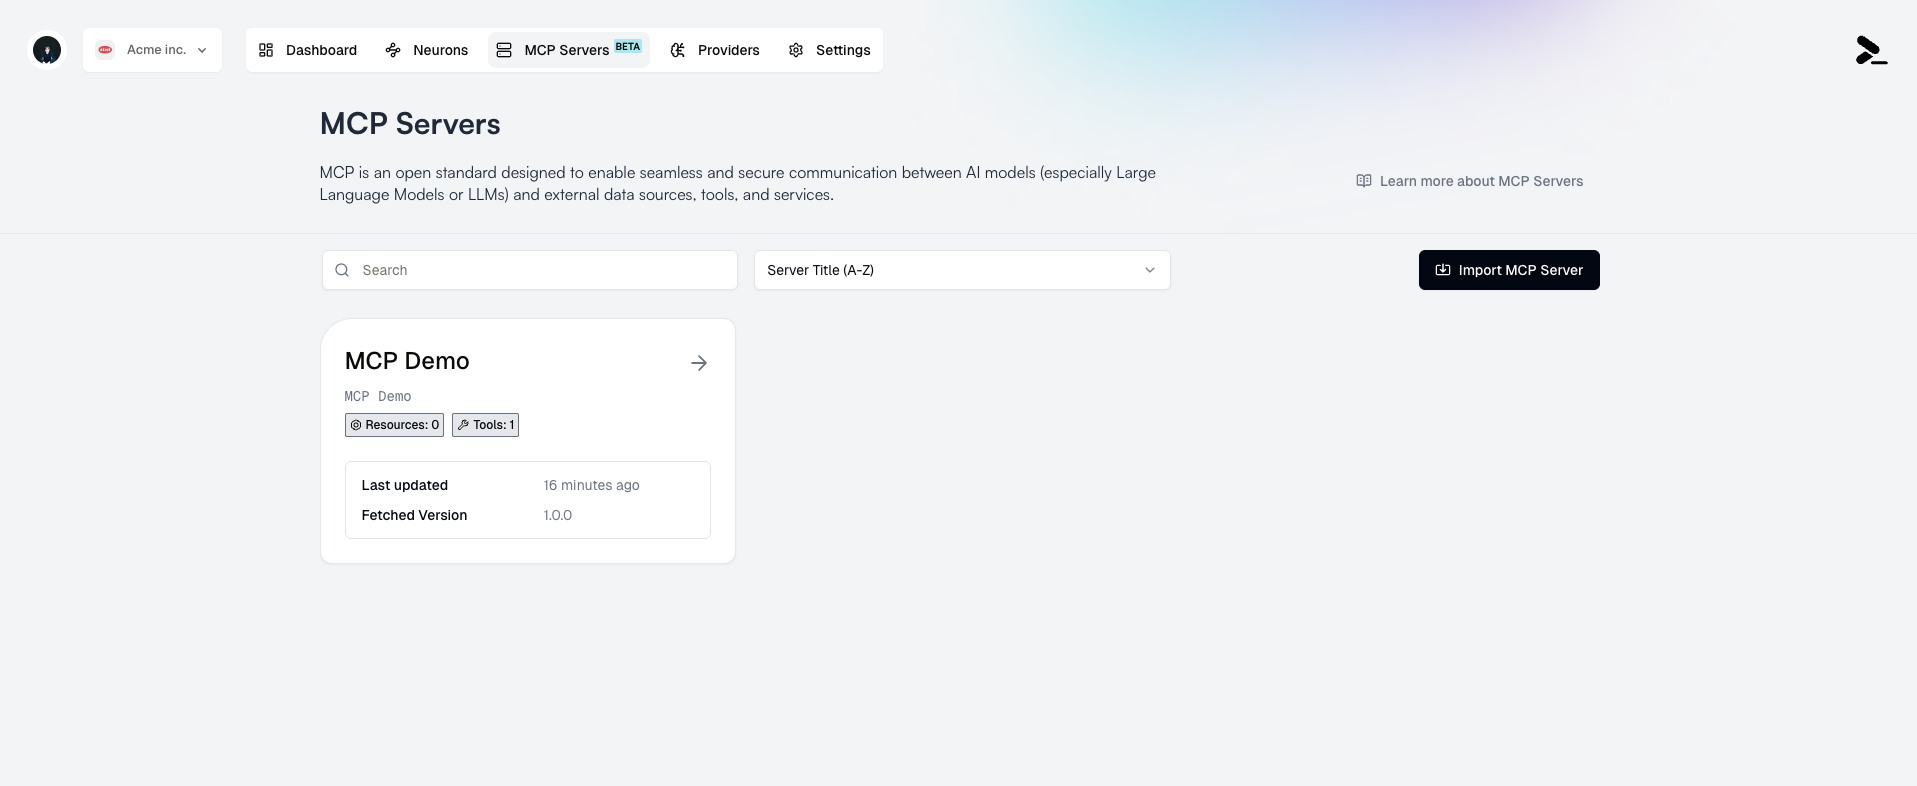
## Importing an MCP Server
To import an MCP Server in Prompteus:
1. Navigate to the MCP Servers page, then click the **Import MCP Server** button.
The dashboard consists of four main panels that give you a comprehensive view of your Neurons' performance and costs:
### Neuron Execution
The Neuron Execution panel shows the success rate of your Neuron executions through a pie chart visualization. It displays:
* Successful executions (green)
* Failed executions (if any, in red)
* Time range filters: 1d, 7d, and 30d
This metric helps you monitor the reliability of your Neurons and quickly identify if there are any issues that need attention.
### Microdollar Usage
The Microdollar Usage panel shows your spending over time. A microdollar (μ\$) is one millionth of a dollar, allowing for precise tracking of API costs at a very granular level. The graph shows:
* Usage patterns over time
* Spending spikes and trends
* Time range filters: 1d, 7d, and 30d
Microdollars (μ\$) are used to track costs with high precision. For example:
* μ\$1,000,000 = \$1.00
* μ\$100,000 = \$0.10
* μ\$1,000 = \$0.001
### Cumulative Usage
The Cumulative Usage panel tracks your total resource consumption, with options to view:
* Total tokens processed
* Input tokens
* Output tokens
* Total spend
* Time range filters: 1d, 7d, and 30d
For better readability, the dashboard automatically switches between dollars (\$) and microdollars (μ\$) based on the amount:
* Large amounts (≥ \$1.00) are shown in dollars (e.g., \$118,954.925)
* Small amounts (\< \$1.00) are shown in microdollars (e.g., μ\$100,000)
This helps you understand your overall usage patterns and plan capacity accordingly.
### Caching Savings
The Caching Savings panel shows how much you've saved through [caching](/neurons/settings/caching). It displays:
* Total amount saved through cache hits
* Savings over time graph
* Time range filters: 1d, 7d, and 30d
Like the Cumulative Usage panel, this panel also automatically switches between dollars and microdollars for better readability:
* Significant savings are displayed in dollars (e.g., \$13,236.50)
* Smaller savings are displayed in microdollars (e.g., μ\$13,236)
The automatic unit switching between dollars (\$) and microdollars (μ\$) helps you quickly understand the scale of usage and savings:
* Microdollars (μ\$) provide precision for small amounts
* Dollars (\$) offer familiarity for larger amounts
* The switch happens automatically at the \$0.0001 threshold
## Using Dashboard Insights
Here are some ways to use dashboard insights effectively:
1. **Monitor Performance**
* Track success rates to ensure your Neurons are functioning properly
* Identify patterns in failed executions through [detailed execution logs](/neurons/logging)
* [Configure rate limiting](/neurons/settings/rate-limiting) based on usage patterns
2. **Optimize Costs**
* Monitor microdollar usage to identify expensive operations
* Track caching savings to validate your [caching strategy](/neurons/settings/caching)
* Adjust [access controls](/neurons/settings/access-control) if you notice unexpected usage patterns
3. **Capacity Planning**
* Use cumulative usage data to forecast future needs
* Identify peak usage periods
* Plan for scaling based on growth trends
# MCP Servers
Source: https://docs.prompteus.com/features/mcp-servers
Connect remote MCP Servers to access Resources and Tools in your Neurons.
MCP Servers, and specifically the use of remote MCP servers, are nascent
technology subject to rapid and frequent change.
## Introduction
[Model Context Protocol (MCP)](https://modelcontextprotocol.io/introduction) is an open protocol that standardizes how applications provide context to LLMs.
The MCP Servers feature in Prompteus allows users to import and configure remotely hosted MCP Servers over the [Streamable HTTP transport](https://modelcontextprotocol.io/specification/2025-03-26/basic/transports#streamable-http) to access and use [Resources](https://modelcontextprotocol.io/docs/concepts/resources) and [Tools](https://modelcontextprotocol.io/docs/concepts/tools) in your Neurons.
Specification around remote MCP Servers are [still in
development](https://modelcontextprotocol.io/quickstart/server#why-claude-for-desktop-and-not-claude-ai).
In the MCP [General architecture](https://modelcontextprotocol.io/introduction#general-architecture), Prompteus is an MCP Host, and Neurons (and more specifically, the Call AI Model node) within Prompteus are MCP Clients.
## Importing an MCP Server
To import an MCP Server in Prompteus:
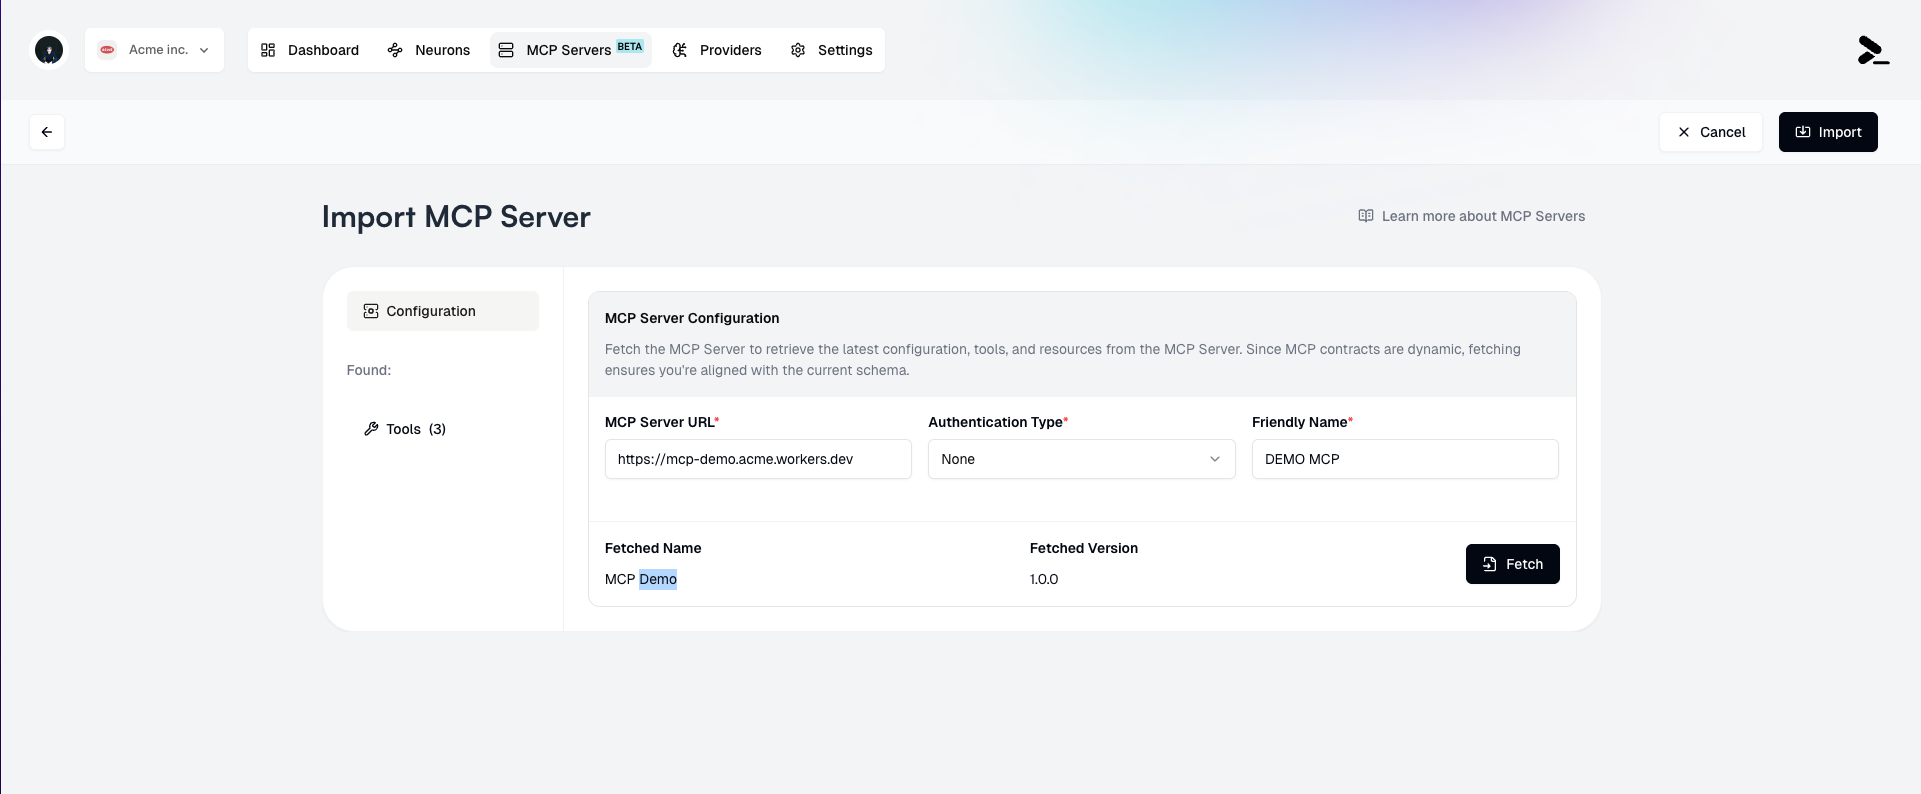
1. Navigate to the MCP Servers page, then click the **Import MCP Server** button.
 2. Enter in the required fields:
* **MCP Server URL**: The URL of the MCP Server you want to import.
* **Authentication Type**: The authentication type for the MCP Server (default is None).
2. Enter in the required fields:
* **MCP Server URL**: The URL of the MCP Server you want to import.
* **Authentication Type**: The authentication type for the MCP Server (default is None).
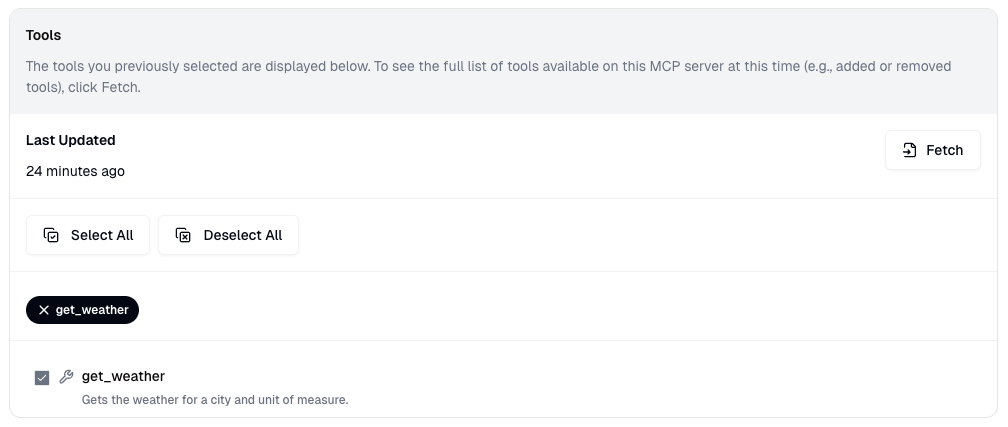
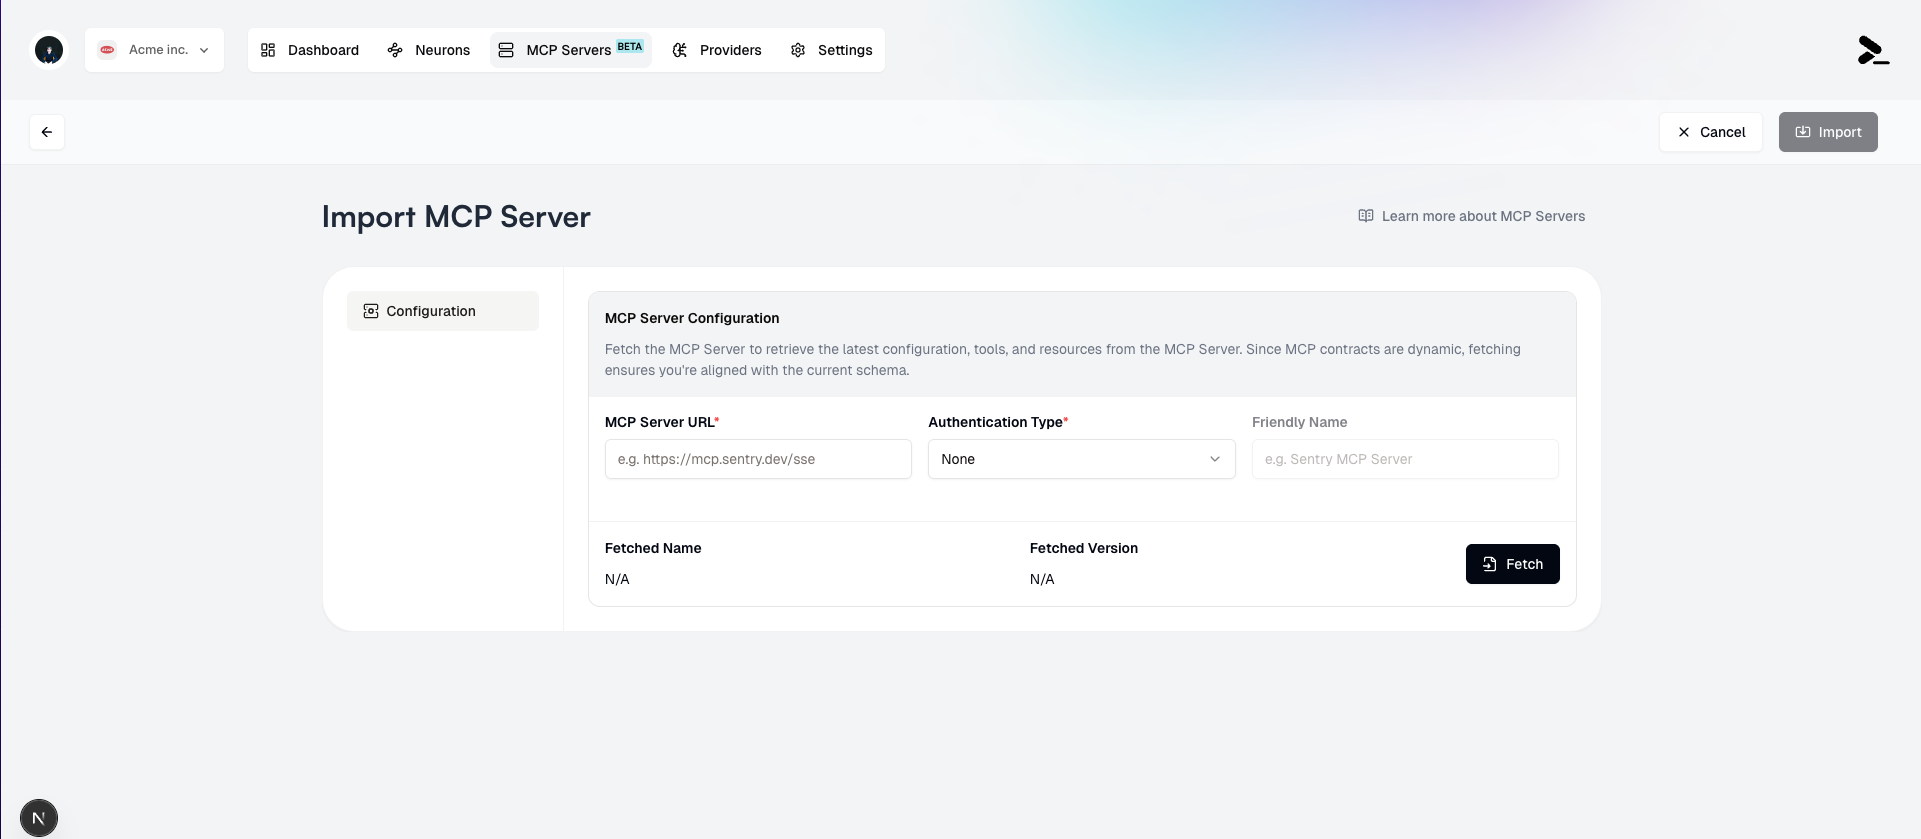 3. Click the **Fetch** button to validate the URL and initialize the server.
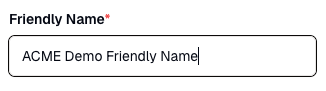
 4. Add a **Friendly Name** for the MCP Server if desired. This is optional, but may be useful for distinguishing between multiple MCP Servers that have different subsets of **Tools** and **Resources** selected.
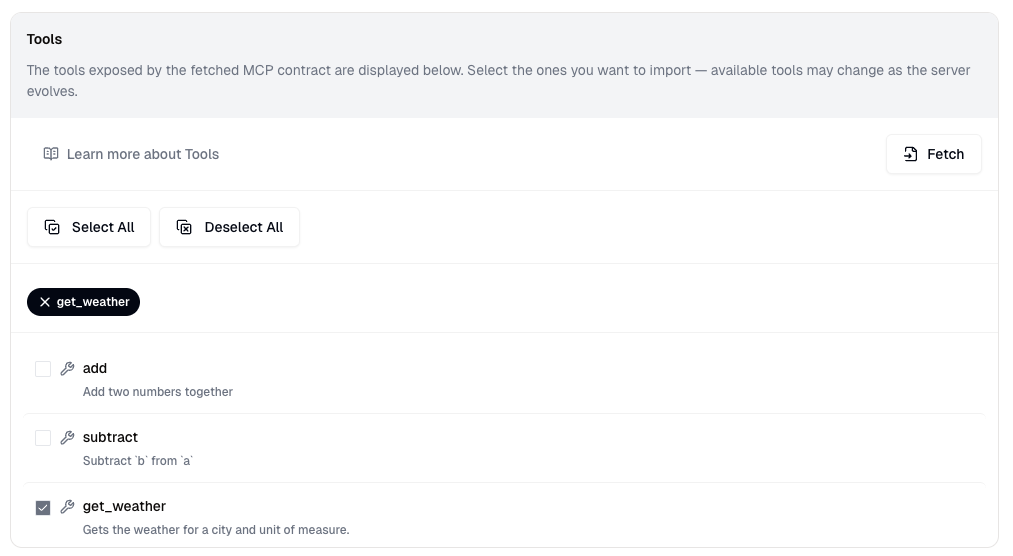
 5. If the server is successfully initialized, you will see a list of available **Tools** and **Resources** for selection.
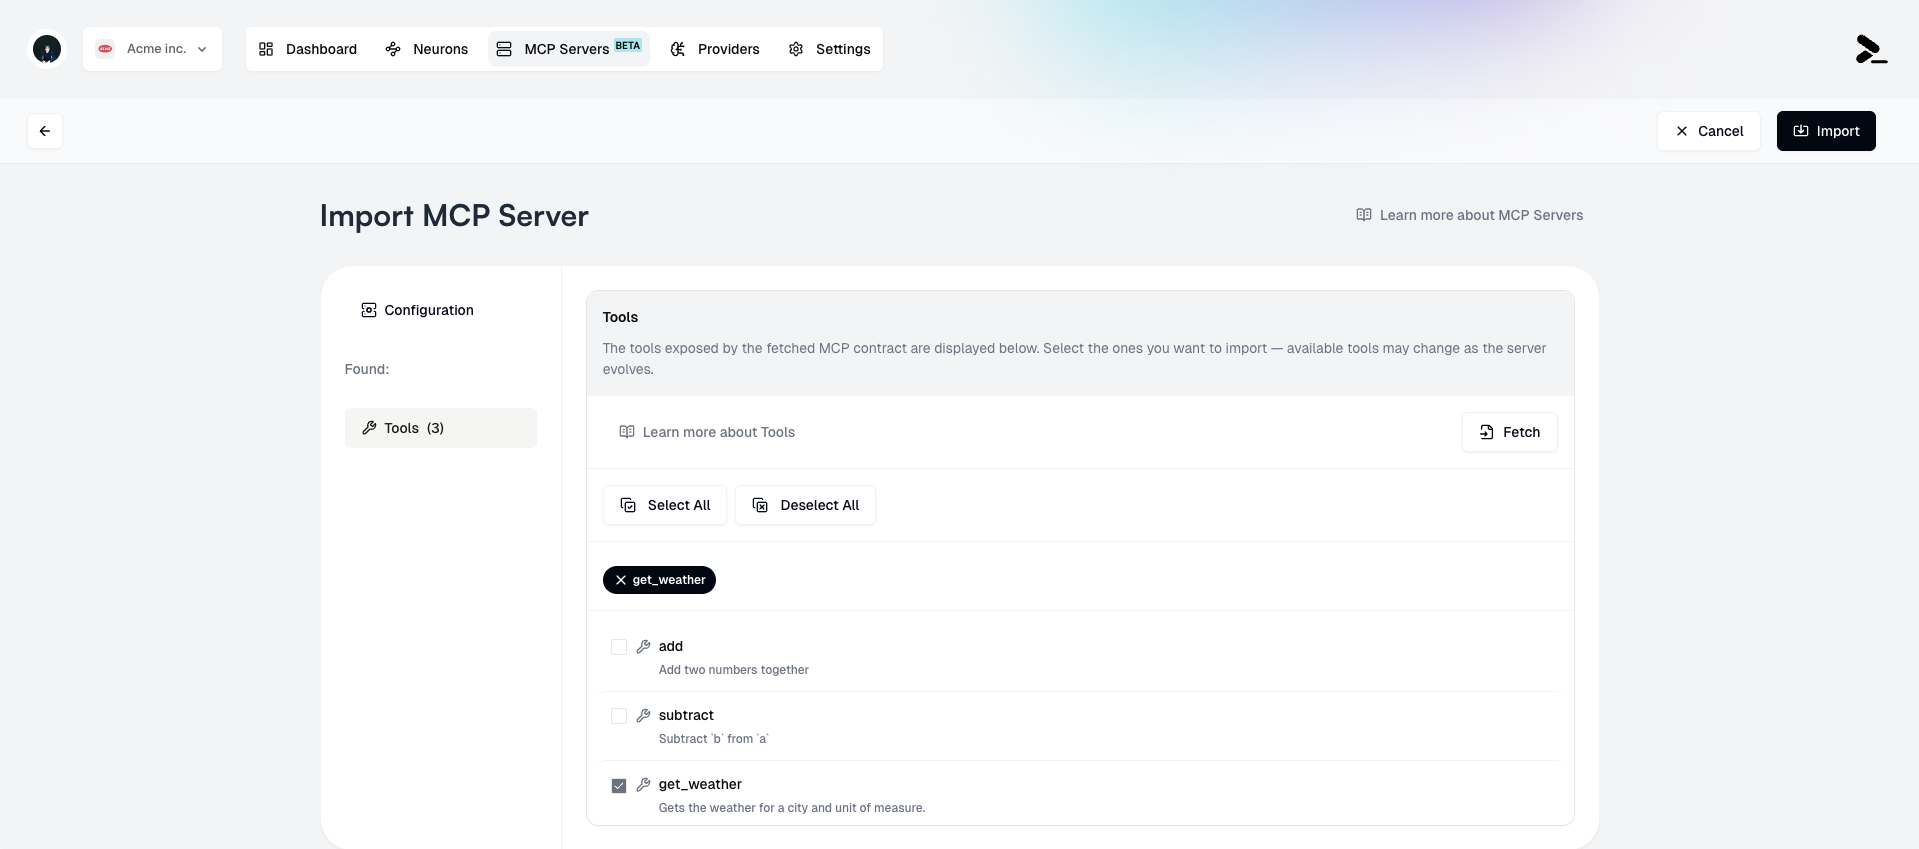 6. Select the **Tools** and **Resources** you want to import from the MCP Server.
Users may import the same MCP Server multiple times, with different subsets of
**Tools** and **Resources** selected.
6. Select the **Tools** and **Resources** you want to import from the MCP Server.
Users may import the same MCP Server multiple times, with different subsets of
**Tools** and **Resources** selected.
 7. Click the **Import** button to finish the import.
 ## Using an MCP Server in a Neuron workflow
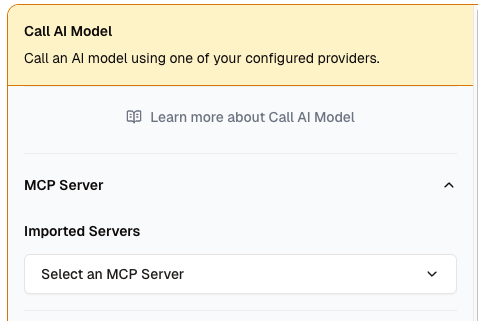
**MCP Servers** are accessed from the [Call AI Model](/neurons/editor/nodes/call-ai-model) node in the Neuron workflow.
To use an MCP Server's tools or resources in a Neuron workflow:
1. Navigate to the [editor](/neurons/editor/visual-editor) of a Neuron.
2. Add a [Call AI Model](/neurons/editor/nodes/call-ai-model) node to the workflow, if one doesn't already exist.
3. In the [Call AI Model](/neurons/editor/nodes/call-ai-model) node's settings, select one or more MCP Servers from the **Select an MCP Server** dropdown.
If you have multiple MCP Servers imported, you can select multiple MCP Servers
to use in a single Neuron workflow. Setting clear and descriptive **Friendly
Names** for MCP Servers can help you distinguish between them.
## Using an MCP Server in a Neuron workflow
**MCP Servers** are accessed from the [Call AI Model](/neurons/editor/nodes/call-ai-model) node in the Neuron workflow.
To use an MCP Server's tools or resources in a Neuron workflow:
1. Navigate to the [editor](/neurons/editor/visual-editor) of a Neuron.
2. Add a [Call AI Model](/neurons/editor/nodes/call-ai-model) node to the workflow, if one doesn't already exist.
3. In the [Call AI Model](/neurons/editor/nodes/call-ai-model) node's settings, select one or more MCP Servers from the **Select an MCP Server** dropdown.
If you have multiple MCP Servers imported, you can select multiple MCP Servers
to use in a single Neuron workflow. Setting clear and descriptive **Friendly
Names** for MCP Servers can help you distinguish between them.
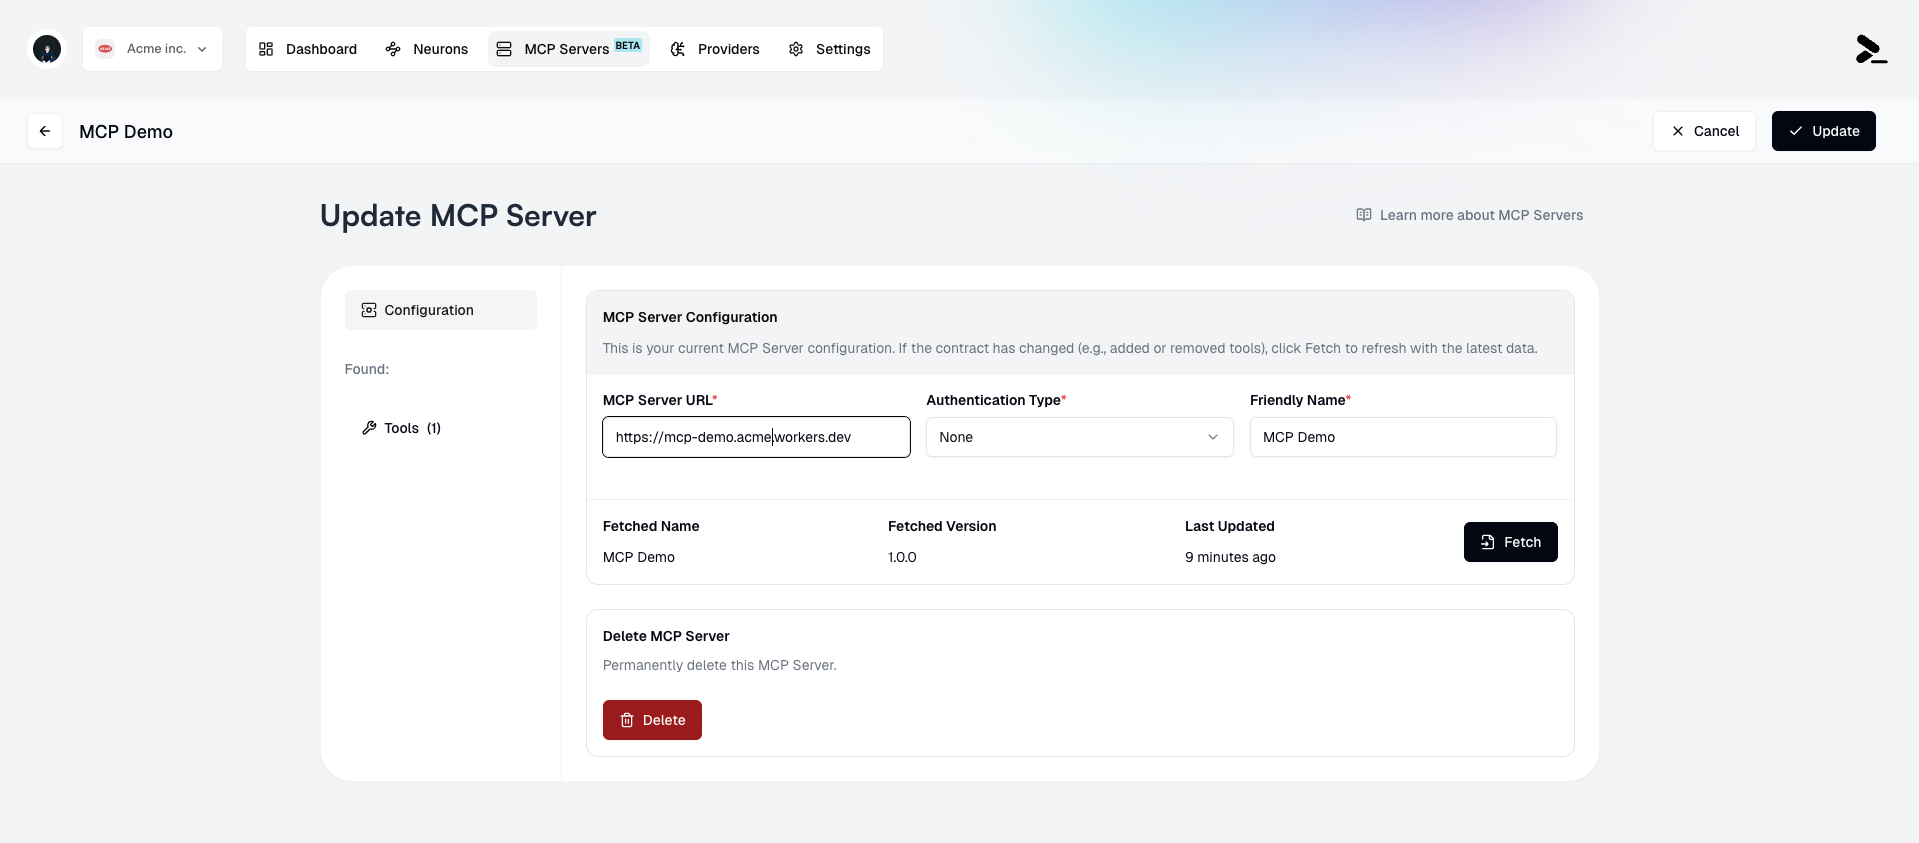
 ## Modifying or deleting an existing MCP Server
### Editing an MCP Server's Configuration
To make changes to an existing MCP Server:
1. Select it from the list of MCP Servers by clicking it's card.
## Modifying or deleting an existing MCP Server
### Editing an MCP Server's Configuration
To make changes to an existing MCP Server:
1. Select it from the list of MCP Servers by clicking it's card.
 2. Make changes such as:
* Update the **MCP Server URL** (requires revalidation of the server)
* Update the **Authentication Type** (requires revalidation of the server)
* Update the **Friendly Name**
* Update the selected **Tools** and **Resources**
2. Make changes such as:
* Update the **MCP Server URL** (requires revalidation of the server)
* Update the **Authentication Type** (requires revalidation of the server)
* Update the **Friendly Name**
* Update the selected **Tools** and **Resources**

 3. Click the **Update** button to save the changes.
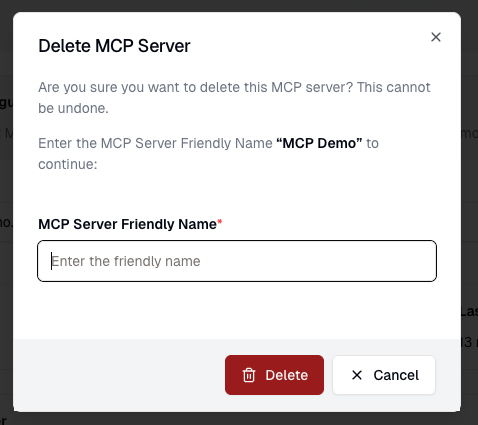
 ### Deleting an MCP Server
To delete an MCP Server:
1. Select it from the list of MCP Servers by clicking it's card.
2. Click the **Delete** button to delete the MCP Server.
### Deleting an MCP Server
To delete an MCP Server:
1. Select it from the list of MCP Servers by clicking it's card.
2. Click the **Delete** button to delete the MCP Server.
 3. Confirm the deletion.
MCP Servers cannot be deleted if they are used in any Neuron workflows. A
warning will be displayed if this is the case.
3. Confirm the deletion.
MCP Servers cannot be deleted if they are used in any Neuron workflows. A
warning will be displayed if this is the case.
 ## Limitations
* Prompteus only supports remote MCP Servers configured to use the [Streamable HTTP transport](https://modelcontextprotocol.io/specification/2025-03-26/basic/transports#streamable-http).
* MCP Servers in Prompteus currently do not support importing and using{" "}
[Prompts](https://modelcontextprotocol.io/docs/concepts/prompts) within
Neurons.
# Providers
Source: https://docs.prompteus.com/features/providers
Connect your AI provider accounts by managing API keys for OpenAI, Google, Anthropic, Cohere, and Mistral.
The Providers page allows you to manage API keys for various AI providers that your Neurons can use. You can add multiple API keys for each provider, making it easy to manage different projects, environments, or billing accounts.
## Provider Management
## Limitations
* Prompteus only supports remote MCP Servers configured to use the [Streamable HTTP transport](https://modelcontextprotocol.io/specification/2025-03-26/basic/transports#streamable-http).
* MCP Servers in Prompteus currently do not support importing and using{" "}
[Prompts](https://modelcontextprotocol.io/docs/concepts/prompts) within
Neurons.
# Providers
Source: https://docs.prompteus.com/features/providers
Connect your AI provider accounts by managing API keys for OpenAI, Google, Anthropic, Cohere, and Mistral.
The Providers page allows you to manage API keys for various AI providers that your Neurons can use. You can add multiple API keys for each provider, making it easy to manage different projects, environments, or billing accounts.
## Provider Management
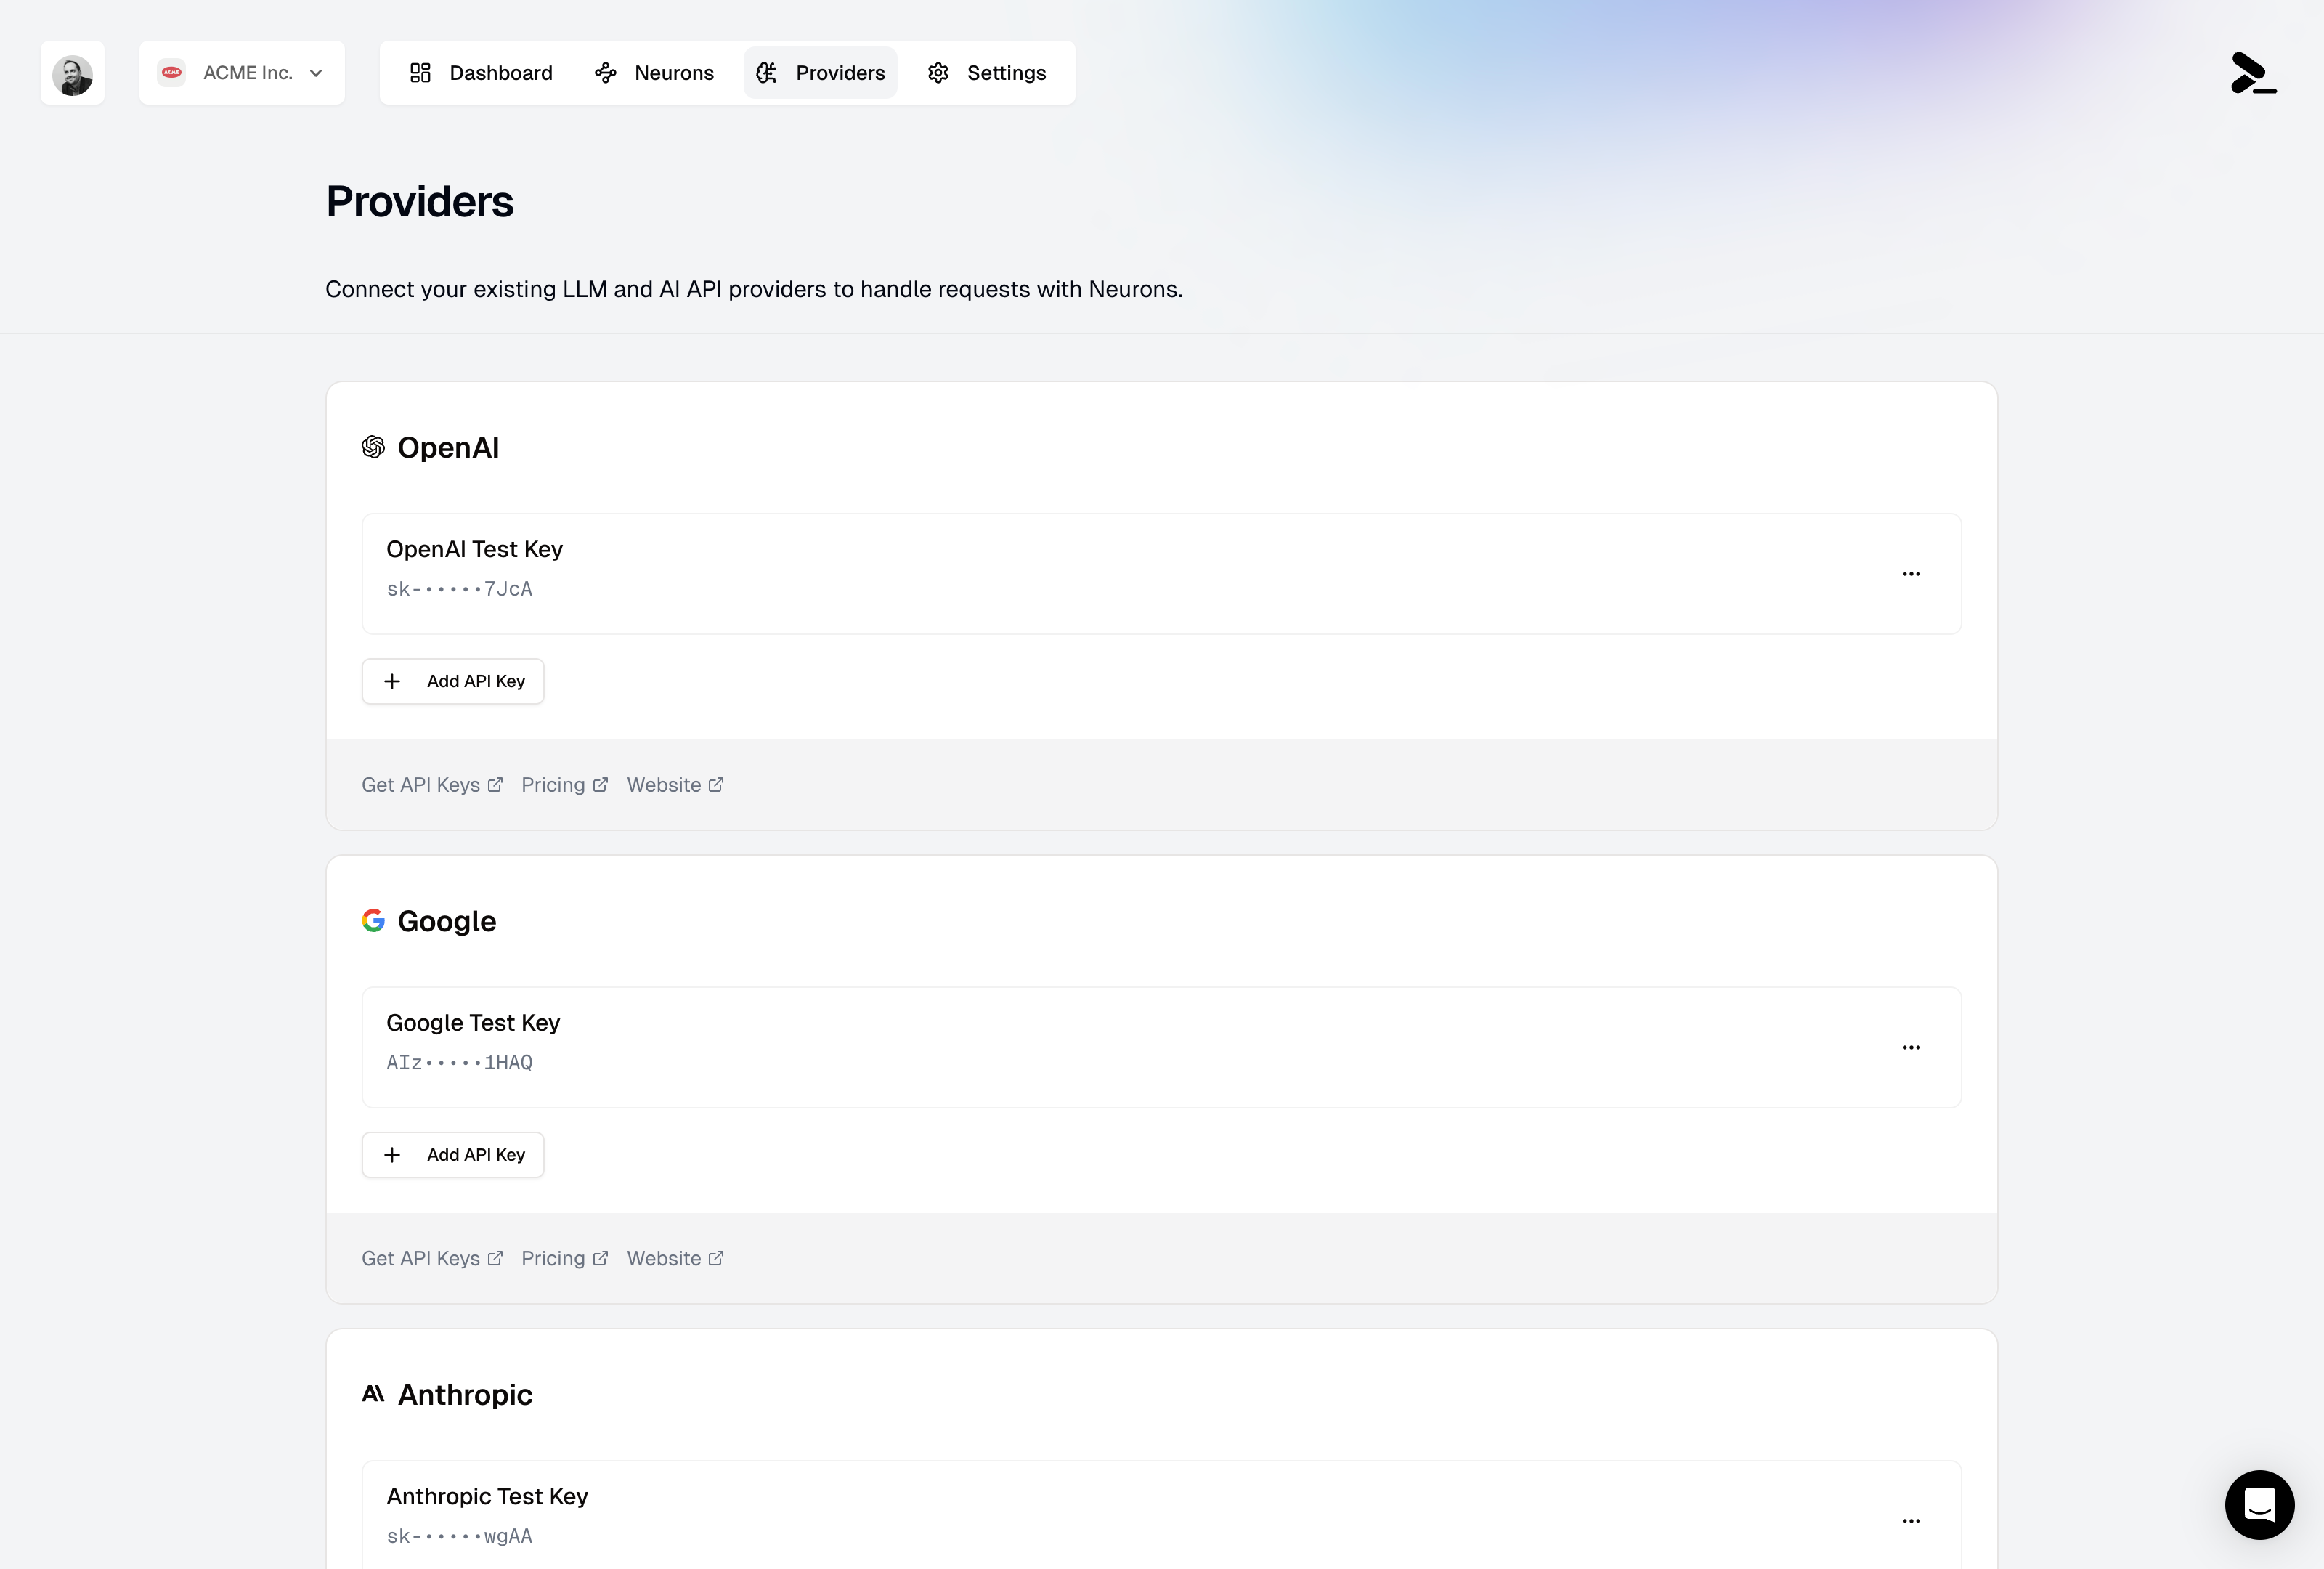 ### Supported Providers
Prompteus currently supports the following AI providers in the [Call AI Model](/neurons/editor/nodes/call-ai-model) node:
* OpenAI
* Google - Generative AI
* Anthropic
* Cohere
* Mistral
Support for more providers is coming soon, including custom AI API endpoints. [Contact us](mailto:support@prompteus.com) if you need a specific provider or are interested in beta-testing a new provider.
### Managing API Keys
For each provider, you can:
* Add multiple API keys
* Give each key a friendly name
* Update existing keys
* Delete keys when they're no longer needed
When adding a new API key, you'll need to provide:
1. A friendly name (e.g., "Production API Key", "Testing Key")
2. The actual API key from your provider
### Multiple Keys Per Provider
You can add as many API keys as you want for each provider. This flexibility enables:
* Separate keys for development and production environments
* Different keys for various projects or teams
* Billing management across multiple accounts
* Backup keys for redundancy
Never share your API keys or commit them to version control. If a key is compromised, immediately rotate it at your provider and update it in Prompteus.
## Related Resources
* [Dashboard](/features/dashboard) - Monitor usage and costs
* [Rate Limiting](/neurons/settings/rate-limiting) - Control API usage
* [Access Control](/neurons/settings/access-control) - Manage Neuron access
# Sandbox
Source: https://docs.prompteus.com/features/sandbox
Test and interact with your Neurons using our open-source Sandbox application.
The Sandbox is a lightweight web application that allows you to quickly test and interact with your Neurons. Available at [sandbox.prompteus.com](https://sandbox.prompteus.com), it provides a simple interface for making API calls to any Neuron endpoint.
## Features
* **Interactive Testing**: Enter your Neuron path and input, then see the results in real-time
* **Authentication Support**: Securely provide API keys or JWT tokens for protected Neurons
* **Client-Side Processing**: All API calls are processed directly in your browser
* **Cache Control**: Easily bypass cache for testing with fresh responses
* **Open Source**: The entire application is [available on GitHub](https://github.com/prompteus-ai/sandbox)
## Using the Sandbox
### Supported Providers
Prompteus currently supports the following AI providers in the [Call AI Model](/neurons/editor/nodes/call-ai-model) node:
* OpenAI
* Google - Generative AI
* Anthropic
* Cohere
* Mistral
Support for more providers is coming soon, including custom AI API endpoints. [Contact us](mailto:support@prompteus.com) if you need a specific provider or are interested in beta-testing a new provider.
### Managing API Keys
For each provider, you can:
* Add multiple API keys
* Give each key a friendly name
* Update existing keys
* Delete keys when they're no longer needed
When adding a new API key, you'll need to provide:
1. A friendly name (e.g., "Production API Key", "Testing Key")
2. The actual API key from your provider
### Multiple Keys Per Provider
You can add as many API keys as you want for each provider. This flexibility enables:
* Separate keys for development and production environments
* Different keys for various projects or teams
* Billing management across multiple accounts
* Backup keys for redundancy
Never share your API keys or commit them to version control. If a key is compromised, immediately rotate it at your provider and update it in Prompteus.
## Related Resources
* [Dashboard](/features/dashboard) - Monitor usage and costs
* [Rate Limiting](/neurons/settings/rate-limiting) - Control API usage
* [Access Control](/neurons/settings/access-control) - Manage Neuron access
# Sandbox
Source: https://docs.prompteus.com/features/sandbox
Test and interact with your Neurons using our open-source Sandbox application.
The Sandbox is a lightweight web application that allows you to quickly test and interact with your Neurons. Available at [sandbox.prompteus.com](https://sandbox.prompteus.com), it provides a simple interface for making API calls to any Neuron endpoint.
## Features
* **Interactive Testing**: Enter your Neuron path and input, then see the results in real-time
* **Authentication Support**: Securely provide API keys or JWT tokens for protected Neurons
* **Client-Side Processing**: All API calls are processed directly in your browser
* **Cache Control**: Easily bypass cache for testing with fresh responses
* **Open Source**: The entire application is [available on GitHub](https://github.com/prompteus-ai/sandbox)
## Using the Sandbox
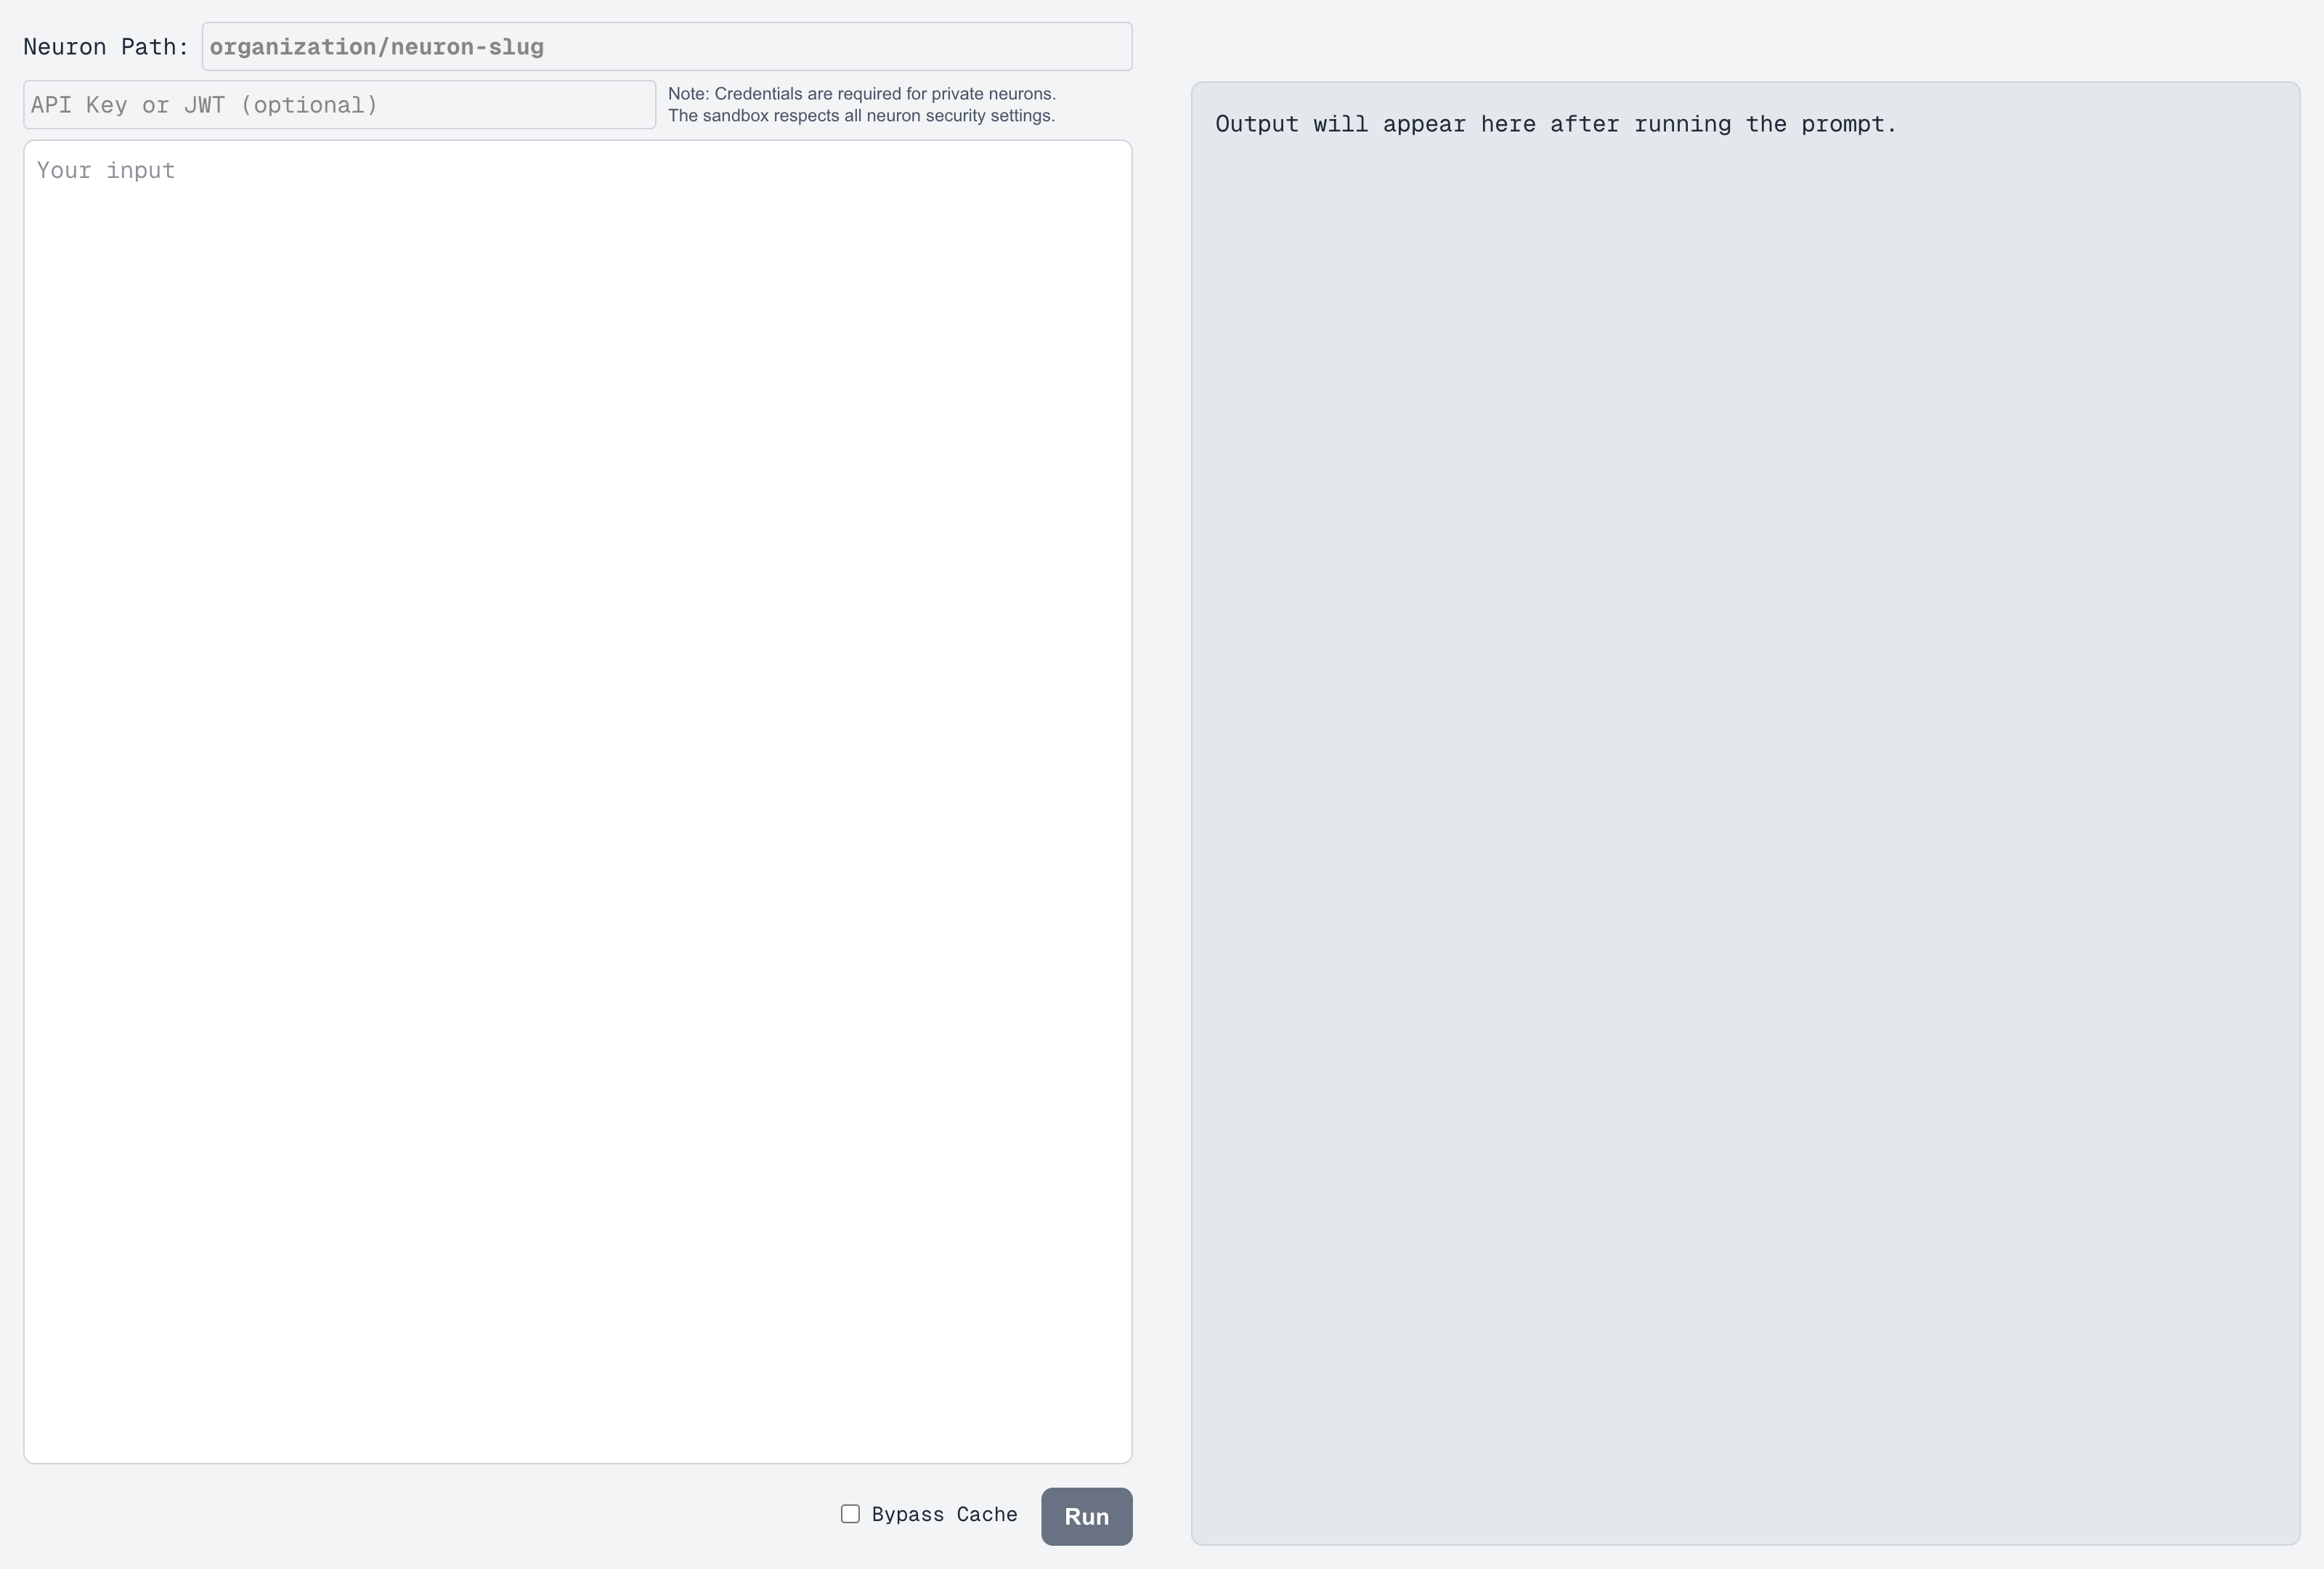 1. **Neuron Path**: Enter your Neuron's path in the format `organization/neuron-slug`
2. **Authentication** (Optional): If your Neuron requires authentication, enter your API key or JWT token
3. **Input**: Type your input in the text area
4. **Cache Control**: Toggle the "Bypass Cache" option if you need fresh responses
5. **Run**: Click the "Run" button to execute the Neuron and see the results
The Sandbox respects all Neuron security settings. If a Neuron requires authentication, you'll need to provide valid credentials to access it.
## Contributing
The Sandbox is open source and available on [GitHub](https://github.com/prompteus-ai/sandbox). We welcome contributions from the community, whether it's bug fixes, feature improvements, or documentation updates.
# Prompteus API Keys
Source: https://docs.prompteus.com/features/settings/api-keys
Learn how to manage your Prompteus API keys to authenticate requests to your Neurons.
Prompteus API Keys are used to authenticate requests to the Prompteus API when calling your Neurons. Only Neurons with API Key access control enabled will accept these keys.
## Managing API Keys
1. **Neuron Path**: Enter your Neuron's path in the format `organization/neuron-slug`
2. **Authentication** (Optional): If your Neuron requires authentication, enter your API key or JWT token
3. **Input**: Type your input in the text area
4. **Cache Control**: Toggle the "Bypass Cache" option if you need fresh responses
5. **Run**: Click the "Run" button to execute the Neuron and see the results
The Sandbox respects all Neuron security settings. If a Neuron requires authentication, you'll need to provide valid credentials to access it.
## Contributing
The Sandbox is open source and available on [GitHub](https://github.com/prompteus-ai/sandbox). We welcome contributions from the community, whether it's bug fixes, feature improvements, or documentation updates.
# Prompteus API Keys
Source: https://docs.prompteus.com/features/settings/api-keys
Learn how to manage your Prompteus API keys to authenticate requests to your Neurons.
Prompteus API Keys are used to authenticate requests to the Prompteus API when calling your Neurons. Only Neurons with API Key access control enabled will accept these keys.
## Managing API Keys
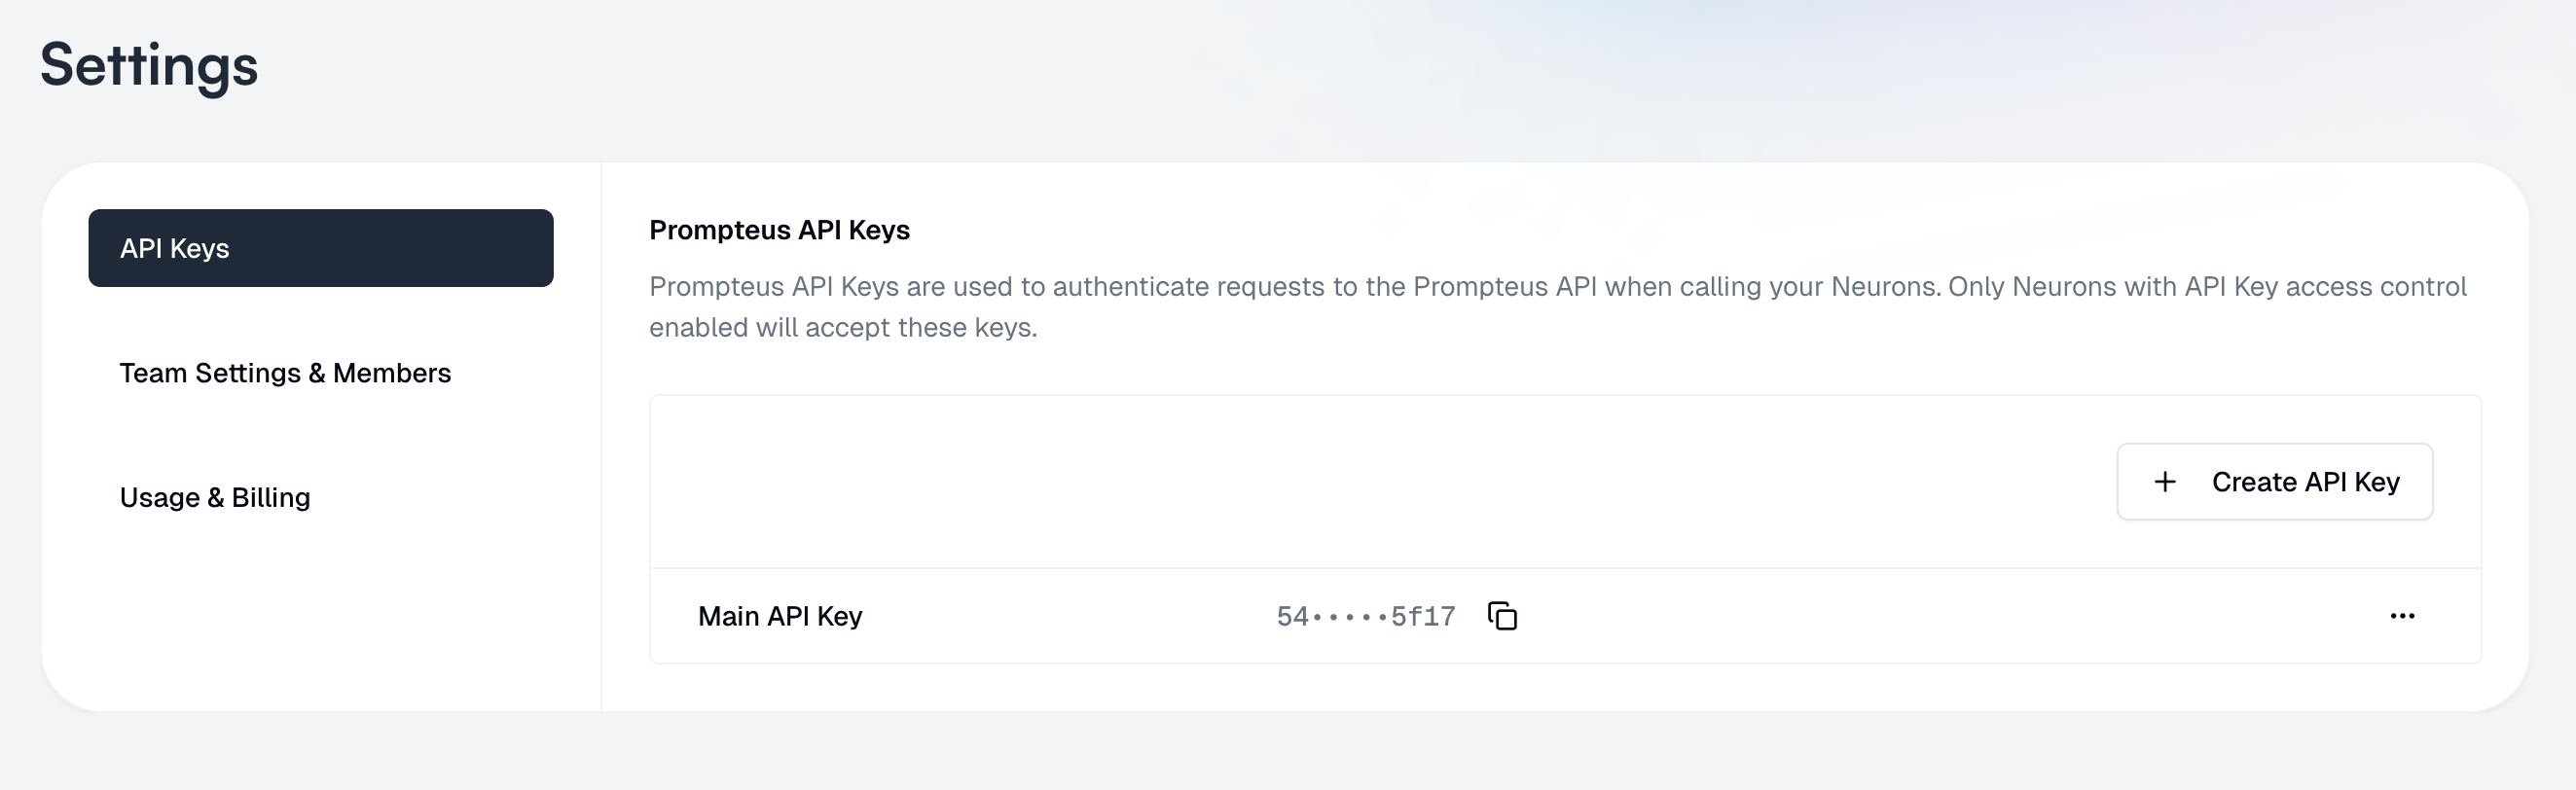 ### Creating API Keys
1. Navigate to the Settings page
2. Select "[API Keys](https://dashboard.prompteus.com/settings/api-keys)" from the left sidebar
3. Click "Create API Key"
4. Give your key a friendly name for easy identification
You will be able to see the API key, even later. Be careful to not expose it to others, and revoke keys that are no longer needed or compromised.
### Using API Keys
To use an API key with your Neurons, you'll need to:
1. Enable API Key authentication in your [Neuron's access control settings](/neurons/settings/access-control#api-key-authentication)
2. Include the API key in your requests as described in the [authentication guide](/neurons/settings/access-control#using-api-keys)
### Best Practices
1. **Key Management**
* Use different keys for different environments (development, staging, production)
* Rotate keys periodically for security
* Delete unused keys
2. **Security**
* Never share API keys or commit them to version control
* Use environment variables to store keys in your applications
* Monitor key usage for unusual patterns
# Billing
Source: https://docs.prompteus.com/features/settings/billing
Understand Prompteus billing, manage your usage, and configure billing settings.
Prompteus uses a pay-as-you-go billing model with a generous free tier. This guide explains our billing system, pricing, and how to manage your billing settings.
## Billing Overview
### Creating API Keys
1. Navigate to the Settings page
2. Select "[API Keys](https://dashboard.prompteus.com/settings/api-keys)" from the left sidebar
3. Click "Create API Key"
4. Give your key a friendly name for easy identification
You will be able to see the API key, even later. Be careful to not expose it to others, and revoke keys that are no longer needed or compromised.
### Using API Keys
To use an API key with your Neurons, you'll need to:
1. Enable API Key authentication in your [Neuron's access control settings](/neurons/settings/access-control#api-key-authentication)
2. Include the API key in your requests as described in the [authentication guide](/neurons/settings/access-control#using-api-keys)
### Best Practices
1. **Key Management**
* Use different keys for different environments (development, staging, production)
* Rotate keys periodically for security
* Delete unused keys
2. **Security**
* Never share API keys or commit them to version control
* Use environment variables to store keys in your applications
* Monitor key usage for unusual patterns
# Billing
Source: https://docs.prompteus.com/features/settings/billing
Understand Prompteus billing, manage your usage, and configure billing settings.
Prompteus uses a pay-as-you-go billing model with a generous free tier. This guide explains our billing system, pricing, and how to manage your billing settings.
## Billing Overview
 ### Free Tier
The free tier provides essential features to get started with Prompteus, including:
* First 50,000 Neuron executions free per month
* First team member seat free
* Basic log retention (24 hours)
* No credit card required for free tier usage
If you stay within the free tier limits, you can use Prompteus without providing payment information. However, your account will be paused if you exceed these limits without a payment method on file.
### Pricing Structure
Our pricing is designed to scale with your needs, offering flexibility and transparency:
| Feature | Free Tier | Additional Cost | Notes |
| --------------------- | --------------- | ----------------------------------------------- | --------------------------------------------------------------------------------- |
| **Neuron Executions** | First 50k/month | \$5/100,000 additional executions | Counted per Neuron call, including internal calls |
| **Team Members** | First seat | \$10/member/month for additional seats | Billed based on active seats |
| **Log Retention** | 24h | Extended retention available at additional cost | You will need to wait at least 30 days before you can downgrade after an upgrade. |
## Usage and Balance
### Monitoring Usage
The usage dashboard provides comprehensive insights into your Prompteus account:
* Track current usage
* View billing cycle dates
* Monitor execution counts
* See team member seat usage
### Billing Portal
The billing portal is your central hub for managing all financial aspects of your Prompteus account:
* View detailed charges
* Download invoices
* Update payment methods
* Manage billing address
## Managing Settings
### Team Member Seats
Managing team member seats is straightforward through the billing interface:
1. Navigate to Usage & Billing
2. Find "Team Members Seats"
3. Click "Adjust Seats"
4. Set desired number of seats
Removing seats will not automatically remove team members, and vice versa. You'll need to manage team composition separately in [Team Settings](/features/settings/team).
### Log Retention
Configure your log retention settings to match your compliance and operational needs:
1. Find "Logs Retention Plan"
2. Click "Change Plan"
3. Select desired retention period
Changes to log retention are prorated immediately. You will need to wait at least 30 days before you can downgrade after an upgrade.
## Payment and Billing
### Credit Card Requirement
Understanding when a credit card is required helps prevent service interruptions:
* No credit card required if staying within free tier
* Credit card required when:
* Exceeding 50,000 executions/month
* Adding additional team members
* Extending log retention
If you exceed free tier limits without a payment method, your account will be paused and Neurons will fail until payment is configured.
### Billing Cycle
Our billing system operates on a monthly cycle with clear timing and requirements:
* Monthly billing cycle
* Usage resets at the start of each cycle
* Charges processed at cycle end
* Immediate payment required when exceeding free tier
# Team Settings
Source: https://docs.prompteus.com/features/settings/team
Manage your organization profile and team members in Prompteus.
[Team Settings](https://dashboard.prompteus.com/settings/team) allow you to manage your organization's profile and team members. This includes updating your organization's information, managing your team's composition, and controlling member access.
## Organization Profile
### Free Tier
The free tier provides essential features to get started with Prompteus, including:
* First 50,000 Neuron executions free per month
* First team member seat free
* Basic log retention (24 hours)
* No credit card required for free tier usage
If you stay within the free tier limits, you can use Prompteus without providing payment information. However, your account will be paused if you exceed these limits without a payment method on file.
### Pricing Structure
Our pricing is designed to scale with your needs, offering flexibility and transparency:
| Feature | Free Tier | Additional Cost | Notes |
| --------------------- | --------------- | ----------------------------------------------- | --------------------------------------------------------------------------------- |
| **Neuron Executions** | First 50k/month | \$5/100,000 additional executions | Counted per Neuron call, including internal calls |
| **Team Members** | First seat | \$10/member/month for additional seats | Billed based on active seats |
| **Log Retention** | 24h | Extended retention available at additional cost | You will need to wait at least 30 days before you can downgrade after an upgrade. |
## Usage and Balance
### Monitoring Usage
The usage dashboard provides comprehensive insights into your Prompteus account:
* Track current usage
* View billing cycle dates
* Monitor execution counts
* See team member seat usage
### Billing Portal
The billing portal is your central hub for managing all financial aspects of your Prompteus account:
* View detailed charges
* Download invoices
* Update payment methods
* Manage billing address
## Managing Settings
### Team Member Seats
Managing team member seats is straightforward through the billing interface:
1. Navigate to Usage & Billing
2. Find "Team Members Seats"
3. Click "Adjust Seats"
4. Set desired number of seats
Removing seats will not automatically remove team members, and vice versa. You'll need to manage team composition separately in [Team Settings](/features/settings/team).
### Log Retention
Configure your log retention settings to match your compliance and operational needs:
1. Find "Logs Retention Plan"
2. Click "Change Plan"
3. Select desired retention period
Changes to log retention are prorated immediately. You will need to wait at least 30 days before you can downgrade after an upgrade.
## Payment and Billing
### Credit Card Requirement
Understanding when a credit card is required helps prevent service interruptions:
* No credit card required if staying within free tier
* Credit card required when:
* Exceeding 50,000 executions/month
* Adding additional team members
* Extending log retention
If you exceed free tier limits without a payment method, your account will be paused and Neurons will fail until payment is configured.
### Billing Cycle
Our billing system operates on a monthly cycle with clear timing and requirements:
* Monthly billing cycle
* Usage resets at the start of each cycle
* Charges processed at cycle end
* Immediate payment required when exceeding free tier
# Team Settings
Source: https://docs.prompteus.com/features/settings/team
Manage your organization profile and team members in Prompteus.
[Team Settings](https://dashboard.prompteus.com/settings/team) allow you to manage your organization's profile and team members. This includes updating your organization's information, managing your team's composition, and controlling member access.
## Organization Profile
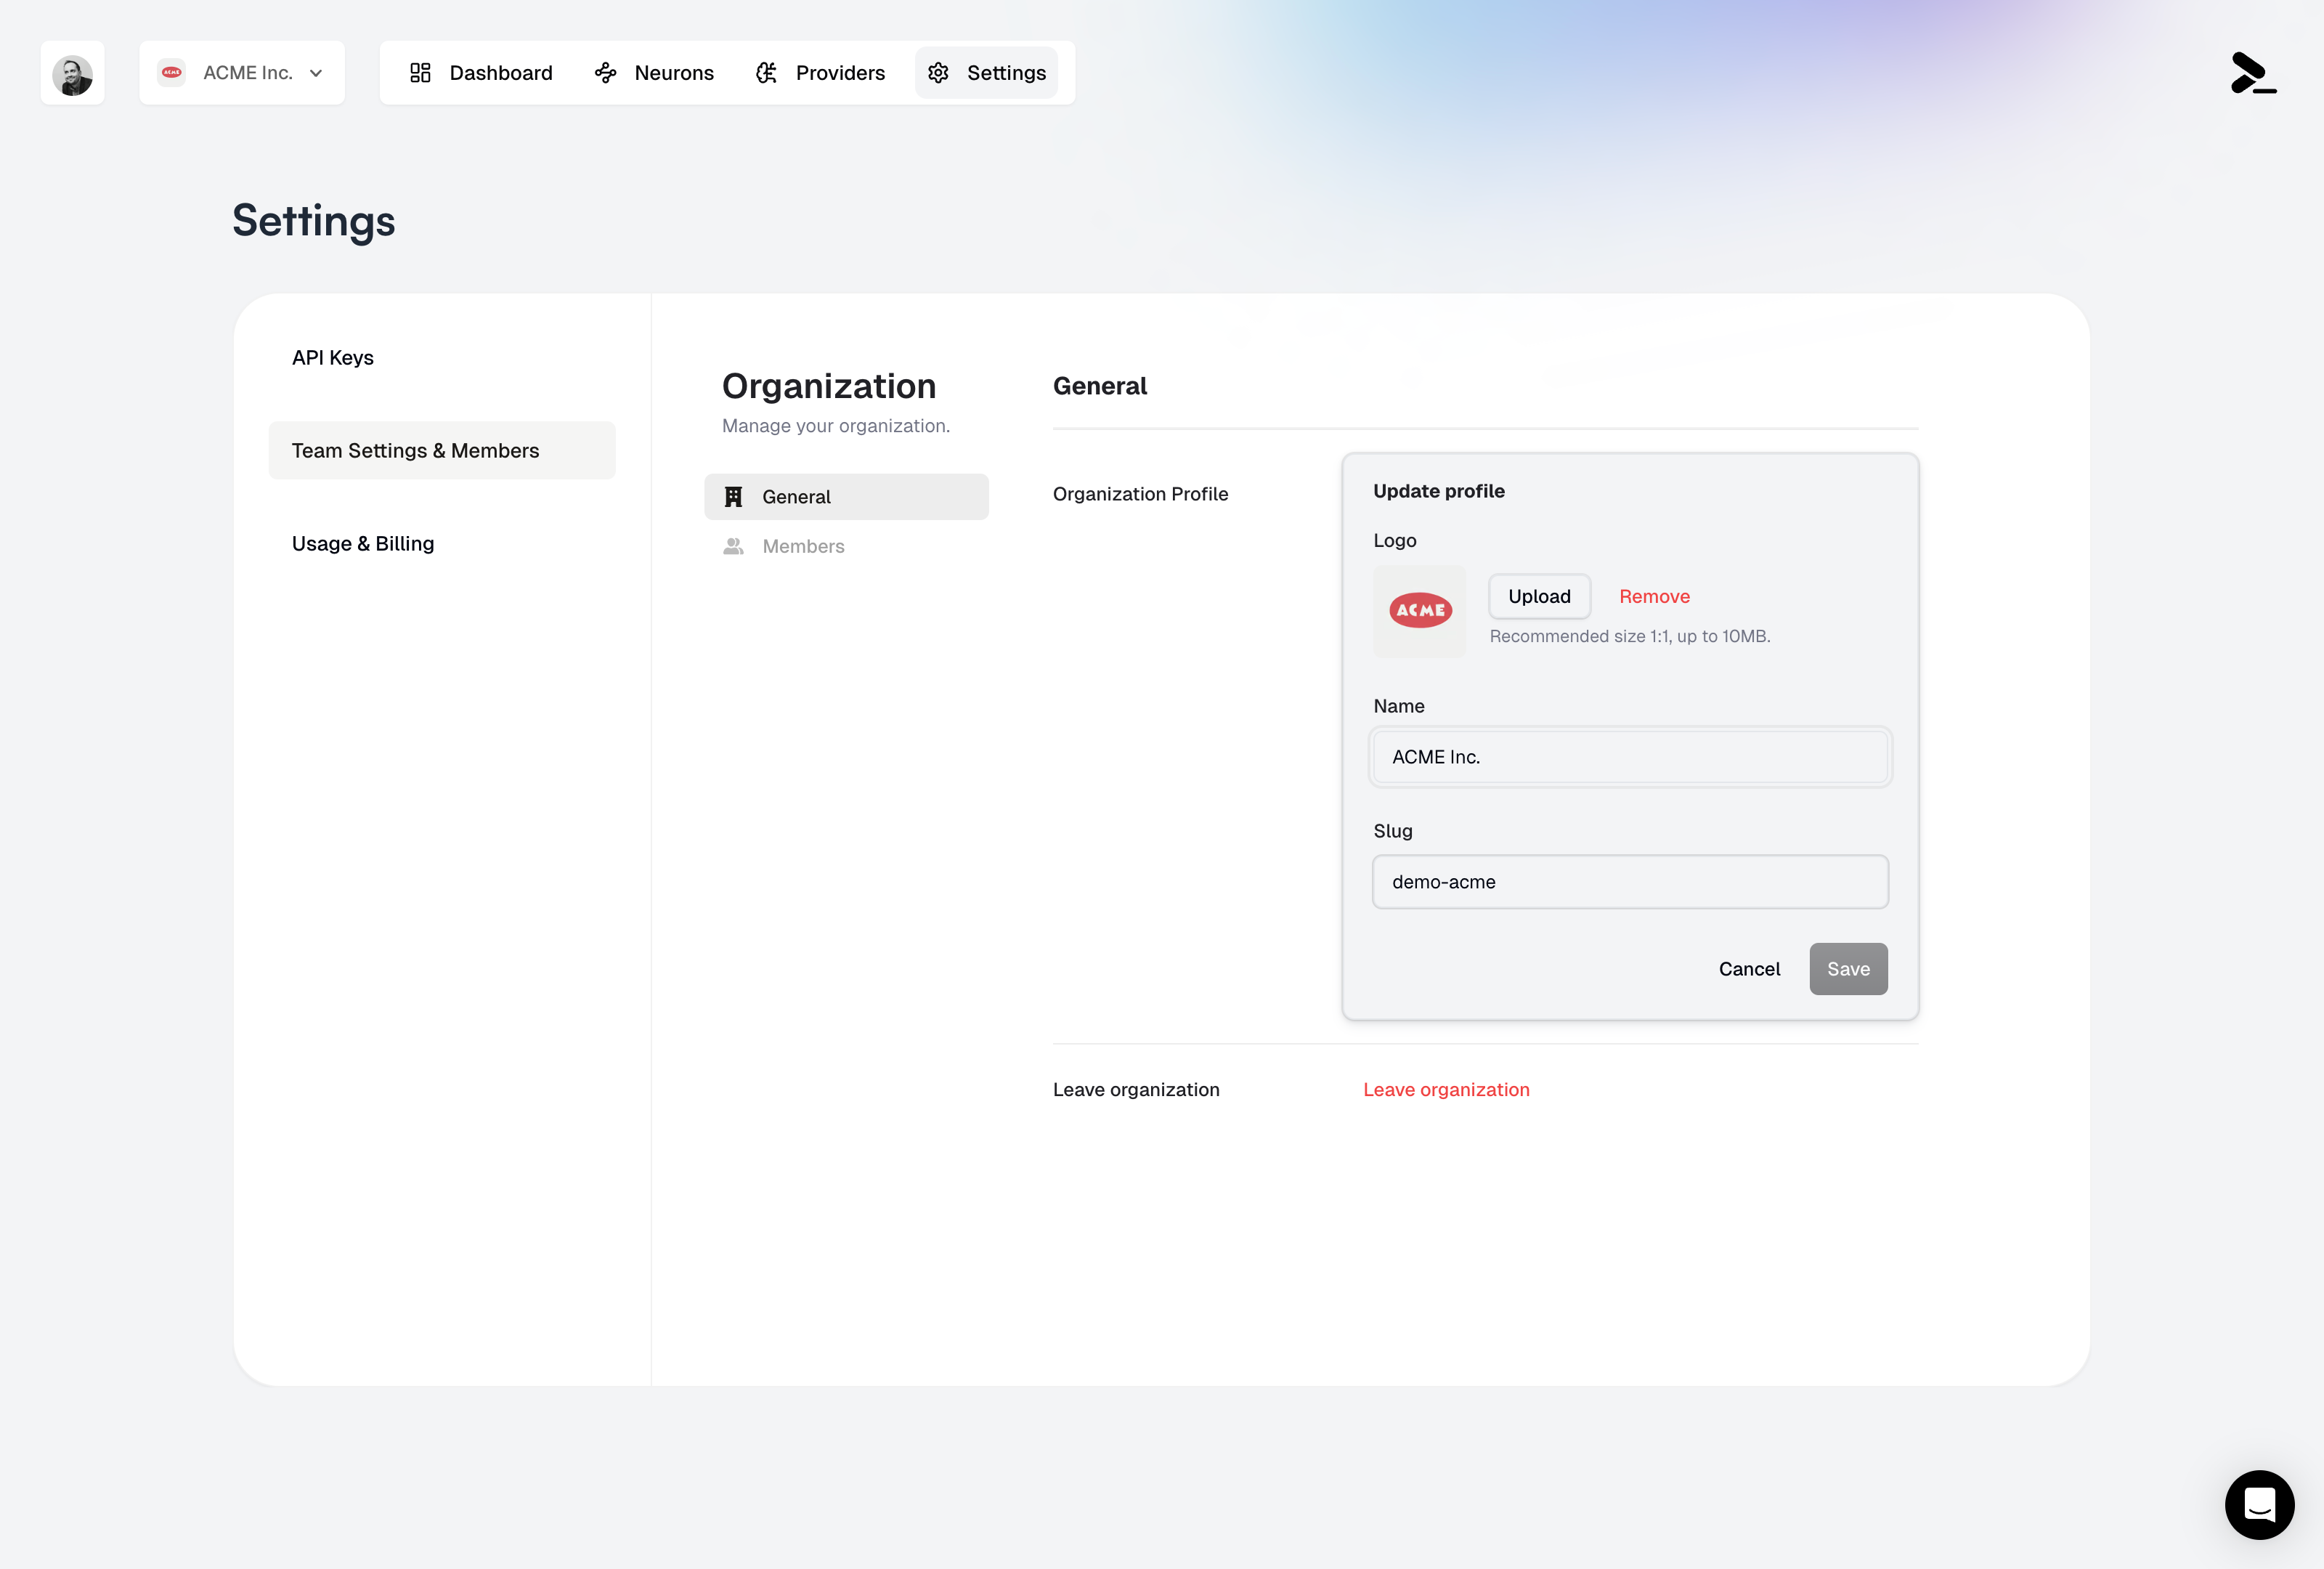 ### Managing Organization Details
Your organization's profile contains essential information that identifies your team and is used throughout Prompteus. Here's what you can configure:
* **Organization Name**: This is your team's display name, visible to all team members and used in the dashboard
* **Organization Slug**: A unique identifier used in API URLs and system references. This is a critical setting as it's used in all your Neuron API endpoints
* **Logo**: Upload your organization's logo to personalize your dashboard (recommended size 1:1, up to 10MB)
The organization slug is used in all your Neuron API endpoints. Changing it will update all your API URLs, so make sure to update your applications accordingly.
## Team Management
The team management interface provides a comprehensive view of your organization's members. Here you can:
* View all team members and their current status
* See when each member joined the organization
* Manage member roles and permissions
* Remove members when they no longer need access
* Search and filter members to quickly find specific team members
### Inviting Members
Adding new team members is a simple process:
1. Click the "Invite" button in the team management interface
2. Enter the member's email address
3. Select their role from the available options
4. Send the invitation
Team member seats are billed monthly. The first member is free, and additional members are \$10/member/month. You can adjust the number of seats in the [billing settings](/features/settings/billing).
### Member Roles
Prompteus provides two distinct roles to manage team member permissions:
* **Admin**: Has full access to all organization settings and Neurons, including the ability to invite new members and modify organization details
* **Member**: Can create and manage Neurons, but cannot modify organization settings or invite new members
We're working on adding more roles in the future to provide finer-grained access control.
## Best Practices
### Organization Management
Maintaining a well-organized team structure is essential for efficient operation:
* Keep your organization slug consistent to avoid breaking API integrations
* Use a recognizable logo to help team members quickly identify your organization
* Document any slug changes to ensure all team members are aware of updates
### Team Management
Effective team management helps maintain security and efficiency:
* Regularly review team member access to ensure only active members have access
* Remove inactive members to maintain accurate billing and security
* Maintain clear role assignments to prevent confusion about permissions
## Related Resources
* [Billing Settings](/features/settings/billing) - Manage team member seats and billing
* [API Keys](/features/settings/api-keys) - Manage authentication for your Neurons
# Calling Neurons
Source: https://docs.prompteus.com/neurons/api
Learn how to call Neurons using the REST API or the TypeScript SDK.
Neurons can be called using either the REST API directly or our official TypeScript SDK. This guide explains both methods and their options.
## REST API
Each Neuron has a unique API URL in the format:
```bash
https://run.prompteus.com//
```
### Authentication Requirements
Authentication is only required if enforced by the Neuron's [access control settings](/neurons/settings/access-control). A Neuron can be configured with:
* **[Public Access](/neurons/settings/access-control#public-access)**: No authentication required
* **[Referer Restrictions](/neurons/settings/access-control#referer-restrictions)**: Only requests from specific domains are allowed
* **[IP Restrictions](/neurons/settings/access-control#ip-restrictions)**: Only requests from specific IP addresses are allowed
* **[API Key Authentication](/neurons/settings/access-control#api-key-authentication)**: Requires a Prompteus API key
* **[JWT Authentication](/neurons/settings/access-control#jwt-authentication)**: Requires a valid JWT token
When authentication is required, provide it using the `Authorization` header:
```bash
Authorization: Bearer
```
If your Neuron has public access enabled, you can skip the authentication step entirely. See the [Access Control documentation](/neurons/settings/access-control) for detailed configuration options.
### Basic Usage
To call a Neuron, send a POST request to its API URL with your input in JSON format:
```bash curl
curl -X POST https://run.prompteus.com// \
-H "Content-Type: application/json" \
-d '{"input": "What is the meaning of life?"}'
```
```javascript Fetch (JavaScript)
const response = await fetch("https://run.prompteus.com//", {
method: "POST",
body: JSON.stringify({ input: "What is the meaning of life?" }),
});
```
```python Python
import requests
response = requests.post(
"https://run.prompteus.com//",
json={"input": "What is the meaning of life?"}
)
print(response.json())
```
### Complete Examples
Here are complete examples showing how to call Neurons with error handling and authentication:
```javascript JavaScript
async function callNeuron(orgSlug, neuronSlug, input, apiKey = null) {
const url = `https://run.prompteus.com/${orgSlug}/${neuronSlug}`;
const headers = {
'Content-Type': 'application/json'
};
// Add authentication if provided
if (apiKey) {
headers['Authorization'] = `Bearer ${apiKey}`;
}
try {
const response = await fetch(url, {
method: 'POST',
headers,
body: JSON.stringify({ input }),
});
if (!response.ok) {
const error = await response.json();
throw new Error(`API Error: ${error.error} (${response.status})`);
}
const data = await response.json();
// Log if response was from cache
if (data.fromCache) {
console.log('Response served from cache');
}
return data;
} catch (error) {
console.error('Failed to call neuron:', error);
throw error;
}
}
// Example usage
async function example() {
try {
// Call without authentication
const publicResponse = await callNeuron(
'my-org',
'my-neuron',
'What is the meaning of life?'
);
console.log('Public response:', publicResponse);
// Call with authentication
const authenticatedResponse = await callNeuron(
'my-org',
'my-neuron',
'What is the meaning of life?',
'your-api-key'
);
console.log('Authenticated response:', authenticatedResponse);
// Call with cache bypass
const url = new URL('https://run.prompteus.com/my-org/my-neuron');
url.searchParams.append('bypassCache', 'true');
const noCacheResponse = await fetch(url, {
method: 'POST',
headers: { 'Content-Type': 'application/json' },
body: JSON.stringify({ input: 'Fresh response please' })
});
console.log('No cache response:', await noCacheResponse.json());
} catch (error) {
console.error('Example failed:', error);
}
}
```
```python Python
import requests
from typing import Optional, Dict, Any
from urllib.parse import urljoin
class NeuronClient:
def __init__(self, base_url: str = "https://run.prompteus.com"):
self.base_url = base_url
self.api_key: Optional[str] = None
def set_api_key(self, api_key: str) -> None:
"""Set the API key for authentication."""
self.api_key = api_key
def call_neuron(
self,
org_slug: str,
neuron_slug: str,
input_text: str,
bypass_cache: bool = False,
raw_output: bool = False
) -> Dict[str, Any]:
"""
Call a Neuron with the given parameters.
Args:
org_slug: Organization slug
neuron_slug: Neuron slug
input_text: Input text for the neuron
bypass_cache: Whether to bypass the cache
raw_output: Whether to return raw output
Returns:
Dict containing the neuron response
Raises:
requests.exceptions.RequestException: If the API call fails
"""
# Build URL with query parameters
url = urljoin(self.base_url, f"{org_slug}/{neuron_slug}")
params = {}
if bypass_cache:
params['bypassCache'] = 'true'
if raw_output:
params['rawOutput'] = 'true'
# Prepare headers
headers = {'Content-Type': 'application/json'}
if self.api_key:
headers['Authorization'] = f'Bearer {self.api_key}'
try:
response = requests.post(
url,
json={'input': input_text},
headers=headers,
params=params
)
response.raise_for_status()
data = response.json()
// Log if response was from cache
if data.get('fromCache'):
print('Response served from cache')
return data
except requests.exceptions.RequestException as e:
if hasattr(e.response, 'json'):
error_data = e.response.json()
print(f"API Error: {error_data.get('error')} ({e.response.status_code})")
raise
# Example usage
def example():
client = NeuronClient()
try:
// Call without authentication
public_response = client.call_neuron(
'my-org',
'my-neuron',
'What is the meaning of life?'
)
print('Public response:', public_response)
// Call with authentication
client.set_api_key('your-api-key')
auth_response = client.call_neuron(
'my-org',
'my-neuron',
'What is the meaning of life?'
)
print('Authenticated response:', auth_response)
// Call with cache bypass
no_cache_response = client.call_neuron(
'my-org',
'my-neuron',
'Fresh response please',
bypass_cache=True
)
print('No cache response:', no_cache_response)
except requests.exceptions.RequestException as e:
print('Example failed:', e)
```
### Query Parameters
The API supports the following query parameters:
| Parameter | Type | Description |
| ------------- | ------- | ------------------------------------------------------------------------------ |
| `bypassCache` | boolean | When true, forces a new execution and bypasses both exact and semantic caching |
| `rawOutput` | boolean | When true, returns the raw text output without any processing |
Example with query parameters:
```bash
https://run.prompteus.com//?bypassCache=true&rawOutput=true
```
### Authentication
If your Neuron requires authentication, you can provide it using the `Authorization` header:
```bash
Authorization: Bearer
```
See [Access Control](/neurons/settings/access-control) for more details about authentication methods.
### Response Format
A successful response will have this structure:
```typescript
{
output?: string; // The generated output
fromCache?: boolean; // Whether the response was served from cache
executionStopped?: boolean; // Whether execution was stopped prematurely
}
```
### Error Handling
Errors are returned with appropriate HTTP status codes and a JSON response:
```typescript
{
error: string; // Error message
statusCode: number; // HTTP status code
}
```
The API uses standard HTTP status codes to indicate the success or failure of requests:
| Status Code | Description | Common Causes |
| --------------------------- | -------------------------- | ------------------------------------------------------------------------------------------------------------------------------------- |
| `400` Bad Request | Invalid request parameters | • Malformed input JSON
### Managing Organization Details
Your organization's profile contains essential information that identifies your team and is used throughout Prompteus. Here's what you can configure:
* **Organization Name**: This is your team's display name, visible to all team members and used in the dashboard
* **Organization Slug**: A unique identifier used in API URLs and system references. This is a critical setting as it's used in all your Neuron API endpoints
* **Logo**: Upload your organization's logo to personalize your dashboard (recommended size 1:1, up to 10MB)
The organization slug is used in all your Neuron API endpoints. Changing it will update all your API URLs, so make sure to update your applications accordingly.
## Team Management
The team management interface provides a comprehensive view of your organization's members. Here you can:
* View all team members and their current status
* See when each member joined the organization
* Manage member roles and permissions
* Remove members when they no longer need access
* Search and filter members to quickly find specific team members
### Inviting Members
Adding new team members is a simple process:
1. Click the "Invite" button in the team management interface
2. Enter the member's email address
3. Select their role from the available options
4. Send the invitation
Team member seats are billed monthly. The first member is free, and additional members are \$10/member/month. You can adjust the number of seats in the [billing settings](/features/settings/billing).
### Member Roles
Prompteus provides two distinct roles to manage team member permissions:
* **Admin**: Has full access to all organization settings and Neurons, including the ability to invite new members and modify organization details
* **Member**: Can create and manage Neurons, but cannot modify organization settings or invite new members
We're working on adding more roles in the future to provide finer-grained access control.
## Best Practices
### Organization Management
Maintaining a well-organized team structure is essential for efficient operation:
* Keep your organization slug consistent to avoid breaking API integrations
* Use a recognizable logo to help team members quickly identify your organization
* Document any slug changes to ensure all team members are aware of updates
### Team Management
Effective team management helps maintain security and efficiency:
* Regularly review team member access to ensure only active members have access
* Remove inactive members to maintain accurate billing and security
* Maintain clear role assignments to prevent confusion about permissions
## Related Resources
* [Billing Settings](/features/settings/billing) - Manage team member seats and billing
* [API Keys](/features/settings/api-keys) - Manage authentication for your Neurons
# Calling Neurons
Source: https://docs.prompteus.com/neurons/api
Learn how to call Neurons using the REST API or the TypeScript SDK.
Neurons can be called using either the REST API directly or our official TypeScript SDK. This guide explains both methods and their options.
## REST API
Each Neuron has a unique API URL in the format:
```bash
https://run.prompteus.com//
```
### Authentication Requirements
Authentication is only required if enforced by the Neuron's [access control settings](/neurons/settings/access-control). A Neuron can be configured with:
* **[Public Access](/neurons/settings/access-control#public-access)**: No authentication required
* **[Referer Restrictions](/neurons/settings/access-control#referer-restrictions)**: Only requests from specific domains are allowed
* **[IP Restrictions](/neurons/settings/access-control#ip-restrictions)**: Only requests from specific IP addresses are allowed
* **[API Key Authentication](/neurons/settings/access-control#api-key-authentication)**: Requires a Prompteus API key
* **[JWT Authentication](/neurons/settings/access-control#jwt-authentication)**: Requires a valid JWT token
When authentication is required, provide it using the `Authorization` header:
```bash
Authorization: Bearer
```
If your Neuron has public access enabled, you can skip the authentication step entirely. See the [Access Control documentation](/neurons/settings/access-control) for detailed configuration options.
### Basic Usage
To call a Neuron, send a POST request to its API URL with your input in JSON format:
```bash curl
curl -X POST https://run.prompteus.com// \
-H "Content-Type: application/json" \
-d '{"input": "What is the meaning of life?"}'
```
```javascript Fetch (JavaScript)
const response = await fetch("https://run.prompteus.com//", {
method: "POST",
body: JSON.stringify({ input: "What is the meaning of life?" }),
});
```
```python Python
import requests
response = requests.post(
"https://run.prompteus.com//",
json={"input": "What is the meaning of life?"}
)
print(response.json())
```
### Complete Examples
Here are complete examples showing how to call Neurons with error handling and authentication:
```javascript JavaScript
async function callNeuron(orgSlug, neuronSlug, input, apiKey = null) {
const url = `https://run.prompteus.com/${orgSlug}/${neuronSlug}`;
const headers = {
'Content-Type': 'application/json'
};
// Add authentication if provided
if (apiKey) {
headers['Authorization'] = `Bearer ${apiKey}`;
}
try {
const response = await fetch(url, {
method: 'POST',
headers,
body: JSON.stringify({ input }),
});
if (!response.ok) {
const error = await response.json();
throw new Error(`API Error: ${error.error} (${response.status})`);
}
const data = await response.json();
// Log if response was from cache
if (data.fromCache) {
console.log('Response served from cache');
}
return data;
} catch (error) {
console.error('Failed to call neuron:', error);
throw error;
}
}
// Example usage
async function example() {
try {
// Call without authentication
const publicResponse = await callNeuron(
'my-org',
'my-neuron',
'What is the meaning of life?'
);
console.log('Public response:', publicResponse);
// Call with authentication
const authenticatedResponse = await callNeuron(
'my-org',
'my-neuron',
'What is the meaning of life?',
'your-api-key'
);
console.log('Authenticated response:', authenticatedResponse);
// Call with cache bypass
const url = new URL('https://run.prompteus.com/my-org/my-neuron');
url.searchParams.append('bypassCache', 'true');
const noCacheResponse = await fetch(url, {
method: 'POST',
headers: { 'Content-Type': 'application/json' },
body: JSON.stringify({ input: 'Fresh response please' })
});
console.log('No cache response:', await noCacheResponse.json());
} catch (error) {
console.error('Example failed:', error);
}
}
```
```python Python
import requests
from typing import Optional, Dict, Any
from urllib.parse import urljoin
class NeuronClient:
def __init__(self, base_url: str = "https://run.prompteus.com"):
self.base_url = base_url
self.api_key: Optional[str] = None
def set_api_key(self, api_key: str) -> None:
"""Set the API key for authentication."""
self.api_key = api_key
def call_neuron(
self,
org_slug: str,
neuron_slug: str,
input_text: str,
bypass_cache: bool = False,
raw_output: bool = False
) -> Dict[str, Any]:
"""
Call a Neuron with the given parameters.
Args:
org_slug: Organization slug
neuron_slug: Neuron slug
input_text: Input text for the neuron
bypass_cache: Whether to bypass the cache
raw_output: Whether to return raw output
Returns:
Dict containing the neuron response
Raises:
requests.exceptions.RequestException: If the API call fails
"""
# Build URL with query parameters
url = urljoin(self.base_url, f"{org_slug}/{neuron_slug}")
params = {}
if bypass_cache:
params['bypassCache'] = 'true'
if raw_output:
params['rawOutput'] = 'true'
# Prepare headers
headers = {'Content-Type': 'application/json'}
if self.api_key:
headers['Authorization'] = f'Bearer {self.api_key}'
try:
response = requests.post(
url,
json={'input': input_text},
headers=headers,
params=params
)
response.raise_for_status()
data = response.json()
// Log if response was from cache
if data.get('fromCache'):
print('Response served from cache')
return data
except requests.exceptions.RequestException as e:
if hasattr(e.response, 'json'):
error_data = e.response.json()
print(f"API Error: {error_data.get('error')} ({e.response.status_code})")
raise
# Example usage
def example():
client = NeuronClient()
try:
// Call without authentication
public_response = client.call_neuron(
'my-org',
'my-neuron',
'What is the meaning of life?'
)
print('Public response:', public_response)
// Call with authentication
client.set_api_key('your-api-key')
auth_response = client.call_neuron(
'my-org',
'my-neuron',
'What is the meaning of life?'
)
print('Authenticated response:', auth_response)
// Call with cache bypass
no_cache_response = client.call_neuron(
'my-org',
'my-neuron',
'Fresh response please',
bypass_cache=True
)
print('No cache response:', no_cache_response)
except requests.exceptions.RequestException as e:
print('Example failed:', e)
```
### Query Parameters
The API supports the following query parameters:
| Parameter | Type | Description |
| ------------- | ------- | ------------------------------------------------------------------------------ |
| `bypassCache` | boolean | When true, forces a new execution and bypasses both exact and semantic caching |
| `rawOutput` | boolean | When true, returns the raw text output without any processing |
Example with query parameters:
```bash
https://run.prompteus.com//?bypassCache=true&rawOutput=true
```
### Authentication
If your Neuron requires authentication, you can provide it using the `Authorization` header:
```bash
Authorization: Bearer
```
See [Access Control](/neurons/settings/access-control) for more details about authentication methods.
### Response Format
A successful response will have this structure:
```typescript
{
output?: string; // The generated output
fromCache?: boolean; // Whether the response was served from cache
executionStopped?: boolean; // Whether execution was stopped prematurely
}
```
### Error Handling
Errors are returned with appropriate HTTP status codes and a JSON response:
```typescript
{
error: string; // Error message
statusCode: number; // HTTP status code
}
```
The API uses standard HTTP status codes to indicate the success or failure of requests:
| Status Code | Description | Common Causes |
| --------------------------- | -------------------------- | ------------------------------------------------------------------------------------------------------------------------------------- |
| `400` Bad Request | Invalid request parameters | • Malformed input JSON
• Missing required fields |
| `401` Unauthorized | Authentication failed | • Invalid/expired token
• Malformed API key
• Missing authentication |
| `403` Forbidden | Access denied | • [Access control](/neurons/settings/access-control) restrictions
• IP not in allowed list
• Domain not in allowed referers |
| `404` Not Found | Resource not found | • Neuron not found
• Deployment not found
• Organization not found
• Invalid neuron configuration |
| `422` Unprocessable Entity | Validation failed | • Input validation failed
• Invalid parameter format |
| `429` Too Many Requests | Rate limit exceeded | • [Rate limits](/neurons/settings/rate-limiting) exceeded
• Account paused (billing)
• Usage limits exceeded |
| `500` Internal Server Error | Server-side error | • Unexpected server errors
• Missing deployment
• Configuration issues |
| `503` Service Unavailable | Service down | • Maintenance mode
• System overload
• Upstream service failures |
For `429` responses, check the `Retry-After` header for the number of seconds to wait before retrying:
```bash
Retry-After: 120 # Seconds until the block expires
```
### Error Handling Examples
Here's how to handle errors in different languages:
```javascript JavaScript
try {
const response = await fetch(url, {
method: 'POST',
headers: { 'Content-Type': 'application/json' },
body: JSON.stringify({ input: 'Hello' })
});
if (!response.ok) {
const error = await response.json();
if (response.status === 429) {
const retryAfter = response.headers.get('Retry-After');
console.log(`Rate limited. Retry after ${retryAfter} seconds`);
}
throw new Error(`API Error: ${error.error} (${response.status})`);
}
const data = await response.json();
// Process successful response...
} catch (error) {
console.error('Request failed:', error);
}
```
```python Python
try:
response = requests.post(url,
json={'input': 'Hello'},
headers={'Content-Type': 'application/json'}
)
response.raise_for_status()
data = response.json()
// Process successful response...
except requests.exceptions.HTTPError as e:
if e.response.status_code == 429:
retry_after = e.response.headers.get('Retry-After')
print(f"Rate limited. Retry after {retry_after} seconds")
error_data = e.response.json()
print(f"API Error: {error_data.get('error')} ({e.response.status_code})")
except requests.exceptions.RequestException as e:
print(f"Request failed: {e}")
```
```typescript TypeScript SDK
try {
const response = await client.callNeuron('org', 'neuron', {
input: 'Hello'
});
// Process successful response...
} catch (error) {
if ('statusCode' in error) {
// Handle specific error types
switch (error.statusCode) {
case 429:
console.error('Rate limited:', error.error);
// Implement retry logic
break;
case 401:
console.error('Authentication failed:', error.error);
// Refresh authentication
break;
default:
console.error(`API Error ${error.statusCode}:`, error.error);
}
} else {
console.error('Unexpected error:', error);
}
}
```
For production applications, we recommend implementing proper retry logic with exponential backoff, especially for `429` and `503` errors. See [Rate Limiting](/neurons/settings/rate-limiting) for more details about handling rate limits.
## TypeScript SDK
We provide an official TypeScript SDK for a more convenient integration experience.
### Installation
```bash
npm install @prompteus-ai/neuron-runner
```
### Authentication
The SDK supports both authenticated and unauthenticated calls, depending on your [Neuron's access control settings](/neurons/settings/access-control). Authentication is only required if your Neuron is configured to use API Key or JWT authentication.
If authentication is needed, you can provide it in multiple ways:
1. During client creation:
```typescript
const client = new Prompteus({ jwtOrApiKey: 'your-token' });
```
2. Using the setter method:
```typescript
client.setJwtOrApiKey('your-token');
```
3. Per request:
```typescript
await client.callNeuron('org', 'neuron', {
input: 'Hello',
jwtOrApiKey: 'your-token'
});
```
If your Neuron has [public access](/neurons/settings/access-control#public-access) enabled, you can omit the authentication token. The SDK will work without authentication for public Neurons.
### Basic Usage
```typescript
import { Prompteus } from '@prompteus-ai/neuron-runner';
// Create a client instance
const client = new Prompteus({
jwtOrApiKey: 'your-jwt-token', // Optional
baseURL: 'https://run.prompteus.com' // Optional, defaults to this value
});
// Call a neuron
try {
const response = await client.callNeuron('your-org', 'your-neuron', {
input: 'Hello, world!'
});
console.log(response);
} catch (error) {
console.error(error);
}
```
### Complete Example
Here's a comprehensive example showing different ways to use the SDK:
```typescript
import { Prompteus } from '@prompteus-ai/neuron-runner';
async function example() {
// Create a client instance
const client = new Prompteus({
jwtOrApiKey: 'your-api-key', // Optional
baseURL: 'https://run.prompteus.com' // Optional
});
try {
// Basic call
const basicResponse = await client.callNeuron(
'my-org',
'my-neuron',
{
input: 'What is the meaning of life?'
}
);
console.log('Basic response:', basicResponse);
// Call with cache bypass and raw output
const advancedResponse = await client.callNeuron(
'my-org',
'my-neuron',
{
input: 'Fresh response please',
bypassCache: true,
rawOutput: true
}
);
console.log('Advanced response:', advancedResponse);
// Call with different authentication
const authenticatedResponse = await client.callNeuron(
'my-org',
'my-neuron',
{
input: 'Hello with different auth',
jwtOrApiKey: 'different-api-key'
}
);
console.log('Authenticated response:', authenticatedResponse);
// Call with custom headers
const customResponse = await client.callNeuron(
'my-org',
'my-neuron',
{
input: 'Hello with custom headers',
headers: {
'Custom-Header': 'value'
}
}
);
console.log('Custom response:', customResponse);
} catch (error) {
if ('statusCode' in error) {
console.error(
`API Error ${error.statusCode}: ${error.error}`
);
} else {
console.error('Unexpected error:', error);
}
}
}
```
### Advanced Options
The `callNeuron` method accepts these options:
```typescript
interface CallNeuronOptions {
bypassCache?: boolean; // Force new execution, bypass caching
input?: string; // Input text for the neuron
rawOutput?: boolean; // Return raw text output
headers?: Record; // Additional headers
jwtOrApiKey?: string; // Auth token for this request
}
```
Example with options:
```typescript
const response = await client.callNeuron('org', 'neuron', {
input: 'Hello',
bypassCache: true,
rawOutput: true,
headers: {
'Custom-Header': 'value'
}
});
```
### Type Safety
The SDK provides TypeScript types for all responses:
```typescript
interface NeuronSuccessResponse {
output?: string;
fromCache?: boolean;
executionStopped?: boolean;
}
interface NeuronErrorResponse {
error: string;
statusCode: number;
}
```
### Error Handling
The SDK provides built-in error handling with TypeScript types, and exposes the [error status code and message from the API](#error-handling). Here's how to handle different error scenarios:
```typescript
try {
const response = await client.callNeuron('org', 'neuron', {
input: 'Hello'
});
// Process successful response...
} catch (error) {
if ('statusCode' in error) {
// Handle specific error types
switch (error.statusCode) {
case 429:
console.error('Rate limited:', error.error);
// Implement retry logic
break;
case 401:
console.error('Authentication failed:', error.error);
// Refresh authentication
break;
default:
console.error(`API Error ${error.statusCode}:`, error.error);
}
} else {
console.error('Unexpected error:', error);
}
}
```
The SDK throws typed errors that include both the error message and status code, making it easy to implement specific error handling logic for different scenarios.
### Complete Example
Here's a comprehensive example showing different ways to use the SDK:
```typescript
import { Prompteus } from '@prompteus-ai/neuron-runner';
async function example() {
// Create a client instance
const client = new Prompteus({
jwtOrApiKey: 'your-api-key', // Optional
baseURL: 'https://run.prompteus.com' // Optional
});
try {
// Basic call
const basicResponse = await client.callNeuron(
'my-org',
'my-neuron',
{
input: 'What is the meaning of life?'
}
);
console.log('Basic response:', basicResponse);
// Call with cache bypass and raw output
const advancedResponse = await client.callNeuron(
'my-org',
'my-neuron',
{
input: 'Fresh response please',
bypassCache: true,
rawOutput: true
}
);
console.log('Advanced response:', advancedResponse);
// Call with different authentication
const authenticatedResponse = await client.callNeuron(
'my-org',
'my-neuron',
{
input: 'Hello with different auth',
jwtOrApiKey: 'different-api-key'
}
);
console.log('Authenticated response:', authenticatedResponse);
// Call with custom headers
const customResponse = await client.callNeuron(
'my-org',
'my-neuron',
{
input: 'Hello with custom headers',
headers: {
'Custom-Header': 'value'
}
}
);
console.log('Custom response:', customResponse);
} catch (error) {
if ('statusCode' in error) {
console.error(
`API Error ${error.statusCode}: ${error.error}`
);
} else {
console.error('Unexpected error:', error);
}
}
}
```
## Related Resources
* [Introduction to Neurons](/neurons/intro) - Learn about Neurons
* [Access Control](/neurons/settings/access-control) - Configure authentication
* [Rate Limiting](/neurons/settings/rate-limiting) - Understand usage limits
* [Caching](/neurons/settings/caching) - Learn about response caching
* [Execution Logs](/neurons/logging) - Monitor Neuron calls
# Call AI Model
Source: https://docs.prompteus.com/neurons/editor/nodes/call-ai-model
Learn how to use the **Call AI Model** node to interact with various AI providers and models, with support for structured output.
The **Call AI Model** node is a powerful component that allows you to make calls to various AI providers and their models. This guide explains how to configure and use AI model calls effectively in your Neurons.
The **Call AI Model** node enables you to interact with AI models from
different providers, configure model parameters, and optionally enforce
structured output formats using JSON schemas.
## Functionality
The **Call AI Model** node allows you to:
* Select from [configured AI providers](/features/providers)
* Choose specific models for each provider
* Configure model parameters
* Define structured output schemas (when supported)
* Chain multiple model calls for advanced workflows
## Node Properties
### AI Provider Configuration
* **AI Provider:** Select from your configured providers (OpenAI, Google, Anthropic, Cohere, Mistral, or Cloudflare Workers AI)
Providers must be configured with valid API keys in the
[Providers](/features/providers) section before they appear in the list. You can
manage multiple API keys per provider for different environments or
projects.
### MCP Server tools selection
[Using an MCP Server in a Neuron workflow](/features/mcp-servers#using-an-mcp-server-in-a-neuron-workflow)
### Model Selection
* **Model:** Choose from available models for the selected provider
* Model availability depends on the selected provider
* Cloudflare Workers AI provides access to 50+ models including Llama, Mistral, etc.
* Some models support structured output, while others don't
### Model Parameters
Available parameters and their valid ranges vary depending on the selected
model. The interface will automatically update to only show the parameters
supported by your chosen model.
Common parameters across many models include:
| Parameter | Description | Notes |
| --------------------------------- | ------------------------------------------------ | ------------------------------------------------------------------------------------------------------------------------------------------------------------------------------ |
| **Max Output Tokens** | Maximum number of tokens in the model's response | Higher values allow longer responses but increase costs.
Each model has its own maximum limit. |
| **Temperature** | Controls response randomness | Lower values (0.1-0.3): More focused, deterministic responses.
Higher values (0.7-1.0): More creative, varied responses.
Recommended: 0.1-0.3 for structured output. |
| **Top P**
(Nucleus Sampling) | Controls response diversity | Works alongside temperature.
Lower values: More focused on likely tokens.
Higher values: More diverse vocabulary.
Not available in all models. |
| **Top K** | Limits token selection to K most likely tokens | Helps prevent unlikely token selections.
Only available in specific models (e.g., Google's Gemini). |
| **Frequency Penalty** | Reduces repetition based on token frequency | Higher values discourage repeating information.
Useful for diverse content.
Primarily in OpenAI models. |
| **Presence Penalty** | Penalizes tokens that have appeared at all | Higher values encourage new topics.
Helps prevent theme repetition.
Primarily in OpenAI models. |
Some models may expose additional parameters not listed here. Always check the
provider's documentation for model-specific parameter details.
### Output Configuration
* **Output Format:**
* Text (default): Regular text output
* Structured Output: JSON-formatted output following a schema
* **Schema Configuration:** (When using Structured Output)
* Inline JSON: Define the schema directly
* URL: Reference an external JSON Schema
## Advanced Usage: Chaining Models
You can create powerful workflows by chaining different models using nodes:
1. Use a more capable model for initial processing
2. Connect to a **Use Output** node
3. Change the system instructions of the second model, to ask it to structure the output into a specific format, for example: `Extract useful information from the following text`
4. Feed the result to a fast (and cheap!) model with structured output support
This pattern allows you to:
* Leverage the strengths of different models
* Enforce structured output even with models that don't natively support it
* Optimize for both quality and cost
## Tips and Best Practices
* Start with lower temperatures (0.1-0.3) when using structured output to get more consistent results
* Use Top K and Top P carefully as they can significantly impact output quality
* When using structured output:
* Ensure your schema is valid and well-defined
* Test with simple schemas before moving to complex ones
* Monitor token usage and costs through [execution logs](/neurons/logging) when chaining multiple model calls
## Testing Undeployed Versions
You can test undeployed versions of your Neurons using the **Snippets** button in the editor. This feature:
* Generates code snippets that can be used to call your Neuron in its current state
* Allows you to test revisions before deploying
* Provides example code in various programming languages
* Helps verify that your changes work as expected
This is particularly useful when:
* Making changes to model parameters
* Testing new structured output schemas
* Verifying model chaining behavior
* Debugging issues with specific configurations
# Call Neuron
Source: https://docs.prompteus.com/neurons/editor/nodes/call-neuron
Learn how to use the **Call Neuron** node to invoke other neurons and pass context between them.
The **Call Neuron** node enables you to invoke other neurons within your workflow, passing the current input and context. This allows for modular workflow design and reuse of common functionality.
The **Call Neuron** node lets you execute another neuron as part of your workflow, maintaining context and enabling workflow composition.
## Functionality
The **Call Neuron** node:
* Executes another neuron using the current input
* Passes all context from the current workflow
* Returns the called neuron's response
* Enables workflow modularity and reuse
## Usage Examples
### Scenario: Modular Processing
```mermaid
graph LR
A[Input] --> B[Call Neuron: Format Text] --> C[Call Neuron: Analyze] --> D[Serve Output]
```
In this example, separate neurons handle text formatting and analysis, making the components reusable across different workflows.
### Scenario: Conditional Neuron Selection
```mermaid
graph TD
A[Check Language] -->|English| B[Call Neuron: English Processing]
A -->|Spanish| C[Call Neuron: Spanish Processing]
B --> D[Serve Output]
C --> D
```
## Tips and Best Practices
* Design neurons to be modular and reusable
* Use meaningful neuron names for better workflow readability
* Consider creating utility neurons for common operations
* Remember that called neurons inherit the context of the calling workflow
* Avoid deep nesting of neuron calls to maintain clarity
* Use the same input/output format conventions across related neurons
## Common Use Cases
* Language-specific processing
* Reusable validation workflows
* Standard formatting operations
* Complex multi-step analyses
* Error handling patterns
* Template-based generation
# If Input Contains
Source: https://docs.prompteus.com/neurons/editor/nodes/if-input-contains
Learn how to use the **If Input Contains** node to create conditional logic based on input content patterns.
The **If Input Contains** node allows you to create dynamic paths in your workflow by checking if inputs contain specific text patterns or match regex expressions. The node evaluates conditions using OR logic, executing the path if any condition is met.
## Functionality
The **If Input Contains** node acts as a content filter, analyzing input text and directing the flow based on pattern matching. This can be useful for:
* Content Filtering: Route inputs containing specific keywords or patterns
* Safety Checks: Identify and handle inputs with particular content
* Dynamic Routing: Create different processing paths based on input content
* Pattern Recognition: Use regex to identify complex text patterns
## Node Properties
For each condition you add, you can configure:
* **Text to Match:** The pattern or text to search for in the input
* **Use Regex:** Toggle to enable regular expression pattern matching
* **Case Sensitive:** Toggle to make the pattern matching case sensitive
Multiple conditions are evaluated using OR logic — if any condition is true, the workflow will proceed down the true path. To use AND logic, simply chain multiple **If Input Contains** nodes together.
## Usage Examples
### Scenario: Content-Based Routing
Let's say you want to handle inputs differently based on whether they contain questions about specific topics:
1. Add an **If Input Contains** node to your workflow
2. Add conditions for different keywords:
* Text: "pricing" (for pricing-related queries)
* Text: "support" (for support-related queries)
3. Connect the "True" path to specialized handling nodes
4. Connect the "False" path to general handling nodes
### Scenario: Pattern Matching with Regex
To identify inputs containing email addresses or specific formats:
1. Add an **If Input Contains** node
2. Enable "Use regex"
3. Add a condition with pattern: `[a-zA-Z0-9._%+-]+@[a-zA-Z0-9.-]+\.[a-zA-Z]{2,}`
4. Route matching inputs to appropriate handling nodes
## Tips and Best Practices
* Start with simple text matches before using regex for complex patterns
* Use case sensitivity thoughtfully — consider your use case requirements
* Combine multiple conditions to create more sophisticated routing logic
* Test your conditions with various input texts to ensure proper routing
* Consider checking the Execution Logs to track which conditions are being triggered
# If Output Contains
Source: https://docs.prompteus.com/neurons/editor/nodes/if-output-contains
Learn how to use the **If Output Contains** node to create conditional logic based on LLM output content patterns.
The **If Output Contains** node allows you to create dynamic paths in your workflow by checking if LLM outputs contain specific text patterns or match regex expressions.
## Functionality
The **If Output Contains** node acts as a content filter, analyzing LLM output text and directing the flow based on pattern matching. This can be useful for:
* Output Validation: Ensure AI outputs meet specific criteria
* Content Classification: Route outputs based on detected themes or content
* Quality Control: Identify and handle outputs with particular characteristics
* Output Filtering: Filter out unwanted content patterns
* Automated Output Handling: Route different types of outputs to appropriate processing steps
## Node Properties
For each condition you add, you can configure:
* **Text to Match:** The pattern or text to search for in the LLM output
* **Use Regex:** Toggle to enable regular expression pattern matching
* **Case Sensitive:** Toggle to make the pattern matching case sensitive
Multiple conditions are evaluated using OR logic — if any condition is true, the workflow will proceed down the true path. To use AND logic, simply chain multiple **If Output Contains** nodes together.
## Usage Examples
### Scenario: Output Quality Control
Let's say you want to handle AI outputs differently based on their content characteristics:
1. Add an **If Output Contains** node after your LLM node
2. Add conditions for quality checks:
* Text: "I apologize" (to catch uncertainty or inability to answer)
* Text: "I don't know" (to identify knowledge gaps)
3. Connect the "True" path to fallback handling
4. Connect the "False" path to normal processing
### Scenario: Content Classification with Regex
To categorize outputs based on specific patterns:
1. Add an **If Output Contains** node
2. Enable "Use regex"
3. Add a condition with pattern: `\$\d+(\.\d{2})?` (to identify outputs containing dollar amounts)
4. Route matching outputs to financial processing nodes
## Tips and Best Practices
* Place this node immediately after LLM nodes to analyze their outputs
* Use simple text matches for basic content detection
* Implement regex for more complex pattern recognition
* Consider case sensitivity based on your content requirements
* Chain multiple nodes for sophisticated output analysis
* Test conditions with various LLM outputs to ensure reliable routing
* Consider checking the Execution Logs to track which conditions are being triggered
# Randomized Split
Source: https://docs.prompteus.com/neurons/editor/nodes/randomized-split
Use the **Randomized Split** node to create branching logic in your Neuron workflows based on random conditions.
The **Randomized Split** node allows you to create dynamic branching paths in your Neuron workflows. This guide explains how to use randomized splits effectively.
The **Randomized Split** node enables you to create A/B tests, canary deployments, or simply add randomness to your AI workflows. It allows you to send a percentage of requests down one path and the remainder down another.
## Functionality
The **Randomized Split** node acts as a traffic director, splitting incoming requests based on a configurable percentage. This can be useful for:
* A/B Testing: Compare the performance of different AI models, prompts, or node configurations
* Canary Deployments: Gradually roll out changes to a subset of users to monitor stability and performance
* Adding Randomness: Introduce variety into workflows, for example, using different LLMs for each request
## Node Properties
* **Percentage A:** Sets the probability that a workflow will run down the A Path
* **Percentage B:** Sets the probability that a workflow will run down the B Path
Percentage B is automatically calculated as the remaining percentage.
## Usage Examples
### Scenario: A/B Testing Different Models
Let's say you want to compare the output of a base LLM like GPT-3.5 with the more advanced GPT-4 model:
1. Add a **Randomized Split** node to your workflow
2. Set "Percentage A" to 50%; "Percentage B" will automatically be set to 50%
3. Connect "A Path" to a **Call AI Model** node configured to use GPT-3.5
4. Connect "B Path" to a **Call AI Model** node configured to use GPT-4
Now, half of your requests will be processed by GPT-3.5, and half by GPT-4, allowing you to compare the results.
### Scenario: Implementing a Canary Deployment
You've developed a new version of your image generation workflow. To avoid breaking things for all users, you can gradually roll out the changes:
1. Add a **Randomized Split** node
2. Set "Percentage A" to 90%; "Percentage B" will automatically be set to 10%. This sends only 10% of requests down the new deployment, while 90% use the known stable setup
3. Connect the "A Path" to your current, stable workflow
4. Connect the "B Path" to the new workflow
5. Over time, you can gradually increase percentage B (and thus reduce percentage A) to expose the new model to more users
## Tips and Best Practices
* Use [execution logs](/neurons/logging) to track which path is being taken and evaluate the performance of each branch
* Start with small percentages when testing new paths
* Monitor the results of each path to make data-driven decisions
* Consider using multiple splits for more complex testing scenarios
* Combine **Randomized Split** with other node types to create more complex and dynamic workflows, for example:
* Split traffic between two different LLM models
* Split traffic between two different system instructions
# Replace Words in Prompt
Source: https://docs.prompteus.com/neurons/editor/nodes/replace-words-in-input
Learn how to use the **Replace Words in Prompt** node to perform text substitutions in your prompts before they reach the LLM.
The **Replace Words in Prompt** node allows you to define multiple find-and-replace rules to modify your prompts. Each replacement can use either plain text or regex patterns, with support for case-sensitive matching.
## Functionality
The **Replace Words in Prompt** node acts as a text transformer, finding and replacing specified patterns in your prompts. This can be useful for:
* Variable Substitution: Replace placeholders with actual values
* Content Standardization: Ensure consistent terminology across prompts
* Text Sanitization: Remove or replace unwanted content patterns
* Dynamic Content: Modify prompts based on workflow context
* Prompt Templating: Maintain templates with replaceable sections
## Node Properties
For each replacement rule you add, you can configure:
* **Find:**
* **Text to Find:** The pattern or text to search for in the prompt
* **Use Regex:** Toggle to enable regular expression pattern matching
* **Case Sensitive:** Toggle to make the pattern matching case sensitive
* **Replace:**
* **Replacement Text:** The text to insert in place of matched content
You can add multiple replacement rules using the "Add a Replacement" button. Rules are applied sequentially in the order they are defined.
## Usage Examples
### Scenario: Acronym Expansion
Let's say you want to expand industry-specific acronyms to make prompts more clear:
1. Add a **Replace Words in Prompt** node before your LLM node
2. Add multiple replacements:
* Find: "ML", Replace: "Machine Learning"
* Find: "NLP", Replace: "Natural Language Processing"
* Find: "CV", Replace: "Computer Vision"
3. Enable "Case sensitive" for each to avoid replacing lowercase instances
4. This will convert technical text like "ML and NLP techniques in CV" to "Machine Learning and Natural Language Processing techniques in Computer Vision"
### Scenario: Content Redaction
Let's say you want to redact sensitive information from prompts:
1. Add a **Replace Words in Prompt** node before your LLM node
2. Enable "Use regex"
3. Configure a replacement:
* Find: `\b\d{4}[-\s]?\d{4}[-\s]?\d{4}[-\s]?\d{4}\b`
* Replace: "\[REDACTED CREDIT CARD]"
4. This will replace credit card numbers like "4111-1111-1111-1111" or "4111 1111 1111 1111" with "\[REDACTED CREDIT CARD]"
## Tips and Best Practices
* Order your replacements carefully as they are applied sequentially
* Use regex for complex pattern matching needs
* Test replacements with various prompt inputs to ensure desired outcomes
* Consider case sensitivity requirements for your use case
* Verify that replacements don't introduce unintended side effects
* Keep replacement rules simple and focused for better maintenance
# Replace Words in Response
Source: https://docs.prompteus.com/neurons/editor/nodes/replace-words-in-output
Learn how to use the **Replace Words in Response** node to perform text substitutions in your LLM responses after they are generated.
The **Replace Words in Response** node allows you to define multiple find-and-replace rules to modify your LLM responses. Each replacement can use either plain text or regex patterns, with support for case-sensitive matching.
## Functionality
The **Replace Words in Response** node acts as a text transformer, finding and replacing specified patterns in your LLM responses. This can be useful for:
* Response Formatting: Standardize output formats and styling
* Content Filtering: Remove or modify unwanted content patterns
* Brand Consistency: Ensure consistent terminology in responses
* Data Transformation: Convert units or standardize numerical formats
* Response Sanitization: Clean up or modify AI-generated content
## Node Properties
For each replacement rule you add, you can configure:
* **Find:**
* **Text to Find:** The pattern or text to search for in the response
* **Use Regex:** Toggle to enable regular expression pattern matching
* **Case Sensitive:** Toggle to make the pattern matching case sensitive
* **Replace:**
* **Replacement Text:** The text to insert in place of matched content
You can add multiple replacement rules using the "Add a Replacement" button. Rules are applied sequentially in the order they are defined.
## Usage Examples
### Scenario: Response Standardization
Let's say you want to ensure consistent terminology in AI responses:
1. Add a **Replace Words in Response** node after your LLM node
2. Add multiple replacements:
* Find: "AI assistant", Replace: "Virtual Assistant"
* Find: "artificial intelligence", Replace: "AI"
* Find: "I think", Replace: "Based on the available information"
3. Enable "Case sensitive" where appropriate
4. This helps maintain consistent branding and professional tone in responses
### Scenario: Response Sanitization
Let's say you want to remove or mask sensitive information that the LLM might inadvertently include:
1. Add a **Replace Words in Response** node after your LLM node
2. Enable "Use regex"
3. Configure a replacement:
* Find: `/[A-Za-z0-9._%+-]+@[A-Za-z0-9.-]+\.[A-Z|a-z]{2,}/`
* Replace: "\[REDACTED EMAIL]"
4. This will replace any email addresses in the response with "\[REDACTED EMAIL]"
## Tips and Best Practices
* Place this node immediately after LLM nodes to process their outputs
* Order your replacements carefully as they are applied sequentially
* Use regex for complex pattern matching needs
* Test replacements with various response types to ensure desired outcomes
* Consider case sensitivity requirements for your use case
* Monitor replaced content to ensure accuracy
* Keep replacement rules simple and focused for better maintenance
* Regularly review and update rules as LLM response patterns evolve
# Serve Output
Source: https://docs.prompteus.com/neurons/editor/nodes/serve-output
Learn how to use the Serve Output node to return results from your workflow.
The **Serve Output** node designates the output that should be returned from your workflow, making it a crucial component for any workflow that needs to provide results.
## Functionality
The **Serve Output** node:
* Marks the final output of your workflow
* Returns the input it receives as the workflow's output
* Can be used multiple times in different branches
* First **Serve Output** node reached determines the output
## Usage Examples
### Scenario: Basic Output
```mermaid
graph LR
A[Process Input] --> B[AI Model] --> C[Serve Output]
```
### Scenario: Conditional Outputs
```mermaid
graph TD
A[Check Condition] -->|Success| B[Success Output]
A -->|Error| C[Error Output]
B --> D[Serve Output]
C --> E[Serve Output]
```
## Tips and Best Practices
* Place at the end of your workflow branches
* Ensure all possible execution paths lead to a **Serve Output**
* Consider formatting or structuring data before the **Serve Output**
* Remember only the first **Serve Output** reached will be used
* Use in combination with conditional nodes for different output types
# Set System Instructions
Source: https://docs.prompteus.com/neurons/editor/nodes/set-system-instructions
Learn how to use the **Set System Instructions** node to define the behavior and context for your AI model interactions.
The **Set System Instructions** node is a fundamental component for configuring how your AI models behave. This guide explains how to use system instructions effectively in your Neurons.
The **Set System Instructions** node lets you configure the system instructions that will
be passed to the Large Language Model (LLM) during the neuron's execution. The
system instructions set the context for the LLM, influencing its responses.
## Functionality
The **Set System Instructions** node allows you to define or modify the System Instructions for a Neuron.
The *last* **Set System Instructions** node set in your workflow is the instructions that
LLM will use.
## Node Properties
* **System Instructions:**
* The system instructions to be used for the LLM.
* **Prompt Position:** Select how you want the instructions to behave:
* **Insert Text Before Existing System Instructions:** Add text at the start of any existing system instructions. This can allow you to inject a short introductory statement, or additional instructions.
* **Insert Text After Existing System Instructions:** Add text to the end of the existing system instructions. This position could be useful for providing clarifying information or examples.
* **Replace Entire System Instructions:** Overwrite the entire system instructions with a new text, effectively resetting the LLM's context.
## Usage Examples
### Scenario: Defining an AI assistant
In a customer support chatbot neuron, you might use a **Set System Instructions** with a prompt that reads:
```text
You are a helpful and concise AI customer support assistant. Your goal is to answer customer questions politely and effectively.
```
## Tips and Best Practices
* Using a [Randomized Split node](/neurons/editor/nodes/randomized-split) before the system instructions node can help you test different instructions with the same input — this can help you refine your instructions over time and roll out changes in a controlled manner.
* Think carefully about how you want to configure the instructions. Overwriting, adding before, or adding after can have significant effects on the output's response.
* Test your system instructions changes with different inputs to ensure the LLM responds appropriately in various scenarios.
* Keep your system instructions clear and concise to avoid confusion or conflicting instructions.
# Stop Execution
Source: https://docs.prompteus.com/neurons/editor/nodes/stop-execution
Learn how to use the **Stop Execution** node to conditionally halt workflow execution.
The **Stop Execution** node immediately halts the execution of your workflow when reached, preventing any subsequent nodes from running.
## Functionality
The **Stop Execution** node:
* Immediately stops workflow execution
* Can be used in conditional branches
* Useful for error handling and flow control
## Usage Examples
### Scenario: Error Handling
```mermaid
graph TD
A[Input Validation] -->|Valid| B[Process Data]
A -->|Invalid| C[Stop Execution]
```
In this example, the **Stop Execution** node prevents further processing when invalid input is detected.
### Scenario: Conditional Processing
```mermaid
graph TD
A[Check Condition] -->|Continue| B[Next Step]
A -->|Halt| C[Stop Execution]
```
## Tips and Best Practices
* Use in combination with conditional nodes for flow control
* Place strategically in error handling branches
* Consider adding logging or notification nodes before **Stop Execution**
* Use to prevent unnecessary processing when conditions aren't met
# Use Output
Source: https://docs.prompteus.com/neurons/editor/nodes/use-output
Learn how to use the **Use Output** node to pass output from one node as input to subsequent nodes in your workflow.
The **Use Output** node is a simple but powerful control node that allows you to use the output from a previous node as input for subsequent nodes in your workflow.
The **Use Output** node enables you to chain operations by passing output as
input, making it essential for creating complex workflows with multiple steps.
## Functionality
The **Use Output** node:
* Takes the output from the previous node and makes it available as input
* Enables creation of multi-step workflows
* Is particularly useful when chaining AI model calls or transforming data
## Usage Examples
### Scenario: Chaining AI Models
```mermaid
graph LR
A[AI Model 1] --> B[Use Output] --> D[Set System Instructions] --> C[AI Model 2]
```
In this example, the **Use Output** node takes the response from the first AI model and passes it as input to the second model. This is useful for:
* Breaking down complex tasks into steps
* Refining or structuring output from one model with another
* Cost optimization by using expensive models only for complex tasks
### Scenario: Content Processing Pipeline
```mermaid
graph LR
A[Text Generation] --> B[Use Output] --> C[Text Analysis]
```
## Tips and Best Practices
* Consider adding system instructions after **Use Output** nodes to give context to the next step
* Use it strategically in model chains to optimize for cost and performance
* Remember that the entire output is passed forward - use system instructions or other nodes to filter or transform as needed
# Version Management & Deployment
Source: https://docs.prompteus.com/neurons/editor/version-management
Learn how to manage Neuron versions, deploy them to production, and maintain different versions of your configurations.
Version management allows you to track changes to your Neurons, maintain different versions of your configurations, and control what version is currently deployed and serving requests.
## Version Management
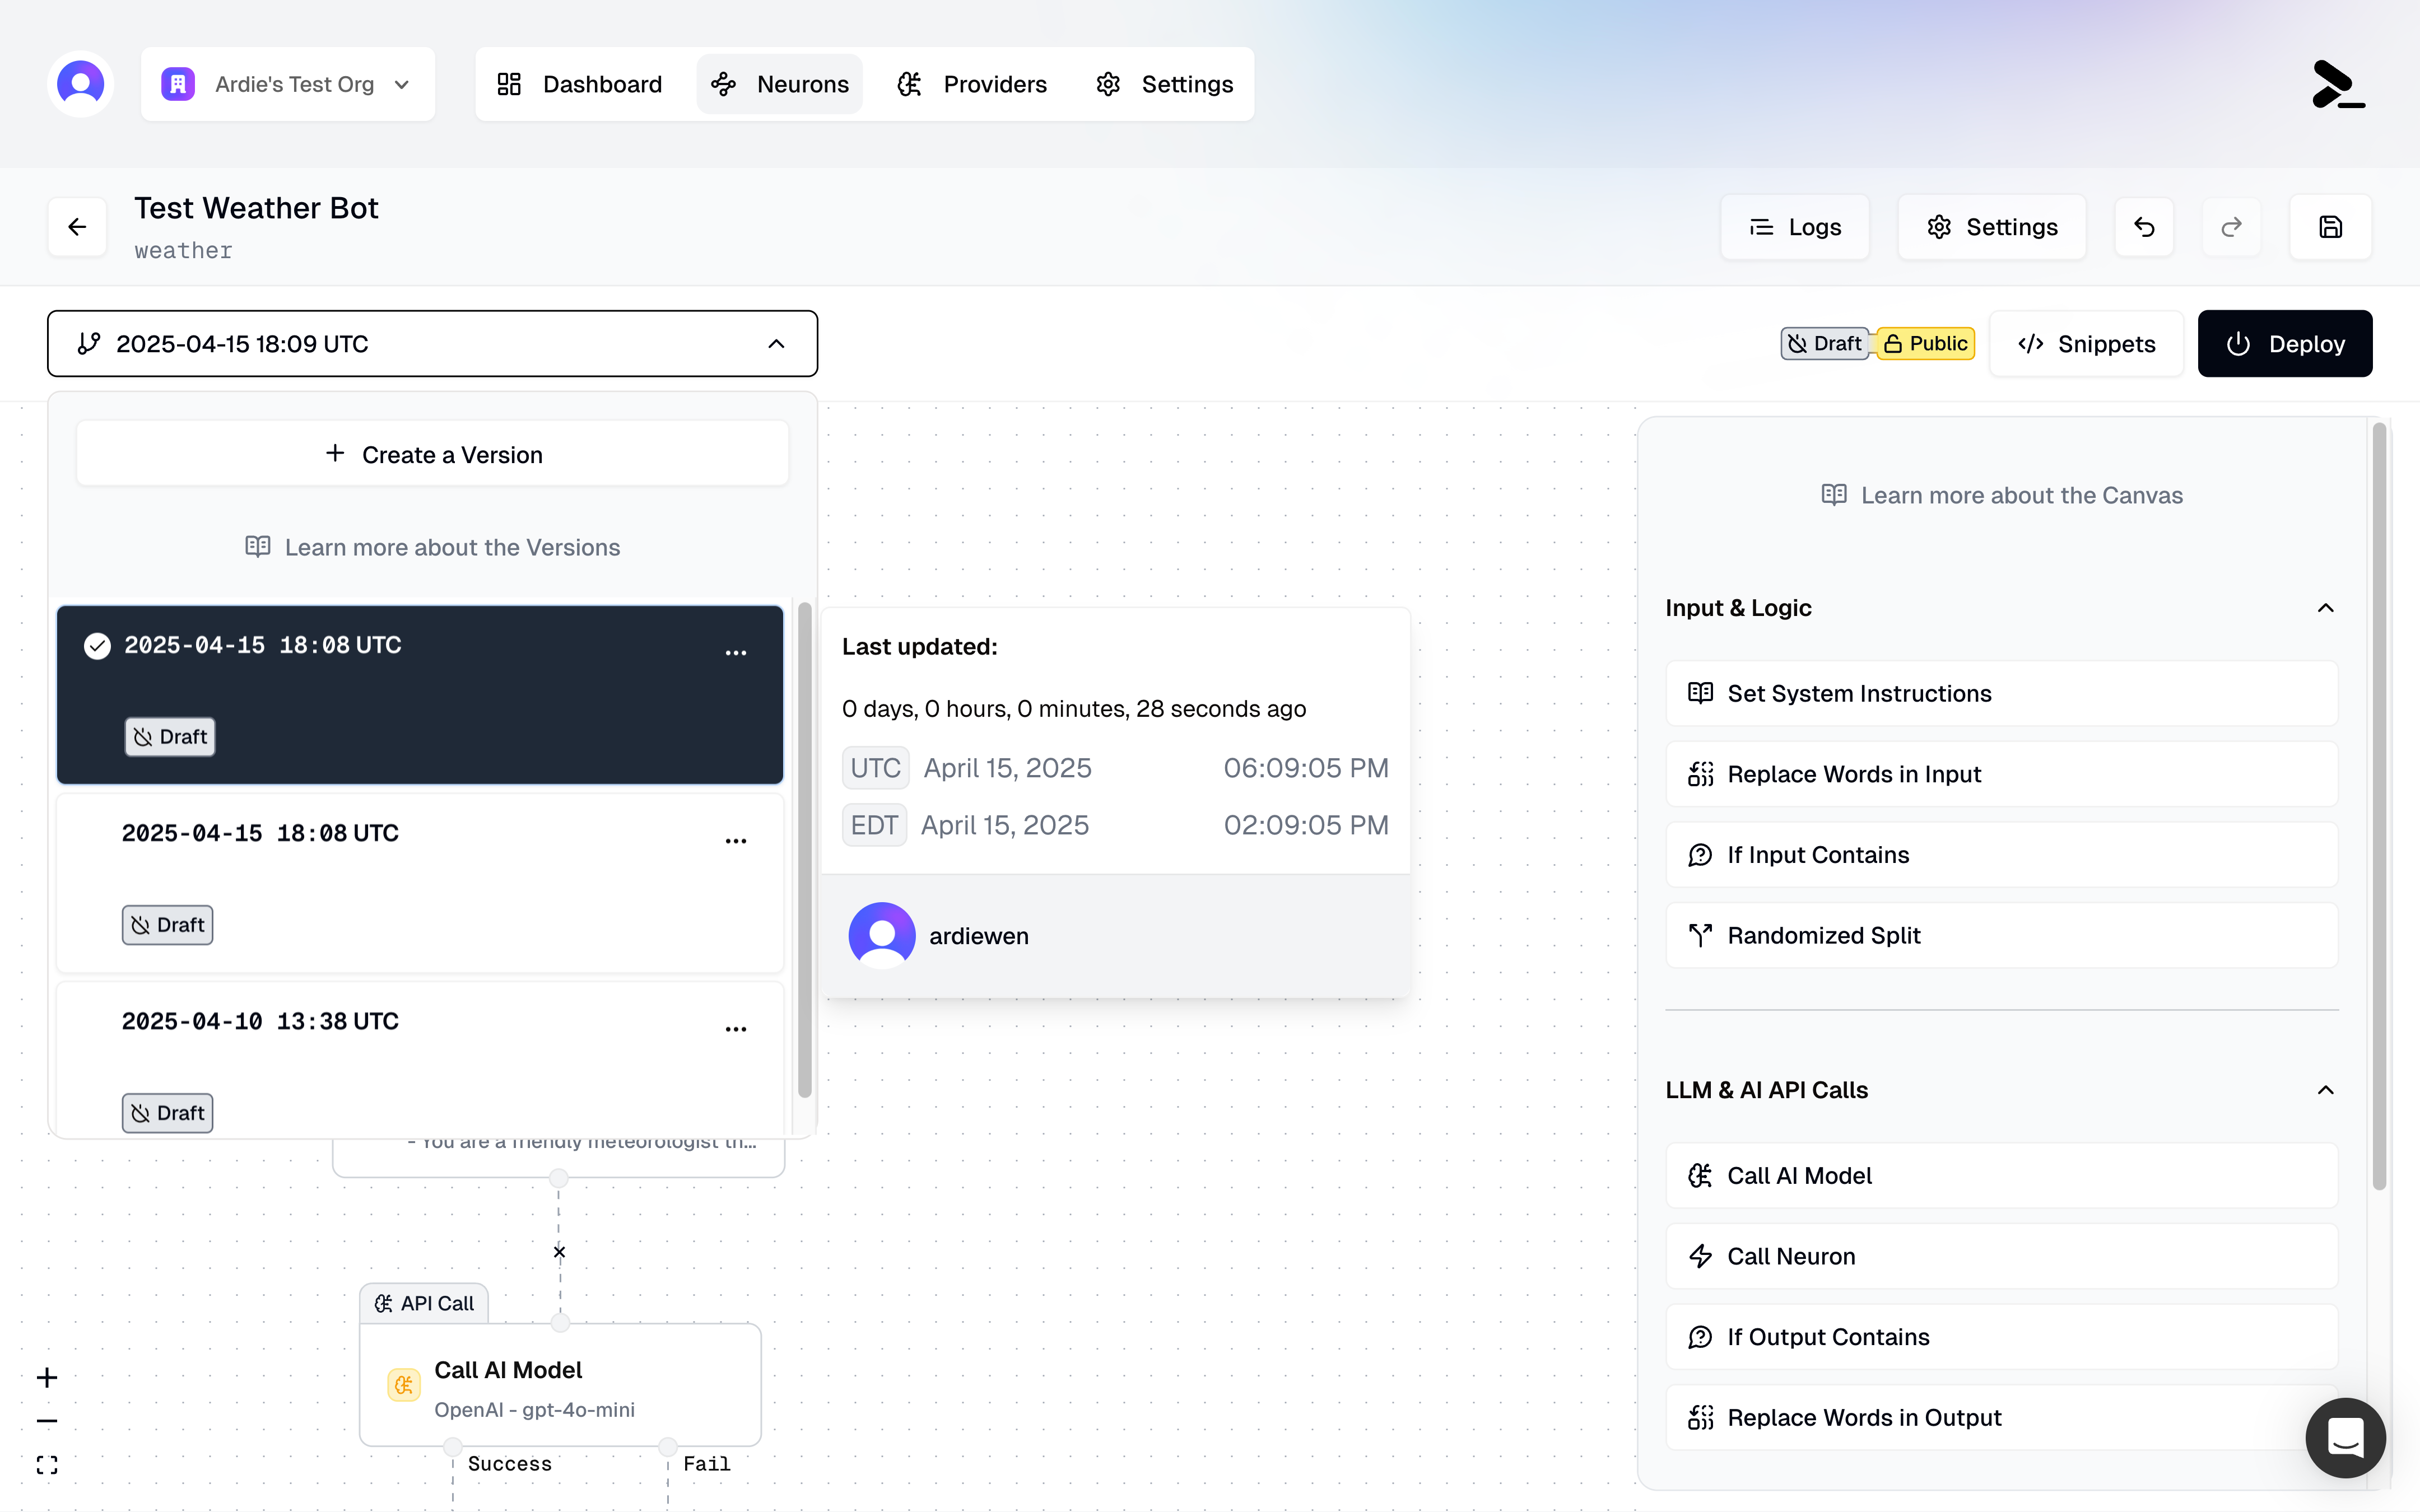 ### Creating Versions
Each time you make changes to your Neuron, you can create a new version:
* Give your version a custom name for easy identification
* Track when versions were created and by whom
* See detailed timestamps by hovering over the version date
* UTC timestamp
* Local time conversion
* Relative time (e.g., "17 days ago")
Versions serve as snapshots of your Neuron configuration. They include all node configurations, and connections between nodes at the time of creation.
Settings are not versioned and exist at the Neuron level. This means that if you make changes to a setting, it will affect all versions of the Neuron, including already deployed versions.
### Version History
The version history shows:
* All versions of your Neuron
* When each version was created
* Who created each version
* Which version is currently deployed
Once a version is deployed, it cannot be edited. This ensures consistency in production. If you try to make changes to a deployed version, Prompteus will offer to create a duplicate of it first.
## Deployment
### Creating Versions
Each time you make changes to your Neuron, you can create a new version:
* Give your version a custom name for easy identification
* Track when versions were created and by whom
* See detailed timestamps by hovering over the version date
* UTC timestamp
* Local time conversion
* Relative time (e.g., "17 days ago")
Versions serve as snapshots of your Neuron configuration. They include all node configurations, and connections between nodes at the time of creation.
Settings are not versioned and exist at the Neuron level. This means that if you make changes to a setting, it will affect all versions of the Neuron, including already deployed versions.
### Version History
The version history shows:
* All versions of your Neuron
* When each version was created
* Who created each version
* Which version is currently deployed
Once a version is deployed, it cannot be edited. This ensures consistency in production. If you try to make changes to a deployed version, Prompteus will offer to create a duplicate of it first.
## Deployment
 ### Deploying a Version
To make your Neuron available for use, you must deploy a version:
1. Select the version you want to deploy
2. Click the "Deploy" button
3. Confirm the deployment
Your Neuron is not available for use until you deploy a version. This ensures that only intentionally released configurations can be called.
### Deployment Rules
When deploying a version:
* Only one version can be deployed at a time
* Deploying a new version will replace the currently deployed version
* The deployed version becomes read-only
* You can still delete a deployed version, but you should deploy another version first
### Making Changes to Deployed Versions
If you need to modify a deployed version:
1. Click the "..." menu on the version
2. Select "Duplicate"
3. Make your changes to the duplicate
4. Deploy the new version when ready
## Best Practices
1. **Version Naming**
* Use descriptive names for versions
* Include the purpose of changes
* Consider including version numbers
2. **Deployment Strategy**
* Test versions thoroughly before deployment
* Consider maintaining a staging version by duplicating your Neuron
* Document changes between versions
3. **Version Management**
* Keep track of which changes are in each version
* Clean up unused versions periodically
* Maintain at least one stable version
## Related Resources
* [Visual Editor](/neurons/editor/visual-editor) - Create and edit Neurons
* [Access Control](/neurons/settings/access-control) - Manage who can access your deployed Neurons
* [Rate Limiting](/neurons/settings/rate-limiting) - Control usage of deployed versions
# Introduction to the Neuron Editor
Source: https://docs.prompteus.com/neurons/editor/visual-editor
Learn about the Neuron Editor's interface and how to build powerful AI workflows using its visual tools.
# Neuron Editor Overview
### Deploying a Version
To make your Neuron available for use, you must deploy a version:
1. Select the version you want to deploy
2. Click the "Deploy" button
3. Confirm the deployment
Your Neuron is not available for use until you deploy a version. This ensures that only intentionally released configurations can be called.
### Deployment Rules
When deploying a version:
* Only one version can be deployed at a time
* Deploying a new version will replace the currently deployed version
* The deployed version becomes read-only
* You can still delete a deployed version, but you should deploy another version first
### Making Changes to Deployed Versions
If you need to modify a deployed version:
1. Click the "..." menu on the version
2. Select "Duplicate"
3. Make your changes to the duplicate
4. Deploy the new version when ready
## Best Practices
1. **Version Naming**
* Use descriptive names for versions
* Include the purpose of changes
* Consider including version numbers
2. **Deployment Strategy**
* Test versions thoroughly before deployment
* Consider maintaining a staging version by duplicating your Neuron
* Document changes between versions
3. **Version Management**
* Keep track of which changes are in each version
* Clean up unused versions periodically
* Maintain at least one stable version
## Related Resources
* [Visual Editor](/neurons/editor/visual-editor) - Create and edit Neurons
* [Access Control](/neurons/settings/access-control) - Manage who can access your deployed Neurons
* [Rate Limiting](/neurons/settings/rate-limiting) - Control usage of deployed versions
# Introduction to the Neuron Editor
Source: https://docs.prompteus.com/neurons/editor/visual-editor
Learn about the Neuron Editor's interface and how to build powerful AI workflows using its visual tools.
# Neuron Editor Overview
 Welcome to the Neuron Editor! This powerful visual workflow builder helps you create, configure, and manage your AI Neurons with ease. Whether you're building simple AI interactions or complex workflows, the Neuron Editor provides an intuitive interface for designing your AI solutions.
## Core Functionality
The Neuron Editor features a user-friendly drag-and-drop interface that makes building AI workflows straightforward and efficient. With this interface, you can create and connect nodes to define your workflow steps, customize individual node settings, and manage your Neuron's properties. The editor makes it easy to save your work, duplicate existing Neurons, and delete them when they're no longer needed.
## Available Node Types
The Neuron Editor comes with a comprehensive set of node types to help you build sophisticated AI workflows. Here's what's available:
### Prompt Management & Logic
| Node | Description |
| ----------------------------------------------------------------------- | ---------------------------------------------------- |
| [Set System Instructions](/neurons/editor/nodes/system-prompt) | Define system-level instructions for AI interactions |
| [Replace Words in Input](/neurons/editor/nodes/replace-words-in-prompt) | Dynamically modify input before sending to AI models |
| [If Input Contains](/neurons/editor/nodes/if-prompt-contains) | Create conditional branches based on input content |
| [Randomized Split](/neurons/editor/nodes/randomized-split) | Add variety with random branching paths |
### LLM & AI API Calls
| Node | Description |
| -------------------------------------------------------------------------- | ------------------------------------------- |
| [Call AI Model](/neurons/editor/nodes/call-ai-model) | Connect to and interact with AI models |
| [Call Neuron](/neurons/editor/nodes/call-neuron) | Call another Neuron from within a workflow |
| [Replace Words in Output](/neurons/editor/nodes/replace-words-in-response) | Transform AI model outputs as needed |
| [If Output Contains](/neurons/editor/nodes/if-response-contains) | Branch workflows based on AI output content |
### Control Flow
| Node | Description |
| ------------------------------------------------------ | -------------------------------------------------- |
| [Use Output](/neurons/editor/nodes/use-output) | Access and incorporate outputs from previous nodes |
| [Stop Execution](/neurons/editor/nodes/stop-execution) | End the Neuron execution when needed |
| [Serve Output](/neurons/editor/nodes/serve-response) | Return the final output to your application |
## Interface Comxponents
The Neuron Editor's interface is designed for efficiency and ease of use, with three main sections that work together to help you build and manage your workflows.
### Canvas (Workflow Editor)
Welcome to the Neuron Editor! This powerful visual workflow builder helps you create, configure, and manage your AI Neurons with ease. Whether you're building simple AI interactions or complex workflows, the Neuron Editor provides an intuitive interface for designing your AI solutions.
## Core Functionality
The Neuron Editor features a user-friendly drag-and-drop interface that makes building AI workflows straightforward and efficient. With this interface, you can create and connect nodes to define your workflow steps, customize individual node settings, and manage your Neuron's properties. The editor makes it easy to save your work, duplicate existing Neurons, and delete them when they're no longer needed.
## Available Node Types
The Neuron Editor comes with a comprehensive set of node types to help you build sophisticated AI workflows. Here's what's available:
### Prompt Management & Logic
| Node | Description |
| ----------------------------------------------------------------------- | ---------------------------------------------------- |
| [Set System Instructions](/neurons/editor/nodes/system-prompt) | Define system-level instructions for AI interactions |
| [Replace Words in Input](/neurons/editor/nodes/replace-words-in-prompt) | Dynamically modify input before sending to AI models |
| [If Input Contains](/neurons/editor/nodes/if-prompt-contains) | Create conditional branches based on input content |
| [Randomized Split](/neurons/editor/nodes/randomized-split) | Add variety with random branching paths |
### LLM & AI API Calls
| Node | Description |
| -------------------------------------------------------------------------- | ------------------------------------------- |
| [Call AI Model](/neurons/editor/nodes/call-ai-model) | Connect to and interact with AI models |
| [Call Neuron](/neurons/editor/nodes/call-neuron) | Call another Neuron from within a workflow |
| [Replace Words in Output](/neurons/editor/nodes/replace-words-in-response) | Transform AI model outputs as needed |
| [If Output Contains](/neurons/editor/nodes/if-response-contains) | Branch workflows based on AI output content |
### Control Flow
| Node | Description |
| ------------------------------------------------------ | -------------------------------------------------- |
| [Use Output](/neurons/editor/nodes/use-output) | Access and incorporate outputs from previous nodes |
| [Stop Execution](/neurons/editor/nodes/stop-execution) | End the Neuron execution when needed |
| [Serve Output](/neurons/editor/nodes/serve-response) | Return the final output to your application |
## Interface Comxponents
The Neuron Editor's interface is designed for efficiency and ease of use, with three main sections that work together to help you build and manage your workflows.
### Canvas (Workflow Editor)
 The canvas is your central workspace where you'll spend most of your time building visual workflows. Here you can drag and drop nodes from the side panel, connect them to create your workflow, and arrange them for optimal visibility. The canvas provides a clear view of your entire workflow, making it easy to understand how different components interact with each other.
### Navigation Bar
The canvas is your central workspace where you'll spend most of your time building visual workflows. Here you can drag and drop nodes from the side panel, connect them to create your workflow, and arrange them for optimal visibility. The canvas provides a clear view of your entire workflow, making it easy to understand how different components interact with each other.
### Navigation Bar
 The navigation bar at the top of the editor gives you quick access to essential features. It displays your Neuron's name and unique identifier (slug), along with important status information like deployment status and access control settings. The navigation bar also includes action buttons for viewing execution logs, accessing settings, managing changes with undo/redo, and saving your work.
### Inspector/Addition Panel (Right Sidebar)
The navigation bar at the top of the editor gives you quick access to essential features. It displays your Neuron's name and unique identifier (slug), along with important status information like deployment status and access control settings. The navigation bar also includes action buttons for viewing execution logs, accessing settings, managing changes with undo/redo, and saving your work.
### Inspector/Addition Panel (Right Sidebar)
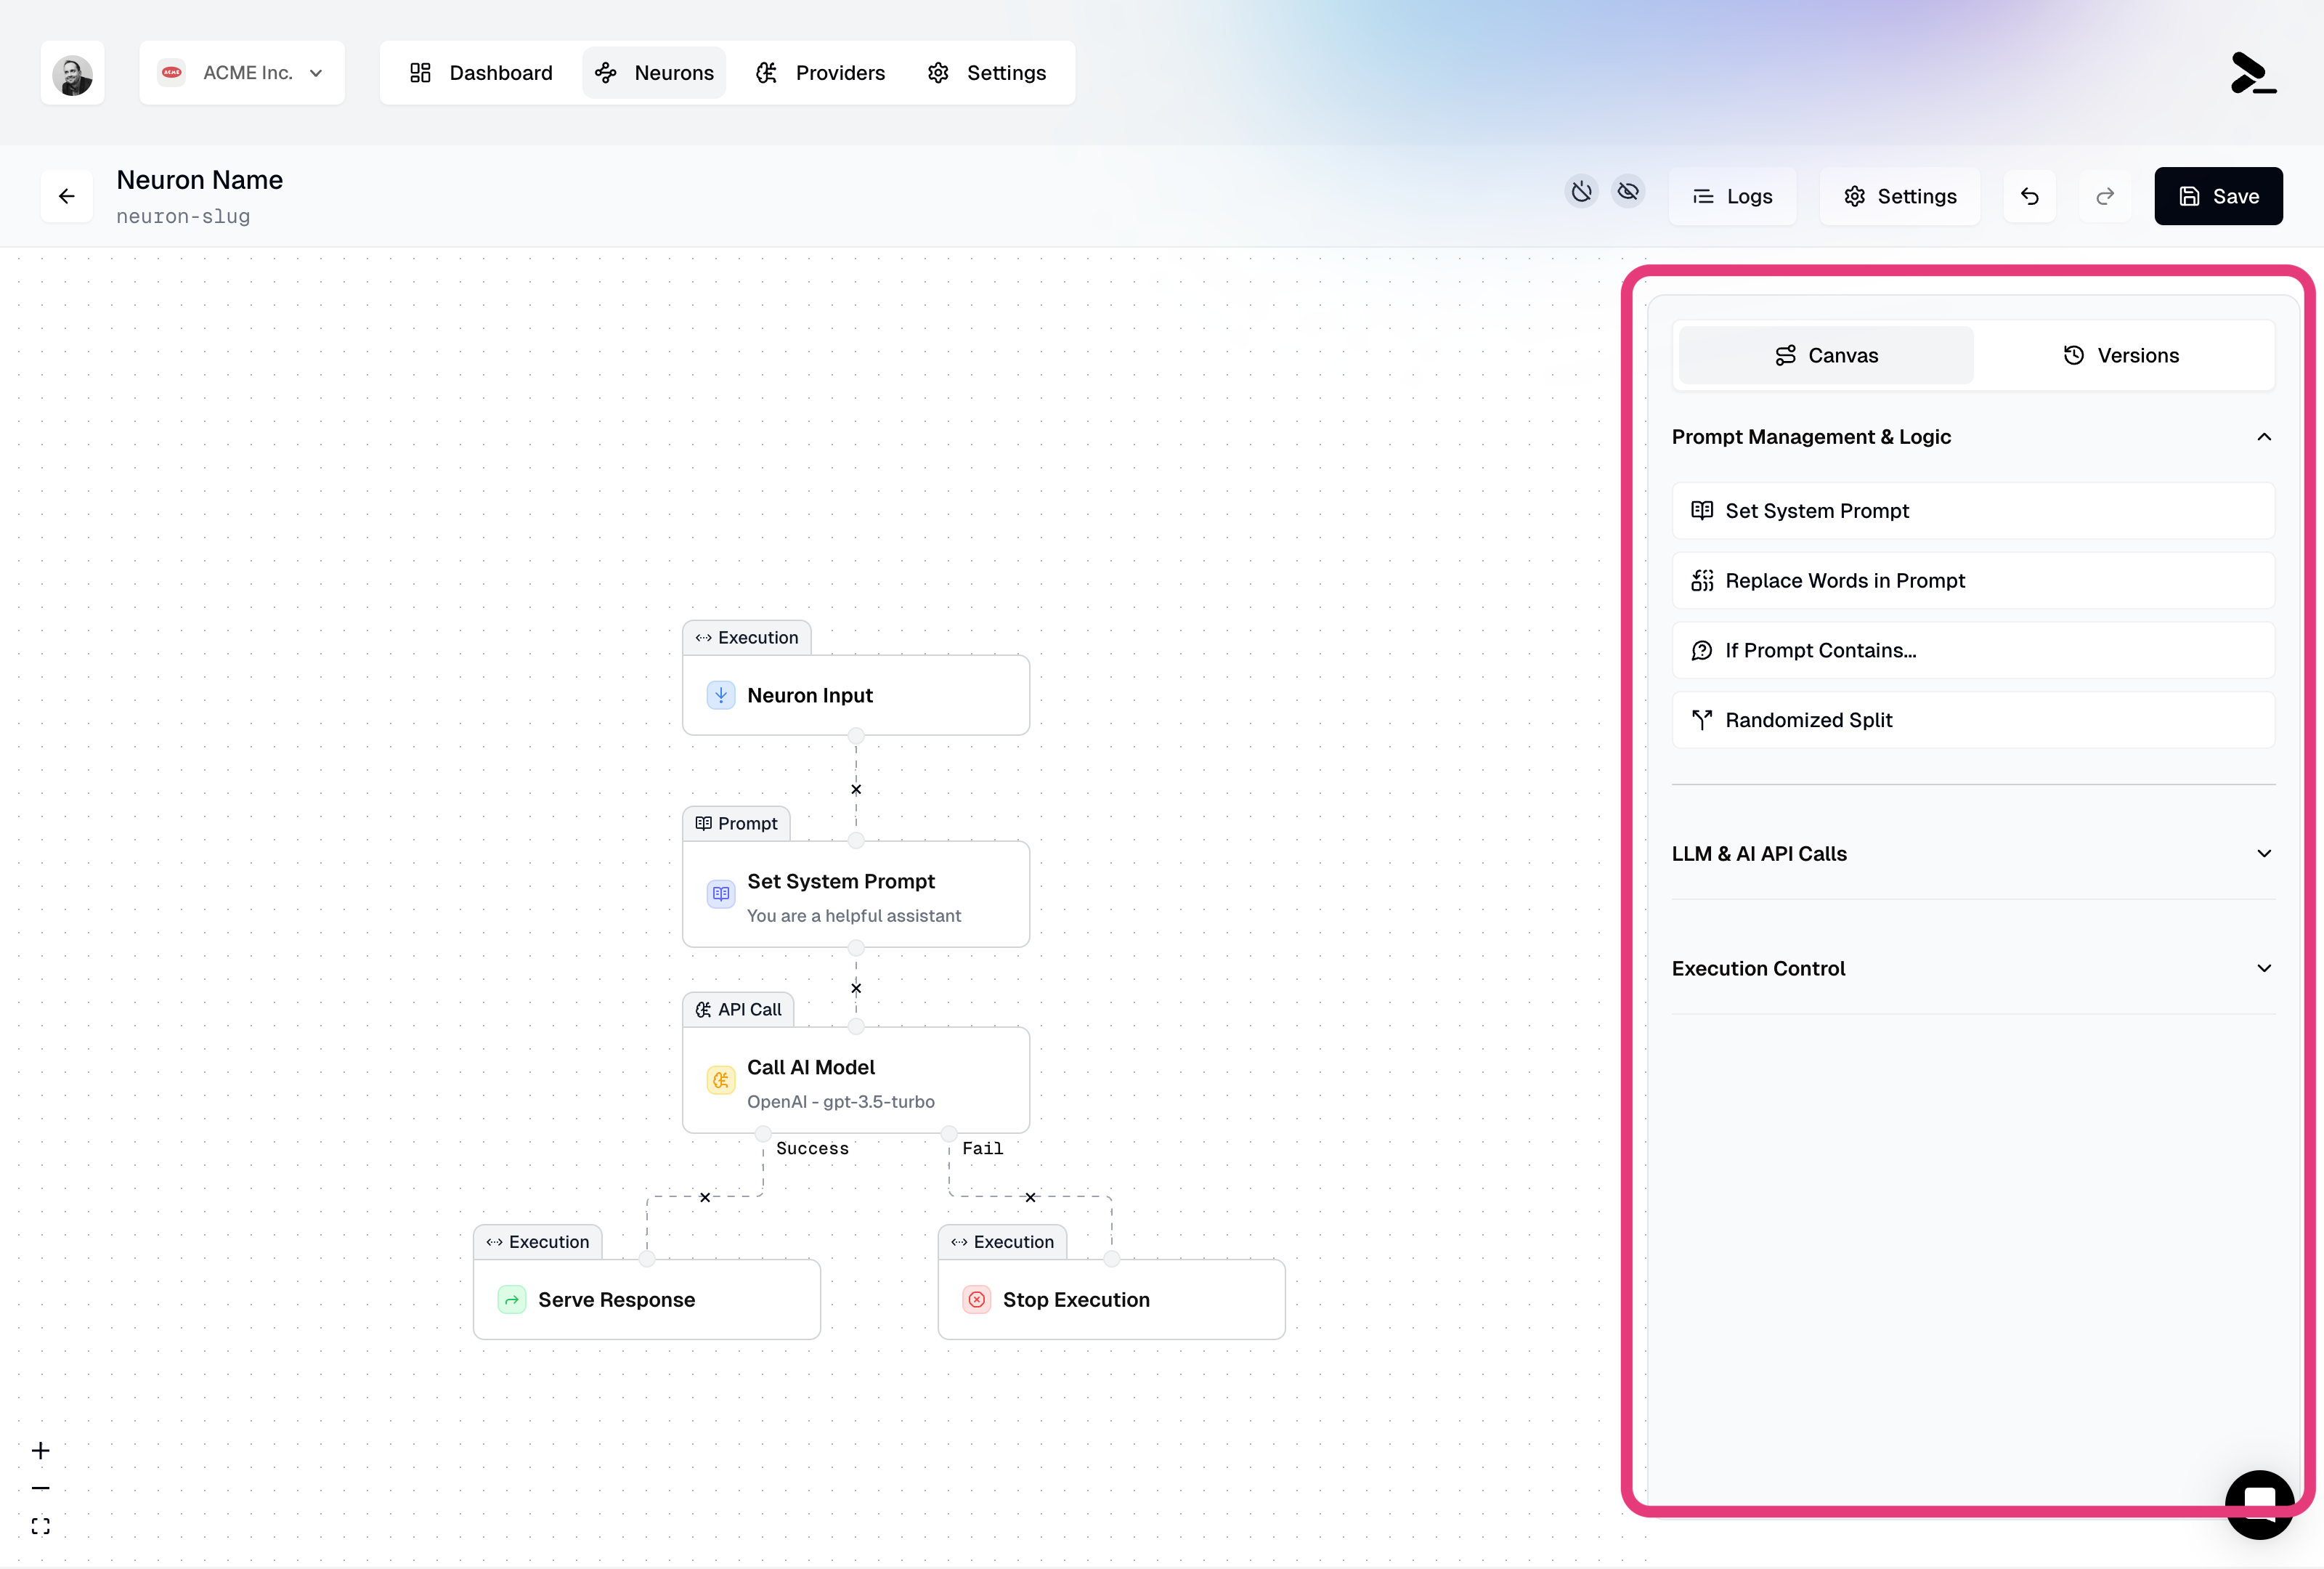 The right sidebar is a dynamic panel that adapts to your current task. When no node is selected, it shows the Node Palette where you can browse and find different node types organized by category. When you select a node, the panel transforms into a configuration interface where you can customize the node's settings and behavior.
## Working with Nodes
The Neuron Editor makes it easy to work with nodes through a variety of intuitive operations. You can add nodes by simply dragging them from the right sidebar to your canvas, and connect them by linking their output and input connectors. Each node can be configured through the right sidebar, where you'll find all the relevant settings and options for that specific node type.
Managing your nodes is straightforward: use the icon (or Delete key on your keyboard) to remove nodes, the Cloning icon to quickly copy nodes, and drag to reposition them on the canvas.
## Best Practices
Building effective Neurons requires a combination of planning, organization, and regular testing. Start by outlining your workflow before building, ensuring your design is clear and efficient.
As you work, keep your workflow organized with a clean layout that makes the flow easy to follow.
Make sure to save your work frequently and test your Neuron regularly to catch any issues early. Take time to review the documentation for each node type to fully understand their capabilities.
## Next Steps
Ready to make your Neuron available? Here's what to do next:
1. [Configure your Neuron's settings](/neurons/settings) to control access and behavior
2. [Deploy your Neuron](/neurons/editor/version-management) to make it available via API
3. [Call your Neuron](/neurons/intro#calling-a-neuron) from your applications
# Introduction to Neurons
Source: https://docs.prompteus.com/neurons/intro
Welcome to the world of Neurons! In Prompteus, Neurons are the foundational elements for building and managing your AI integrations.
Neurons are serverless functions you design with a visual editor, and they control how your requests flow to AI models. Each Neuron is deployed as a secure API endpoint, and can be called from any application.
You can create as many Neurons as you want in your Prompteus account, and Neurons can be chained together to form more complex workflows.
## Editing Neurons
Editing Neurons is done through the [Prompteus Dashboard](https://dashboard.prompteus.com). Once your account and organization are setup, you can create a Neuron from the [Neurons page](https://dashboard.prompteus.com/neurons).
The right sidebar is a dynamic panel that adapts to your current task. When no node is selected, it shows the Node Palette where you can browse and find different node types organized by category. When you select a node, the panel transforms into a configuration interface where you can customize the node's settings and behavior.
## Working with Nodes
The Neuron Editor makes it easy to work with nodes through a variety of intuitive operations. You can add nodes by simply dragging them from the right sidebar to your canvas, and connect them by linking their output and input connectors. Each node can be configured through the right sidebar, where you'll find all the relevant settings and options for that specific node type.
Managing your nodes is straightforward: use the icon (or Delete key on your keyboard) to remove nodes, the Cloning icon to quickly copy nodes, and drag to reposition them on the canvas.
## Best Practices
Building effective Neurons requires a combination of planning, organization, and regular testing. Start by outlining your workflow before building, ensuring your design is clear and efficient.
As you work, keep your workflow organized with a clean layout that makes the flow easy to follow.
Make sure to save your work frequently and test your Neuron regularly to catch any issues early. Take time to review the documentation for each node type to fully understand their capabilities.
## Next Steps
Ready to make your Neuron available? Here's what to do next:
1. [Configure your Neuron's settings](/neurons/settings) to control access and behavior
2. [Deploy your Neuron](/neurons/editor/version-management) to make it available via API
3. [Call your Neuron](/neurons/intro#calling-a-neuron) from your applications
# Introduction to Neurons
Source: https://docs.prompteus.com/neurons/intro
Welcome to the world of Neurons! In Prompteus, Neurons are the foundational elements for building and managing your AI integrations.
Neurons are serverless functions you design with a visual editor, and they control how your requests flow to AI models. Each Neuron is deployed as a secure API endpoint, and can be called from any application.
You can create as many Neurons as you want in your Prompteus account, and Neurons can be chained together to form more complex workflows.
## Editing Neurons
Editing Neurons is done through the [Prompteus Dashboard](https://dashboard.prompteus.com). Once your account and organization are setup, you can create a Neuron from the [Neurons page](https://dashboard.prompteus.com/neurons).
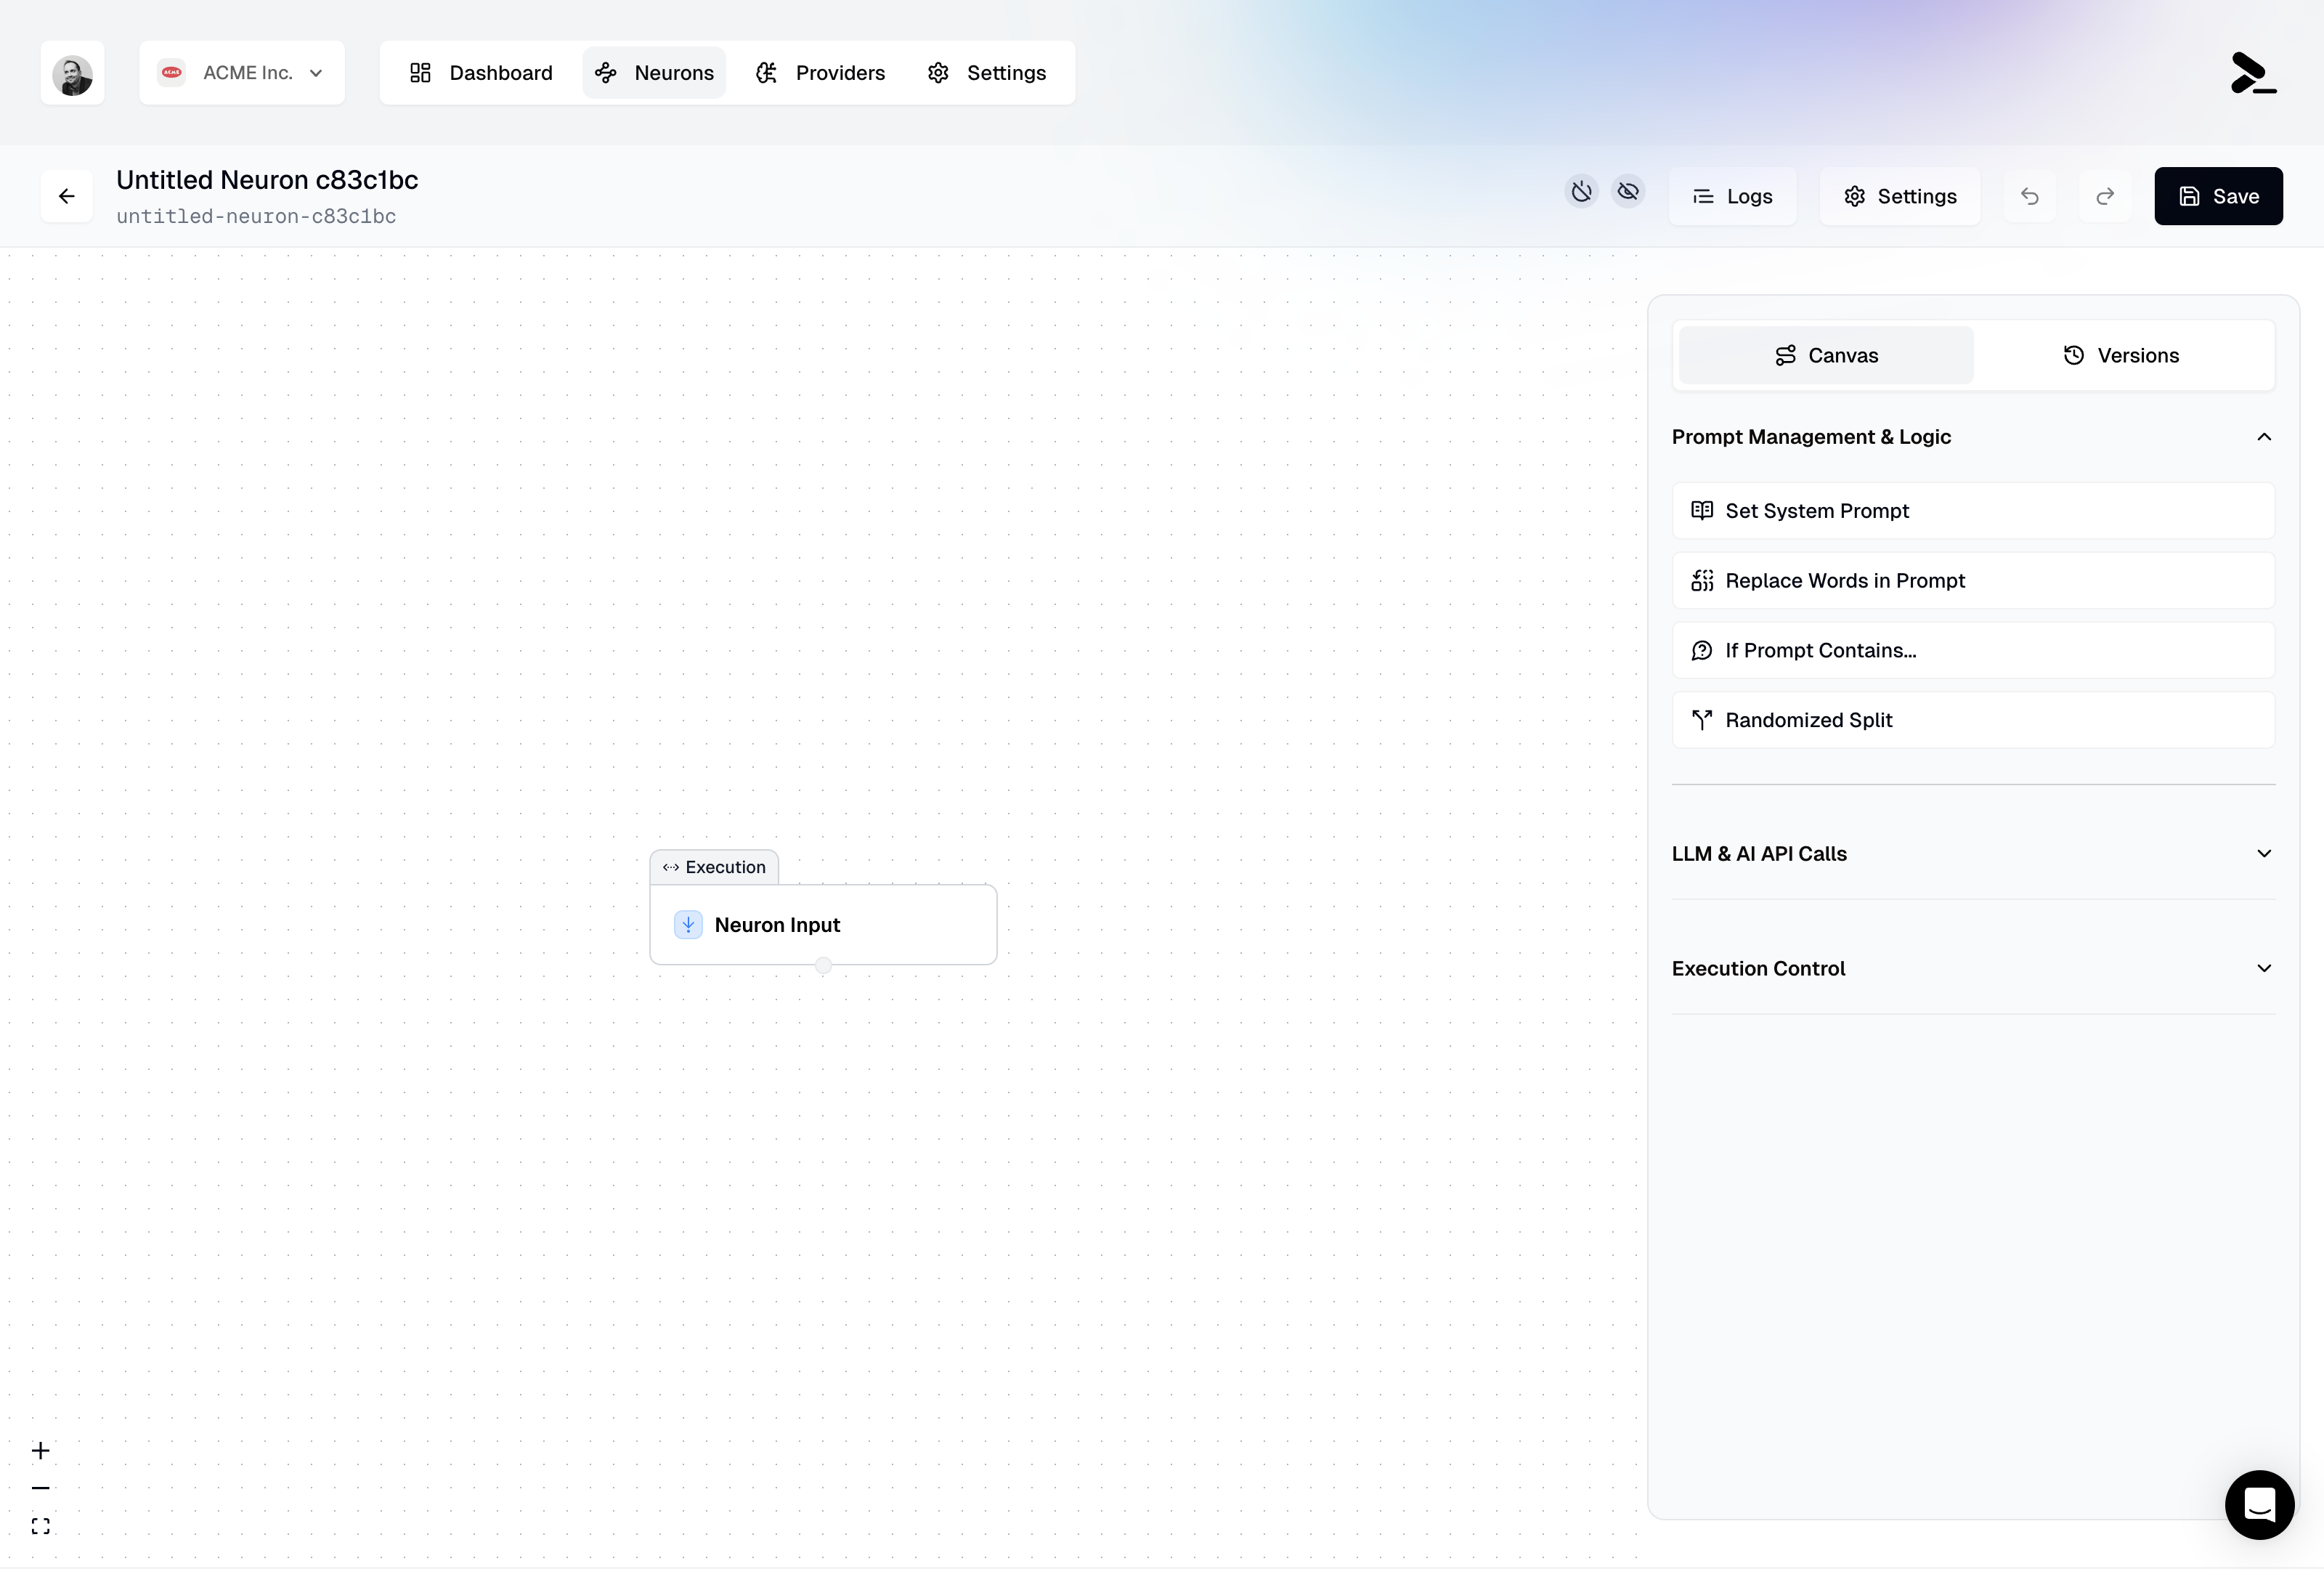 When you create a new Neuron, you will be presented with the Neuron workflow editor.
## Deploying Neurons
Before being able to call your Neurons through their API endpoint, you need to deploy your Neuron, and configure their access settings. Learn more about [version management and deployment](/neurons/editor/version-management).
## Calling a Neuron
Each Neuron can be called from a unique API URL. Your Neuron API URL is visible in the [Neuron Settings](/neurons/settings), and is generated from your organization's slug and the Neuron's slug. You can manage your organization's slug in the [Team Settings](/features/settings/team#managing-organization-details).
```bash
https://run.prompteus.com//
```
In its simplest form, you can call your Neuron by sending a POST request to the API URL:
```bash curl
curl -X POST https://run.prompteus.com// \
-H "Content-Type: application/json" \
-d '{"input": "What is the meaning of life?"}'
```
```javascript Fetch (JavaScript)
const response = await fetch("https://run.prompteus.com//", {
method: "POST",
body: JSON.stringify({ input: "What is the meaning of life?" }),
});
```
```python Python
import requests
response = requests.post(
"https://run.prompteus.com//",
json={"input": "What is the meaning of life?"}
)
print(response.json())
```
```typescript TypeScript SDK
import { Prompteus } from '@prompteus-ai/neuron-runner';
const client = new Prompteus();
const response = await client.callNeuron(
'',
'',
{ input: 'What is the meaning of life?' }
);
```
For detailed information about calling Neurons, including authentication, error handling, and advanced options, see our [API documentation](/neurons/api).
We also provide an official TypeScript SDK (`@prompteus-ai/neuron-runner`) that offers a more convenient way to integrate with Neurons, including type safety and built-in error handling. See the [SDK section](/neurons/api#typescript-sdk) of our API documentation for installation and usage details.
Every call to a Neuron is considered a **Neuron Execution**, which is the fundamental unit of cost in Prompteus. The first 50,000 executions are free every month, and every additional 100,000 executions costs \$5.00.
# Execution Logs
Source: https://docs.prompteus.com/neurons/logging
Monitor and debug your neuron executions with detailed logs
# Execution Logs
When you create a new Neuron, you will be presented with the Neuron workflow editor.
## Deploying Neurons
Before being able to call your Neurons through their API endpoint, you need to deploy your Neuron, and configure their access settings. Learn more about [version management and deployment](/neurons/editor/version-management).
## Calling a Neuron
Each Neuron can be called from a unique API URL. Your Neuron API URL is visible in the [Neuron Settings](/neurons/settings), and is generated from your organization's slug and the Neuron's slug. You can manage your organization's slug in the [Team Settings](/features/settings/team#managing-organization-details).
```bash
https://run.prompteus.com//
```
In its simplest form, you can call your Neuron by sending a POST request to the API URL:
```bash curl
curl -X POST https://run.prompteus.com// \
-H "Content-Type: application/json" \
-d '{"input": "What is the meaning of life?"}'
```
```javascript Fetch (JavaScript)
const response = await fetch("https://run.prompteus.com//", {
method: "POST",
body: JSON.stringify({ input: "What is the meaning of life?" }),
});
```
```python Python
import requests
response = requests.post(
"https://run.prompteus.com//",
json={"input": "What is the meaning of life?"}
)
print(response.json())
```
```typescript TypeScript SDK
import { Prompteus } from '@prompteus-ai/neuron-runner';
const client = new Prompteus();
const response = await client.callNeuron(
'',
'',
{ input: 'What is the meaning of life?' }
);
```
For detailed information about calling Neurons, including authentication, error handling, and advanced options, see our [API documentation](/neurons/api).
We also provide an official TypeScript SDK (`@prompteus-ai/neuron-runner`) that offers a more convenient way to integrate with Neurons, including type safety and built-in error handling. See the [SDK section](/neurons/api#typescript-sdk) of our API documentation for installation and usage details.
Every call to a Neuron is considered a **Neuron Execution**, which is the fundamental unit of cost in Prompteus. The first 50,000 executions are free every month, and every additional 100,000 executions costs \$5.00.
# Execution Logs
Source: https://docs.prompteus.com/neurons/logging
Monitor and debug your neuron executions with detailed logs
# Execution Logs
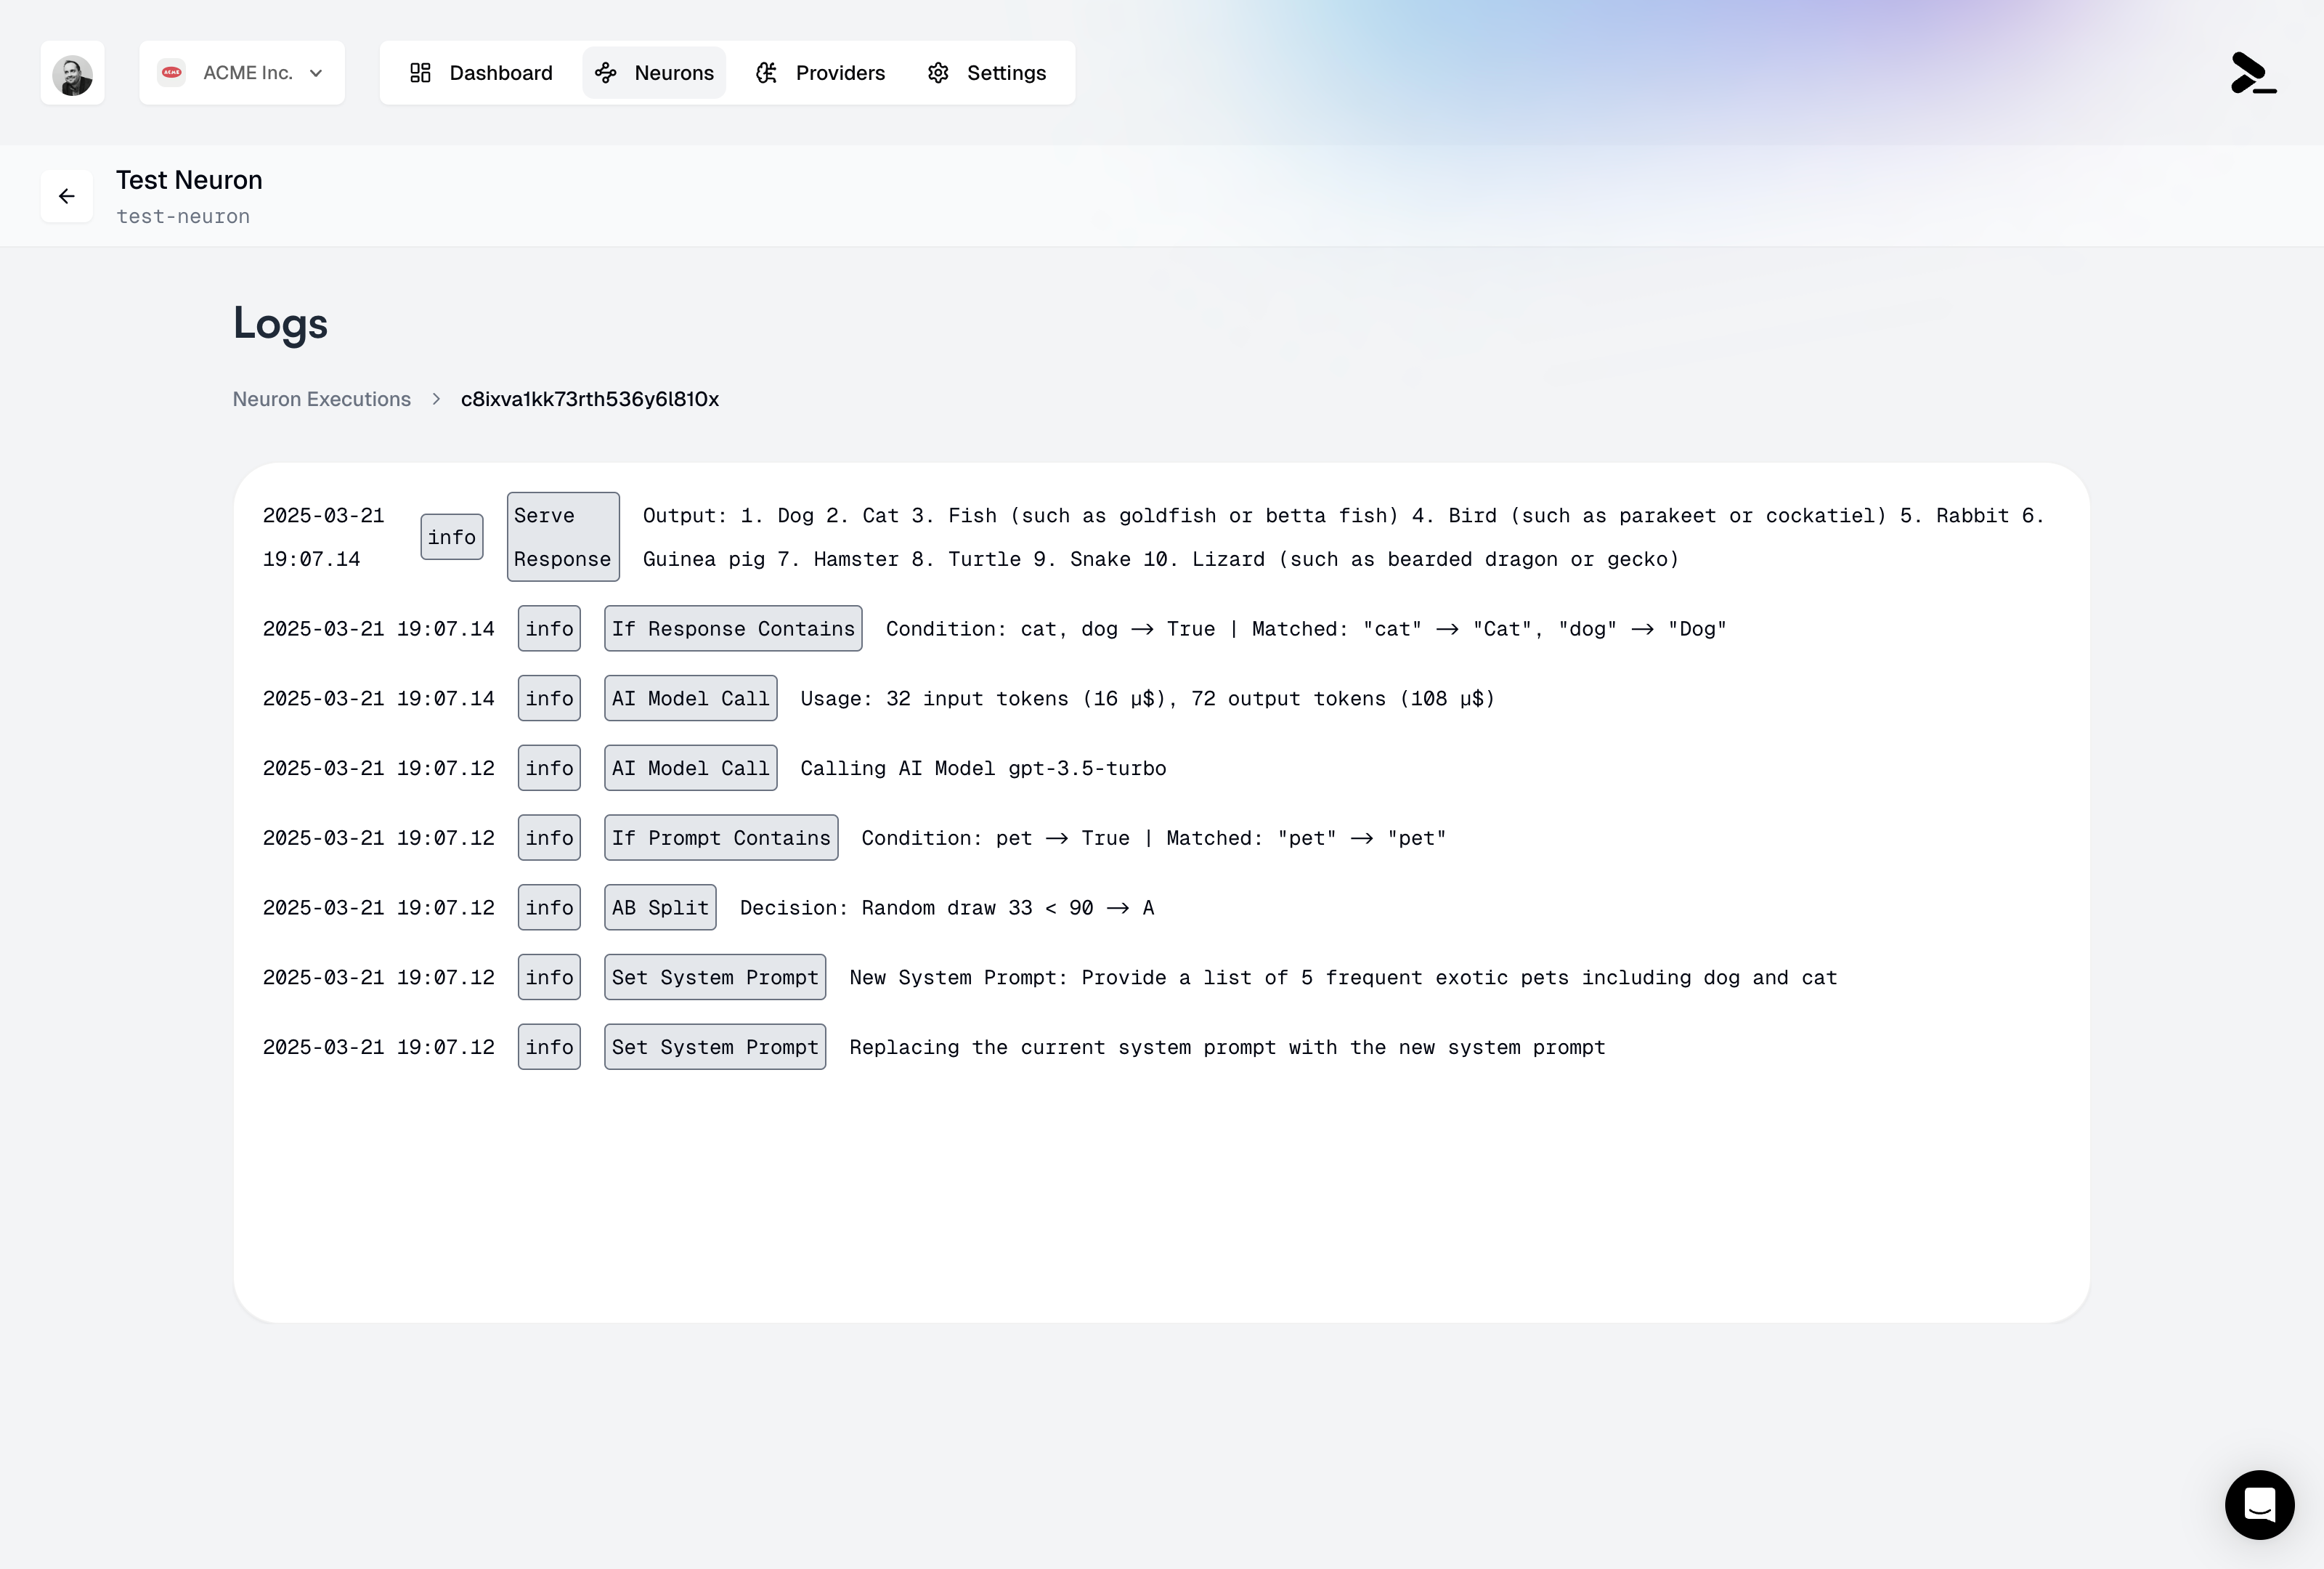 Each neuron execution is logged with detailed information about the execution flow, inputs, outputs, and decision points. These logs are essential for monitoring your neuron's performance and debugging any issues that may arise.
## Accessing Logs
Logs are accessible directly from the neuron editor by clicking on the "Logs" tab. Each execution is identified by:
* Timestamp of execution
* Unique execution ID
* Source IP address
* Execution status (success/stopped)
## Log Details
The execution logs provide a complete trace of every node executed in your neuron, presented in chronological order. Each log entry includes:
* **Node Type**: The specific type of node executed
* **Timestamp**: When the node execution occurred
* **Input Data**: The data received by the node
* **Output/Decision**: The result or output of the node execution
Common node execution examples include:
* **System Instructions**: Changes or updates to the system instructions
* **AI Model Calls**: Complete details including:
* Input/output token counts and costs
* Model version used (e.g., gpt-3.5-turbo)
* Total request cost in USD
* **Condition Nodes**: Results of [If Output Contains](/neurons/editor/nodes/if-output-contains) and [If Input Contains](/neurons/editor/nodes/if-input-contains) checks, including the matched patterns
* **AB Testing**: [Randomized Split](/neurons/editor/nodes/randomized-split) decisions and their outcomes
* **Serve Output**: Final outputs returned to the client
## Cost Tracking
Each execution log includes detailed cost information:
* Per-request cost breakdown
* Token usage per AI model call
* Cumulative cost for the entire execution
* Cost allocation by model type
This granular cost tracking helps you:
* Optimize expensive execution paths
* Monitor usage patterns
* Set up cost alerts
* Generate detailed billing reports
## Log Retention
You can choose different log retention plans, from 1 day to 365 days, directly in your [billing settings](/features/settings/billing).
For longer retention needs, please [contact our support team](mailto:support@prompteus.com).
## Related Features
* [Rate Limiting](/neurons/settings/rate-limiting) - Configure execution limits and monitor usage
* [Caching](/neurons/settings/caching) - Optimize performance and costs
* [Version Management](/neurons/editor/version-management) - Track changes to your neuron configuration
* [Access Control](/neurons/settings/access-control) - Manage who can view execution logs
## Best Practices
1. **Regular Monitoring**: Check your logs periodically to ensure your neuron is performing as expected
2. **Debug Mode**: During development, use the detailed logs to understand the execution flow
3. **Cost Optimization**: Monitor token usage through logs to optimize your prompts and responses
4. **Security**: Review IP addresses and execution patterns to detect unusual activity
## Export and Integration
For additional support or custom log retention requirements, please [contact our support team](mailto:support@prompteus.com).
# Accessing Settings & Details
Source: https://docs.prompteus.com/neurons/settings
Configure and customize your Neurons with various settings to control their behavior, performance, and security.
## Neuron Settings
Neuron settings can be accessed from the Neuron editor, by clicking the Settings button in the top right section of the editor.
Each neuron execution is logged with detailed information about the execution flow, inputs, outputs, and decision points. These logs are essential for monitoring your neuron's performance and debugging any issues that may arise.
## Accessing Logs
Logs are accessible directly from the neuron editor by clicking on the "Logs" tab. Each execution is identified by:
* Timestamp of execution
* Unique execution ID
* Source IP address
* Execution status (success/stopped)
## Log Details
The execution logs provide a complete trace of every node executed in your neuron, presented in chronological order. Each log entry includes:
* **Node Type**: The specific type of node executed
* **Timestamp**: When the node execution occurred
* **Input Data**: The data received by the node
* **Output/Decision**: The result or output of the node execution
Common node execution examples include:
* **System Instructions**: Changes or updates to the system instructions
* **AI Model Calls**: Complete details including:
* Input/output token counts and costs
* Model version used (e.g., gpt-3.5-turbo)
* Total request cost in USD
* **Condition Nodes**: Results of [If Output Contains](/neurons/editor/nodes/if-output-contains) and [If Input Contains](/neurons/editor/nodes/if-input-contains) checks, including the matched patterns
* **AB Testing**: [Randomized Split](/neurons/editor/nodes/randomized-split) decisions and their outcomes
* **Serve Output**: Final outputs returned to the client
## Cost Tracking
Each execution log includes detailed cost information:
* Per-request cost breakdown
* Token usage per AI model call
* Cumulative cost for the entire execution
* Cost allocation by model type
This granular cost tracking helps you:
* Optimize expensive execution paths
* Monitor usage patterns
* Set up cost alerts
* Generate detailed billing reports
## Log Retention
You can choose different log retention plans, from 1 day to 365 days, directly in your [billing settings](/features/settings/billing).
For longer retention needs, please [contact our support team](mailto:support@prompteus.com).
## Related Features
* [Rate Limiting](/neurons/settings/rate-limiting) - Configure execution limits and monitor usage
* [Caching](/neurons/settings/caching) - Optimize performance and costs
* [Version Management](/neurons/editor/version-management) - Track changes to your neuron configuration
* [Access Control](/neurons/settings/access-control) - Manage who can view execution logs
## Best Practices
1. **Regular Monitoring**: Check your logs periodically to ensure your neuron is performing as expected
2. **Debug Mode**: During development, use the detailed logs to understand the execution flow
3. **Cost Optimization**: Monitor token usage through logs to optimize your prompts and responses
4. **Security**: Review IP addresses and execution patterns to detect unusual activity
## Export and Integration
For additional support or custom log retention requirements, please [contact our support team](mailto:support@prompteus.com).
# Accessing Settings & Details
Source: https://docs.prompteus.com/neurons/settings
Configure and customize your Neurons with various settings to control their behavior, performance, and security.
## Neuron Settings
Neuron settings can be accessed from the Neuron editor, by clicking the Settings button in the top right section of the editor.
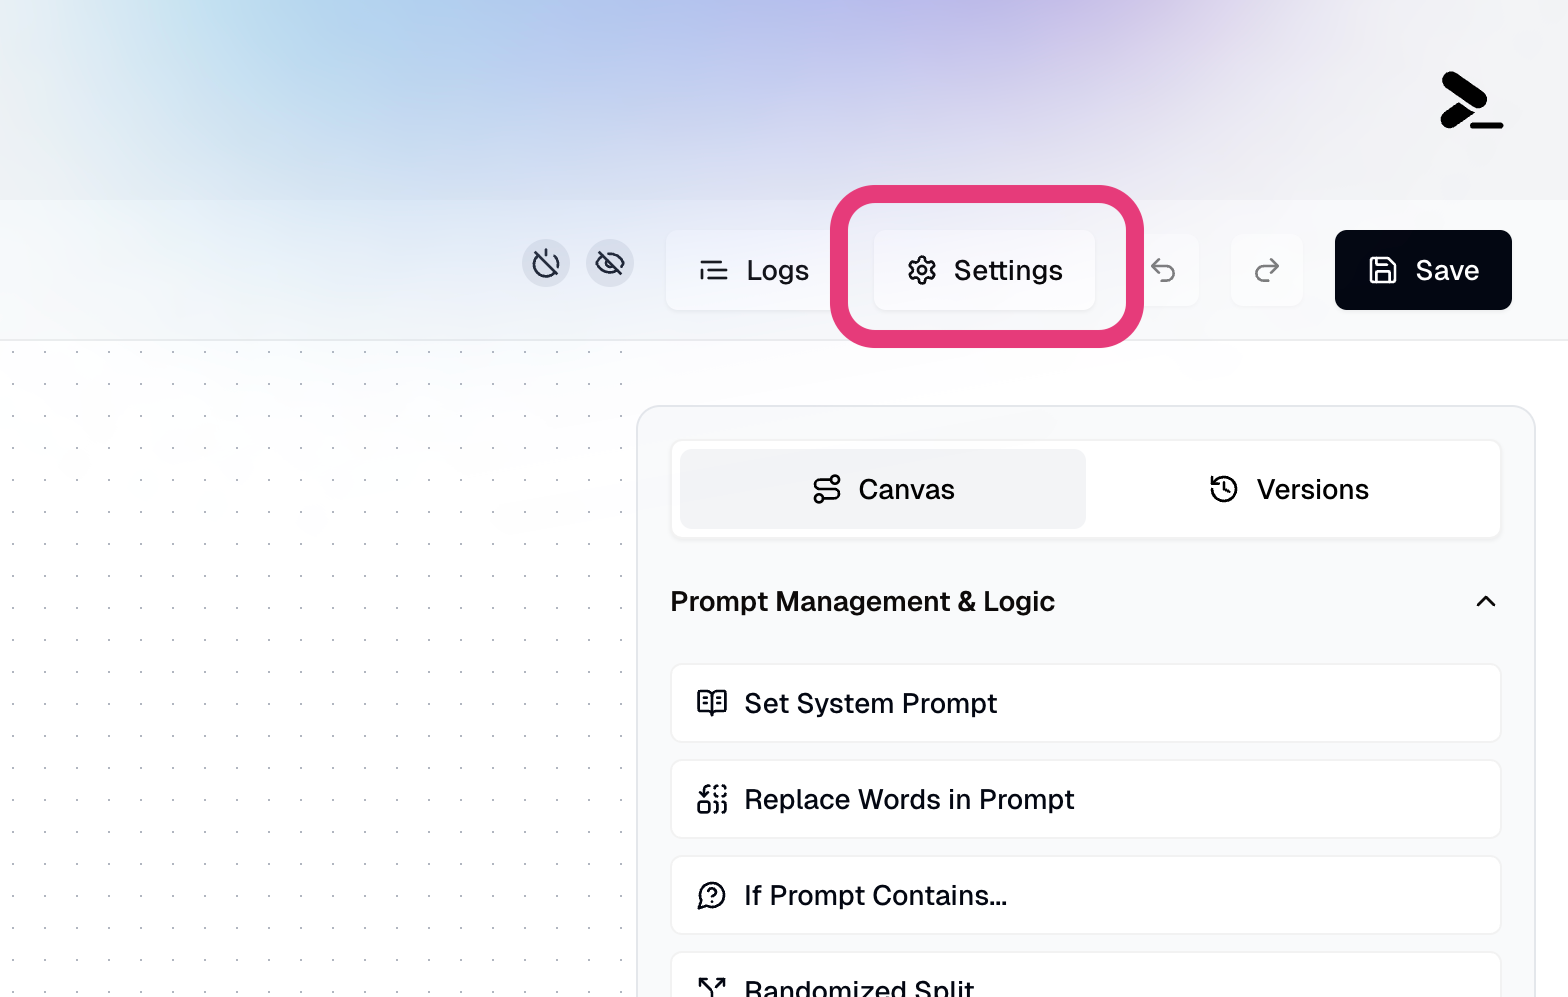 The settings page is split into three sections:
| Setting | Description |
| ------------------------------------------------------ | ------------------------------------------------------- |
| **[Details](#neuron-details)** | General settings for your Neuron, including its API URL |
| **[Access Control](/neurons/settings/access-control)** | Control who can access your Neuron. |
| **[Rate Limiting](/neurons/settings/rate-limiting)** | Control the rate of requests to your Neuron. |
| **[Caching](/neurons/settings/caching)** | Control the caching behavior of your Neuron. |
## Neuron Details
The settings page is split into three sections:
| Setting | Description |
| ------------------------------------------------------ | ------------------------------------------------------- |
| **[Details](#neuron-details)** | General settings for your Neuron, including its API URL |
| **[Access Control](/neurons/settings/access-control)** | Control who can access your Neuron. |
| **[Rate Limiting](/neurons/settings/rate-limiting)** | Control the rate of requests to your Neuron. |
| **[Caching](/neurons/settings/caching)** | Control the caching behavior of your Neuron. |
## Neuron Details
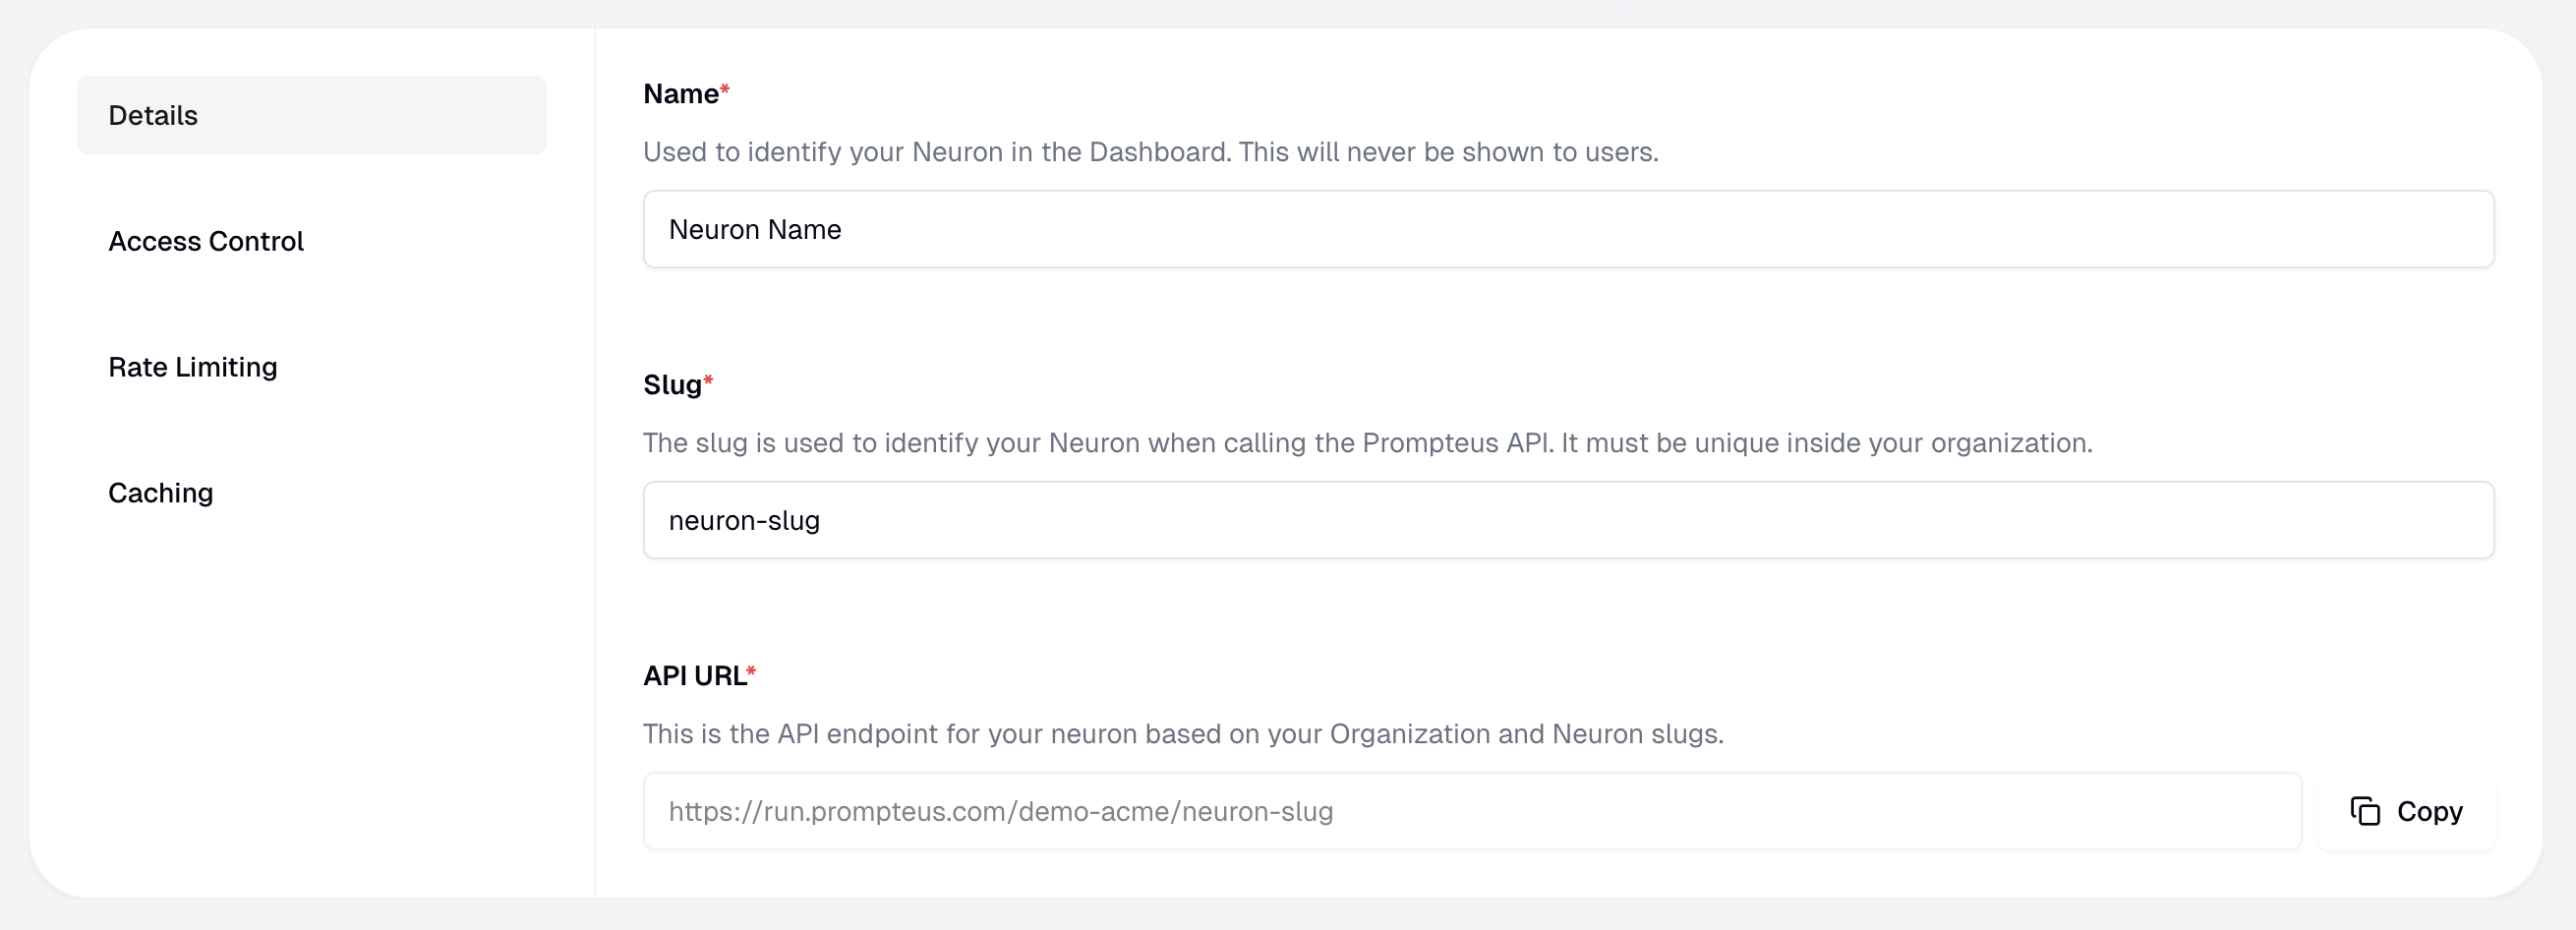 In the Details section, you can edit the Neuron's name, slug, and copy its API URL.
### Name
The name of the Neuron is used to identify it in the Neuron editor and in the Prompteus Dashboard. It is only visible to you.
### Slug
The slug of the Neuron is used to generate the Neuron's API URL. The slug must be unique within your organization, and is used to identify the Neuron in the API URL.
**Important**: Changing a Neuron's slug will update its API URL. Any existing applications or integrations using the old URL will stop working. Make sure to update all API calls to use the new URL after changing the slug.
### API URL
The API URL of the Neuron is used to call the Neuron from your application. It is generated from your organization's slug and the Neuron's slug. You can manage your organization's slug in the [Team Settings](/features/settings/team#managing-organization-details).
# Access Control
Source: https://docs.prompteus.com/neurons/settings/access-control
Manage who can access your Neurons and control permissions with fine-grained access control settings.
We designed Neurons so that they can be called differently from a back-end or front-end service. Calling a Neuron directly from your front-end application helps you build AI features quickly, without having to manage any infrastructure, and without exposing your AI provider API keys.
To ensure a Neuron can be called from a front-end service, the CORS configuration of Neurons endpoints in Prompteus are very permissive. This is intentional, and is not a security risk.
## Access Control Settings
The Access Control section of the Neuron Settings page allows you to control who can access your Neuron.
### Public Access
In the Details section, you can edit the Neuron's name, slug, and copy its API URL.
### Name
The name of the Neuron is used to identify it in the Neuron editor and in the Prompteus Dashboard. It is only visible to you.
### Slug
The slug of the Neuron is used to generate the Neuron's API URL. The slug must be unique within your organization, and is used to identify the Neuron in the API URL.
**Important**: Changing a Neuron's slug will update its API URL. Any existing applications or integrations using the old URL will stop working. Make sure to update all API calls to use the new URL after changing the slug.
### API URL
The API URL of the Neuron is used to call the Neuron from your application. It is generated from your organization's slug and the Neuron's slug. You can manage your organization's slug in the [Team Settings](/features/settings/team#managing-organization-details).
# Access Control
Source: https://docs.prompteus.com/neurons/settings/access-control
Manage who can access your Neurons and control permissions with fine-grained access control settings.
We designed Neurons so that they can be called differently from a back-end or front-end service. Calling a Neuron directly from your front-end application helps you build AI features quickly, without having to manage any infrastructure, and without exposing your AI provider API keys.
To ensure a Neuron can be called from a front-end service, the CORS configuration of Neurons endpoints in Prompteus are very permissive. This is intentional, and is not a security risk.
## Access Control Settings
The Access Control section of the Neuron Settings page allows you to control who can access your Neuron.
### Public Access
 Enabling public access allows anyone to call your Neuron by using the Neuron's API URL. Public access is exclusive of any other access control settings.
We just want to make this extremely clear: Public access means anyone with the URL can call your Neuron. Better safe than sorry!
### Referer Restrictions
Enabling public access allows anyone to call your Neuron by using the Neuron's API URL. Public access is exclusive of any other access control settings.
We just want to make this extremely clear: Public access means anyone with the URL can call your Neuron. Better safe than sorry!
### Referer Restrictions
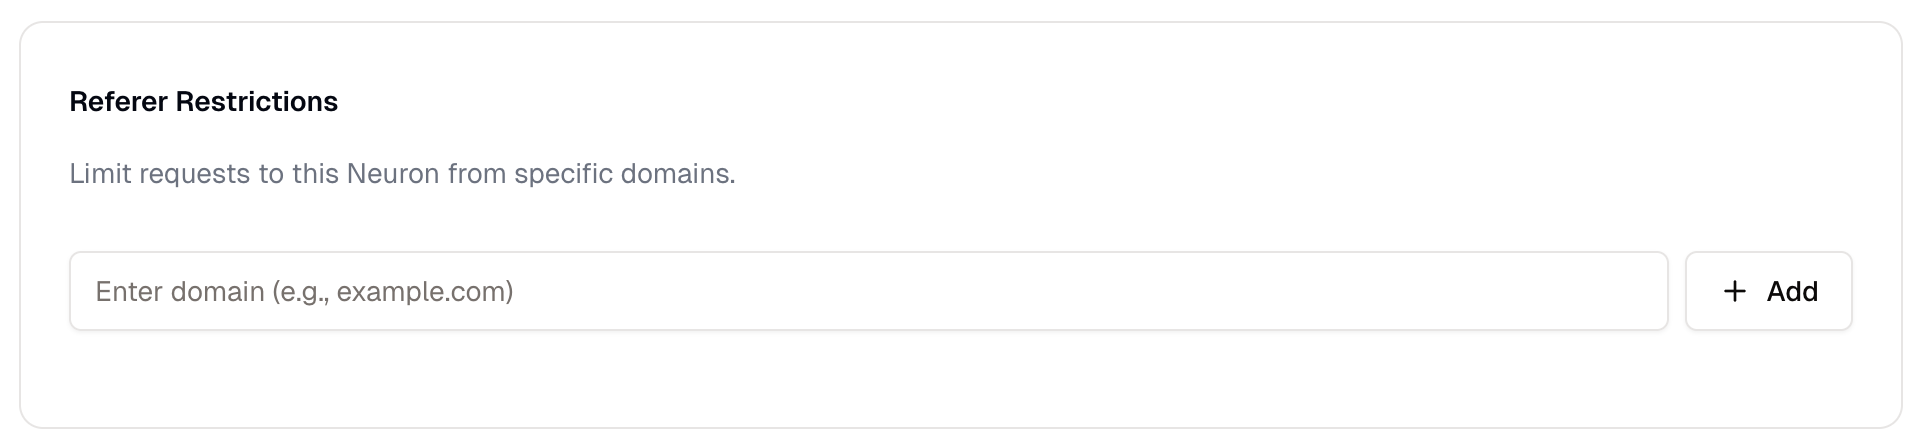 Referer restrictions allow you to restrict access to your Neuron to requests from specific domains. This is useful if you want to allow access to your Neuron from a specific front-end application, while blocking access from other domains.
This has no effect on requests made directly to the Neuron's API URL (e.g. from a back-end service). This is useful if you want your Neuron to be called from a specific front-end application, while blocking access from other domains.
The Neuron will check the Referer header of all requests, and block any requests that do not originate from a domain that is allowed.
Referer Restriction is a minimal security measure. It is not a substitute for proper authentication and authorization. We recommend using JWT Authentication for production applications where you need to verify the identity of your users.
We recommend using Referer Restriction in combination with [Rate Limiting](/neurons/settings/rate-limiting) to prevent abuse.
### IP Restrictions
Referer restrictions allow you to restrict access to your Neuron to requests from specific domains. This is useful if you want to allow access to your Neuron from a specific front-end application, while blocking access from other domains.
This has no effect on requests made directly to the Neuron's API URL (e.g. from a back-end service). This is useful if you want your Neuron to be called from a specific front-end application, while blocking access from other domains.
The Neuron will check the Referer header of all requests, and block any requests that do not originate from a domain that is allowed.
Referer Restriction is a minimal security measure. It is not a substitute for proper authentication and authorization. We recommend using JWT Authentication for production applications where you need to verify the identity of your users.
We recommend using Referer Restriction in combination with [Rate Limiting](/neurons/settings/rate-limiting) to prevent abuse.
### IP Restrictions
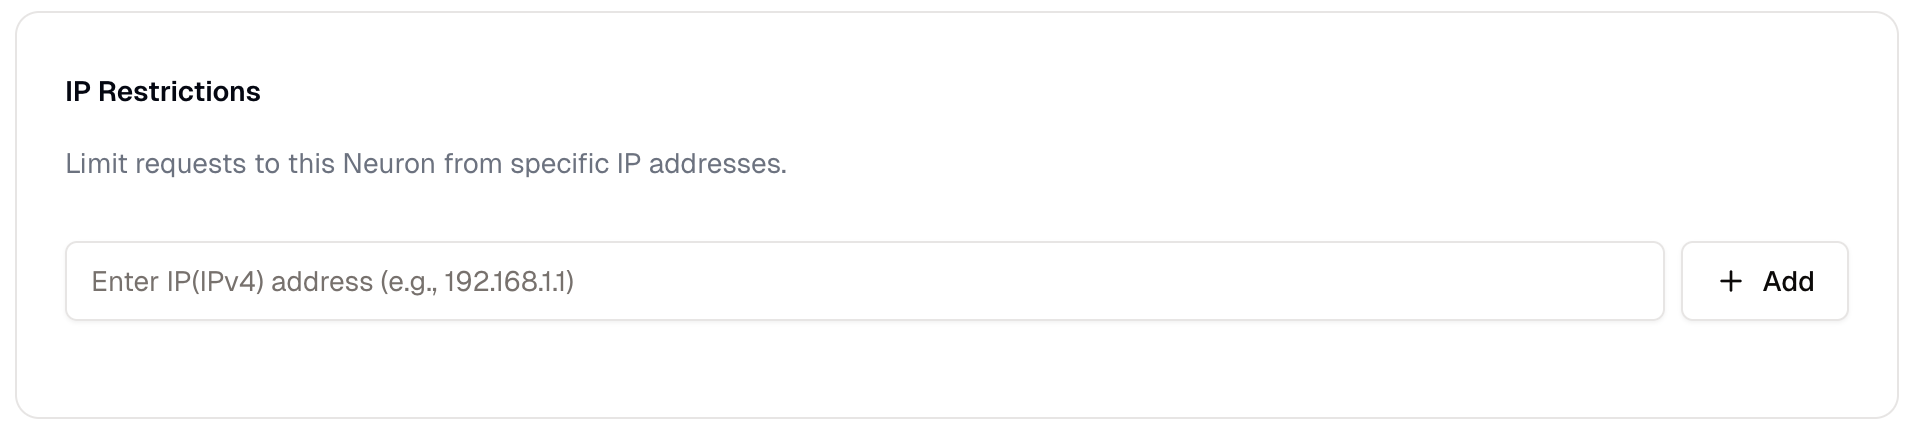 IP restrictions allow you to restrict access to your Neuron to requests from specific IP addresses.
We currently only support IPv4 addresses, but are working on supporting IPv6 in the near future. If you need IPv6 support, please [contact us](mailto:support@prompteus.com).
Any call to a Neuron that does not originate from an IP address that is allowed will be blocked.
***
### API Key Authentication
IP restrictions allow you to restrict access to your Neuron to requests from specific IP addresses.
We currently only support IPv4 addresses, but are working on supporting IPv6 in the near future. If you need IPv6 support, please [contact us](mailto:support@prompteus.com).
Any call to a Neuron that does not originate from an IP address that is allowed will be blocked.
***
### API Key Authentication
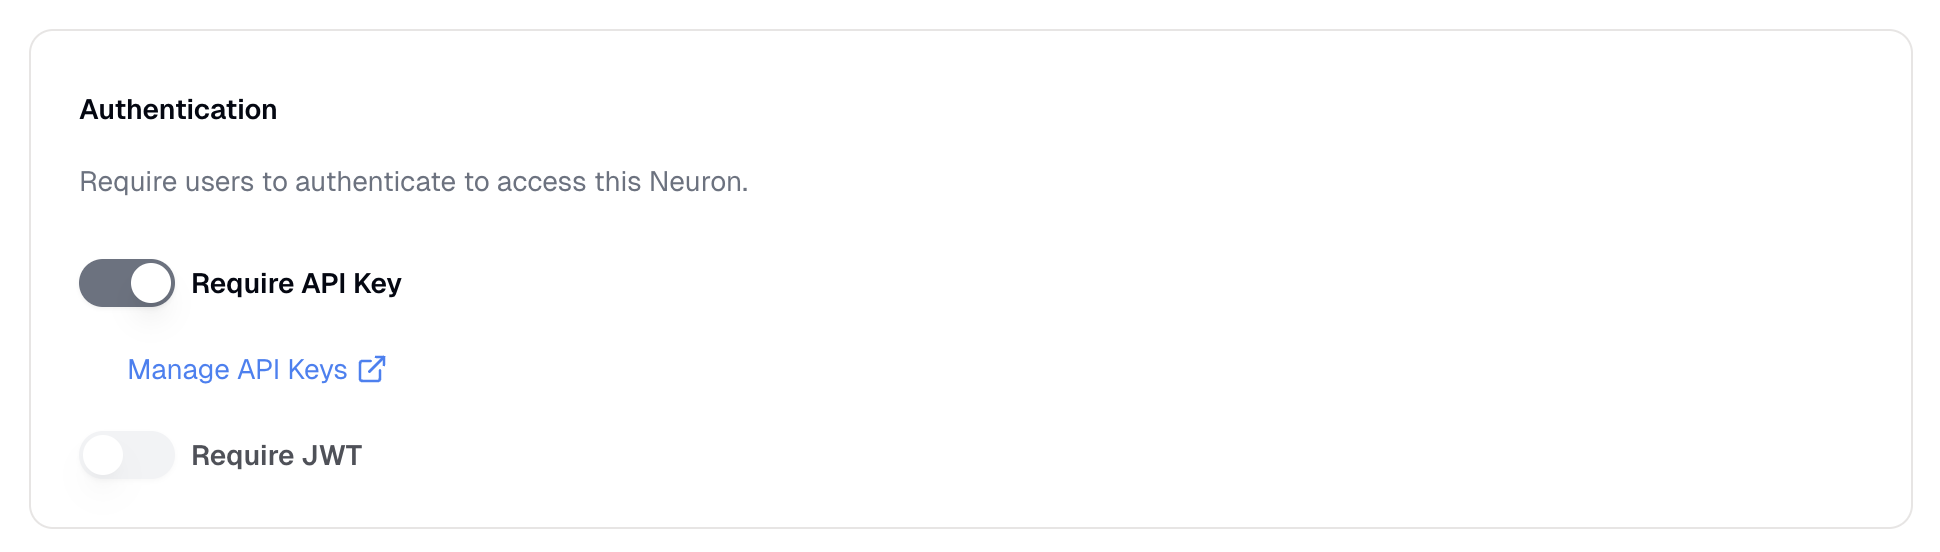 API key authentication allows you to authenticate requests to your Neuron using your Prompteus API key.
This should only be used in a back-end application, and not from a front-end application — be careful not to expose your API key in a client-side application.
You can manage your API keys in the [API Keys section](/features/settings/api-keys) of the Settings page. There is no limit to the number of API keys you can create, and you can revoke them at any time.
For detailed examples of how to use API keys in your requests, including error handling and best practices, see our [API documentation](/neurons/api#authentication).
When executing a Neuron, the API key should be passed in the `Authorization` header of the request, as a Bearer token.
```bash curl
curl -X POST https://run.prompteus.com// \
-H "Content-Type: application/json" \
-H "Authorization: Bearer " \
-d '{"input": "What is the meaning of life?"}'
```
```javascript Fetch (JavaScript)
const response = await fetch("https://run.prompteus.com//", {
method: "POST",
body: JSON.stringify({ input: "What is the meaning of life?" }),
headers: {
"Authorization": "Bearer "
}
});
```
```python Python
import requests
response = requests.post(
"https://run.prompteus.com//",
json={"input": "What is the meaning of life?"},
headers={
"Authorization": "Bearer "
}
)
print(response.json())
```
Replace `` with your organization's slug, which you can manage in the [Team Settings](/features/settings/team#managing-organization-details).
### JWT Authentication
JWT authentication allows you to authenticate requests to your Neuron using a JSON Web Token (JWT). This is useful if you want to authenticate requests to your Neuron from a specific front-end application.
A good introduction to JWTs can be found [on the jwt.io website](https://jwt.io/introduction).
For complete examples of JWT authentication, including error handling and TypeScript SDK usage, see our [API documentation](/neurons/api#authentication).
A JWT can be validated using either a Shared Secret, or a JWKS endpoint.
API key authentication allows you to authenticate requests to your Neuron using your Prompteus API key.
This should only be used in a back-end application, and not from a front-end application — be careful not to expose your API key in a client-side application.
You can manage your API keys in the [API Keys section](/features/settings/api-keys) of the Settings page. There is no limit to the number of API keys you can create, and you can revoke them at any time.
For detailed examples of how to use API keys in your requests, including error handling and best practices, see our [API documentation](/neurons/api#authentication).
When executing a Neuron, the API key should be passed in the `Authorization` header of the request, as a Bearer token.
```bash curl
curl -X POST https://run.prompteus.com// \
-H "Content-Type: application/json" \
-H "Authorization: Bearer " \
-d '{"input": "What is the meaning of life?"}'
```
```javascript Fetch (JavaScript)
const response = await fetch("https://run.prompteus.com//", {
method: "POST",
body: JSON.stringify({ input: "What is the meaning of life?" }),
headers: {
"Authorization": "Bearer "
}
});
```
```python Python
import requests
response = requests.post(
"https://run.prompteus.com//",
json={"input": "What is the meaning of life?"},
headers={
"Authorization": "Bearer "
}
)
print(response.json())
```
Replace `` with your organization's slug, which you can manage in the [Team Settings](/features/settings/team#managing-organization-details).
### JWT Authentication
JWT authentication allows you to authenticate requests to your Neuron using a JSON Web Token (JWT). This is useful if you want to authenticate requests to your Neuron from a specific front-end application.
A good introduction to JWTs can be found [on the jwt.io website](https://jwt.io/introduction).
For complete examples of JWT authentication, including error handling and TypeScript SDK usage, see our [API documentation](/neurons/api#authentication).
A JWT can be validated using either a Shared Secret, or a JWKS endpoint.
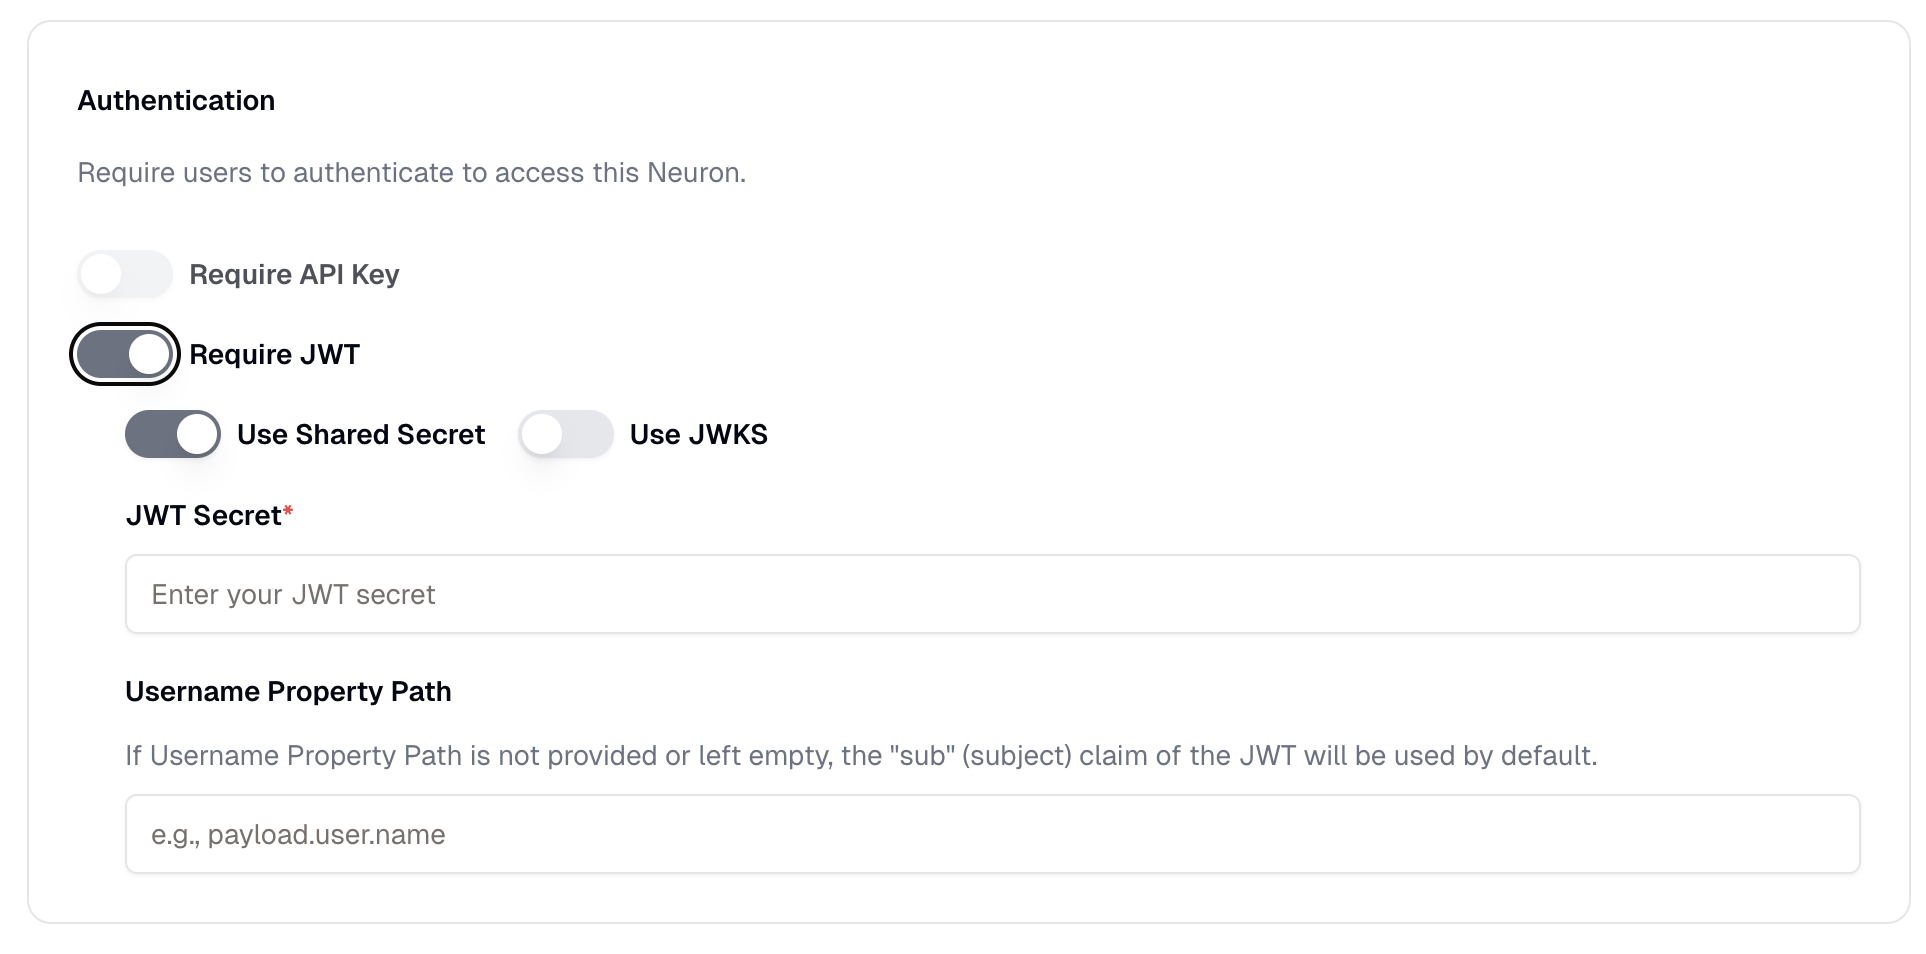 When using the Shared Secret validation method, the JWT must be signed with the same secret that you provide in the **JWT Secret** field. The secret should be a strong, random string that is kept secure.
 When using the JWKS endpoint validation method, the JWT must be signed with a key that is returned by the JWKS endpoint. You can specify multiple JWKS endpoints, and the Neuron will try each one in order until it finds a valid key.
When executing a Neuron, the JWT should be passed in the `Authorization` header of the request, as a Bearer token.
```bash curl
curl -X POST https://run.prompteus.com// \
-H "Content-Type: application/json" \
-H "Authorization: Bearer " \
-d '{"input": "What is the meaning of life?"}'
```
```javascript Fetch (JavaScript)
const response = await fetch("https://run.prompteus.com//", {
method: "POST",
body: JSON.stringify({ input: "What is the meaning of life?" }),
headers: {
"Authorization": "Bearer "
}
});
```
```python Python
import requests
response = requests.post(
"https://run.prompteus.com//",
json={"input": "What is the meaning of life?"},
headers={
"Authorization": "Bearer "
}
)
print(response.json())
```
#### Username Property Path
The Username Property Path is the path to the username property in the JWT. This is used to set the username of the request in the Neuron.
For example, it could be `sub` or `email`. The username is currently used in two ways:
1. When using the [Rate Limiting](/neurons/settings/rate-limiting) feature, the username is useful to limit the rate of requests from a specific user.
2. When reading Neuron logs, the username is used to identify which user made the request.
In a future release, additional JWT properties will be supported and passed to the Neuron context, allowing you to run custom logic in your Neuron based on the user's identity. Let us know if you have a specific use case in mind by [contacting us](mailto:support@prompteus.com).
# Caching
Source: https://docs.prompteus.com/neurons/settings/caching
Optimize your Neurons' performance and lower your AI costs with caching settings to store and reuse responses for similar requests.
Prompteus caching features can significantly improve your Neurons' performance, and lower your AI provider API costs by storing and reusing responses. This guide explains how to configure and use caching effectively.
By caching responses, you can:
* Reduce costs by avoiding unnecessary AI provider API calls
* Improve response times by returning cached results instantly
* Maintain consistency for identical or similar queries
* Scale your application more efficiently by reducing API usage
Caching is available for all Neurons, and is free to use. However, the cache is only available for the current deployment of the Neuron. If you [deploy a new version](/neurons/editor/version-management) of the Neuron with the same slug, the cache will be reset.
## Caching Settings
The Caching section of the Neuron Settings page allows you to control how responses are cached and reused.
### Exact Caching
When using the JWKS endpoint validation method, the JWT must be signed with a key that is returned by the JWKS endpoint. You can specify multiple JWKS endpoints, and the Neuron will try each one in order until it finds a valid key.
When executing a Neuron, the JWT should be passed in the `Authorization` header of the request, as a Bearer token.
```bash curl
curl -X POST https://run.prompteus.com// \
-H "Content-Type: application/json" \
-H "Authorization: Bearer " \
-d '{"input": "What is the meaning of life?"}'
```
```javascript Fetch (JavaScript)
const response = await fetch("https://run.prompteus.com//", {
method: "POST",
body: JSON.stringify({ input: "What is the meaning of life?" }),
headers: {
"Authorization": "Bearer "
}
});
```
```python Python
import requests
response = requests.post(
"https://run.prompteus.com//",
json={"input": "What is the meaning of life?"},
headers={
"Authorization": "Bearer "
}
)
print(response.json())
```
#### Username Property Path
The Username Property Path is the path to the username property in the JWT. This is used to set the username of the request in the Neuron.
For example, it could be `sub` or `email`. The username is currently used in two ways:
1. When using the [Rate Limiting](/neurons/settings/rate-limiting) feature, the username is useful to limit the rate of requests from a specific user.
2. When reading Neuron logs, the username is used to identify which user made the request.
In a future release, additional JWT properties will be supported and passed to the Neuron context, allowing you to run custom logic in your Neuron based on the user's identity. Let us know if you have a specific use case in mind by [contacting us](mailto:support@prompteus.com).
# Caching
Source: https://docs.prompteus.com/neurons/settings/caching
Optimize your Neurons' performance and lower your AI costs with caching settings to store and reuse responses for similar requests.
Prompteus caching features can significantly improve your Neurons' performance, and lower your AI provider API costs by storing and reusing responses. This guide explains how to configure and use caching effectively.
By caching responses, you can:
* Reduce costs by avoiding unnecessary AI provider API calls
* Improve response times by returning cached results instantly
* Maintain consistency for identical or similar queries
* Scale your application more efficiently by reducing API usage
Caching is available for all Neurons, and is free to use. However, the cache is only available for the current deployment of the Neuron. If you [deploy a new version](/neurons/editor/version-management) of the Neuron with the same slug, the cache will be reset.
## Caching Settings
The Caching section of the Neuron Settings page allows you to control how responses are cached and reused.
### Exact Caching
 Exact caching allows Prompteus to compare the input data with previously processed and cached input data, and return a cache hit in case of an exact match. This is useful for scenarios where you expect identical inputs to produce identical outputs.
When enabled, if a request is made with exactly the same input as a previous request, the cached response will be returned immediately without making any API calls to your AI providers. This means you won't be charged for repeated identical requests to your AI providers.
Exact caching is particularly useful for deterministic operations or when you want to ensure consistent responses for identical inputs. It's also the fastest and most efficient caching strategy as it completely eliminates API calls for repeated requests.
### Semantic Caching
Exact caching allows Prompteus to compare the input data with previously processed and cached input data, and return a cache hit in case of an exact match. This is useful for scenarios where you expect identical inputs to produce identical outputs.
When enabled, if a request is made with exactly the same input as a previous request, the cached response will be returned immediately without making any API calls to your AI providers. This means you won't be charged for repeated identical requests to your AI providers.
Exact caching is particularly useful for deterministic operations or when you want to ensure consistent responses for identical inputs. It's also the fastest and most efficient caching strategy as it completely eliminates API calls for repeated requests.
### Semantic Caching
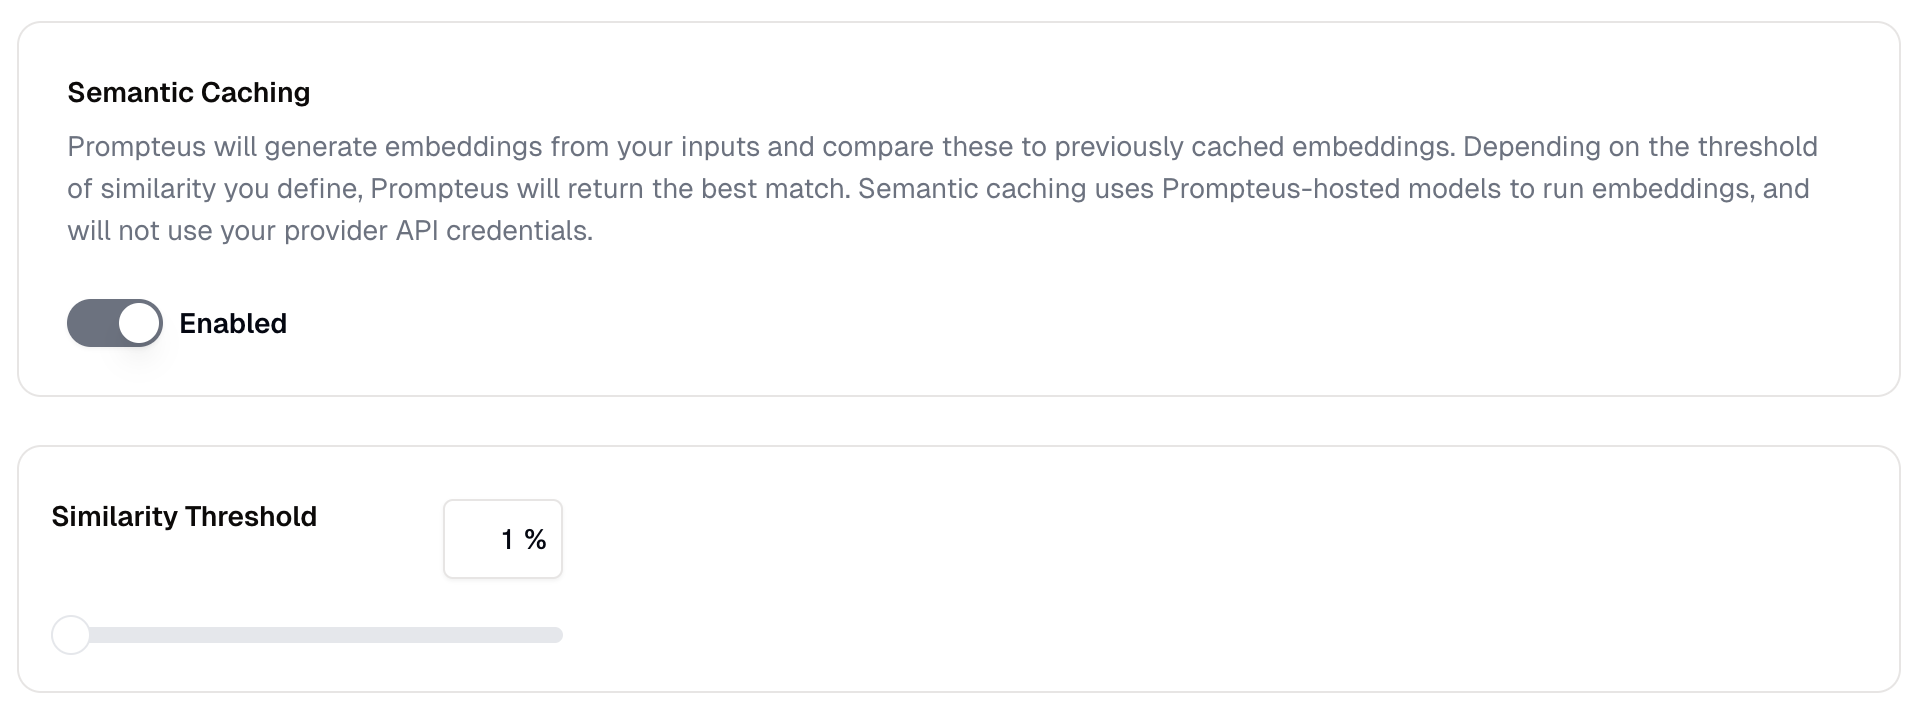 Semantic caching takes caching a step further by using AI embeddings to identify similar inputs. Prompteus will generate embeddings from your inputs and compare these to previously cached embeddings. Depending on the threshold of similarity you define, Prompteus will return the best match.
This feature uses Prompteus-hosted models to generate embeddings and will not consume your provider API credentials. This means you can benefit from semantic matching without incurring additional costs from your AI provider, as the embedding generation and comparison is handled by Prompteus.
#### Semantic Caching Similarity Threshold
The similarity threshold determines how similar an input must be to a cached input to trigger a cache hit. The threshold is expressed as a percentage, where:
* A higher percentage (e.g., 99%) requires inputs to be nearly identical for a cache hit
* A lower percentage (e.g., 50%) allows for more variation between inputs while still returning cached results
We recommend starting with a high similarity threshold and gradually lowering it based on your specific use case and the observed quality of cached responses.
While caching can significantly improve performance and reduce costs, it's important to carefully consider the similarity threshold when using semantic caching. Too low a threshold might return responses that don't accurately match the user's intent.
### Cache Duration
Cached responses are stored for a limited time to ensure freshness of data. The exact duration may vary based on your subscription plan and usage patterns.
You can bypass the cache for individual requests using the `bypassCache` parameter when [calling the API](/neurons/api#query-parameters) or SDK. This is useful for testing or when you need to force a fresh response:
```bash REST API
https://run.prompteus.com//?bypassCache=true
```
```typescript TypeScript SDK
await client.callNeuron('org', 'neuron', {
input: 'Hello',
bypassCache: true
});
```
Bypassing cache will not purge the cache for the Neuron, only for the specific request. If you need to purge the cache for the Neuron, you can do so by [deploying a new version](/neurons/editor/version-management) of the Neuron.
### Best Practices
Here are some recommendations for effective use of caching:
1. Enable exact caching for deterministic operations where identical inputs should always produce identical outputs
2. Use semantic caching when slight variations in input should still return the same or similar responses
3. Adjust the similarity threshold based on your specific use case:
* Higher thresholds for tasks requiring precise matches
* Lower thresholds for more general queries where approximate matches are acceptable
4. Monitor cache hit rates and response quality through [execution logs](/neurons/logging) to fine-tune your caching settings
5. For cost optimization, analyze your most frequent queries and adjust caching settings to maximize cache hits for these high-volume requests
### Upcoming Features
We are working on adding the ability for the cache to be namespaced not only by [Neuron version](/neurons/editor/version-management), but also by user. This will allow you to cache different responses for different users of your application. [Contact us](mailto:support@prompteus.com) if you are interested in this feature.
# Rate Limiting
Source: https://docs.prompteus.com/neurons/settings/rate-limiting
Control the rate of requests to your Neurons to prevent abuse and manage resource usage effectively.
Rate limiting helps you control how often your Neurons can be called.
Semantic caching takes caching a step further by using AI embeddings to identify similar inputs. Prompteus will generate embeddings from your inputs and compare these to previously cached embeddings. Depending on the threshold of similarity you define, Prompteus will return the best match.
This feature uses Prompteus-hosted models to generate embeddings and will not consume your provider API credentials. This means you can benefit from semantic matching without incurring additional costs from your AI provider, as the embedding generation and comparison is handled by Prompteus.
#### Semantic Caching Similarity Threshold
The similarity threshold determines how similar an input must be to a cached input to trigger a cache hit. The threshold is expressed as a percentage, where:
* A higher percentage (e.g., 99%) requires inputs to be nearly identical for a cache hit
* A lower percentage (e.g., 50%) allows for more variation between inputs while still returning cached results
We recommend starting with a high similarity threshold and gradually lowering it based on your specific use case and the observed quality of cached responses.
While caching can significantly improve performance and reduce costs, it's important to carefully consider the similarity threshold when using semantic caching. Too low a threshold might return responses that don't accurately match the user's intent.
### Cache Duration
Cached responses are stored for a limited time to ensure freshness of data. The exact duration may vary based on your subscription plan and usage patterns.
You can bypass the cache for individual requests using the `bypassCache` parameter when [calling the API](/neurons/api#query-parameters) or SDK. This is useful for testing or when you need to force a fresh response:
```bash REST API
https://run.prompteus.com//?bypassCache=true
```
```typescript TypeScript SDK
await client.callNeuron('org', 'neuron', {
input: 'Hello',
bypassCache: true
});
```
Bypassing cache will not purge the cache for the Neuron, only for the specific request. If you need to purge the cache for the Neuron, you can do so by [deploying a new version](/neurons/editor/version-management) of the Neuron.
### Best Practices
Here are some recommendations for effective use of caching:
1. Enable exact caching for deterministic operations where identical inputs should always produce identical outputs
2. Use semantic caching when slight variations in input should still return the same or similar responses
3. Adjust the similarity threshold based on your specific use case:
* Higher thresholds for tasks requiring precise matches
* Lower thresholds for more general queries where approximate matches are acceptable
4. Monitor cache hit rates and response quality through [execution logs](/neurons/logging) to fine-tune your caching settings
5. For cost optimization, analyze your most frequent queries and adjust caching settings to maximize cache hits for these high-volume requests
### Upcoming Features
We are working on adding the ability for the cache to be namespaced not only by [Neuron version](/neurons/editor/version-management), but also by user. This will allow you to cache different responses for different users of your application. [Contact us](mailto:support@prompteus.com) if you are interested in this feature.
# Rate Limiting
Source: https://docs.prompteus.com/neurons/settings/rate-limiting
Control the rate of requests to your Neurons to prevent abuse and manage resource usage effectively.
Rate limiting helps you control how often your Neurons can be called.
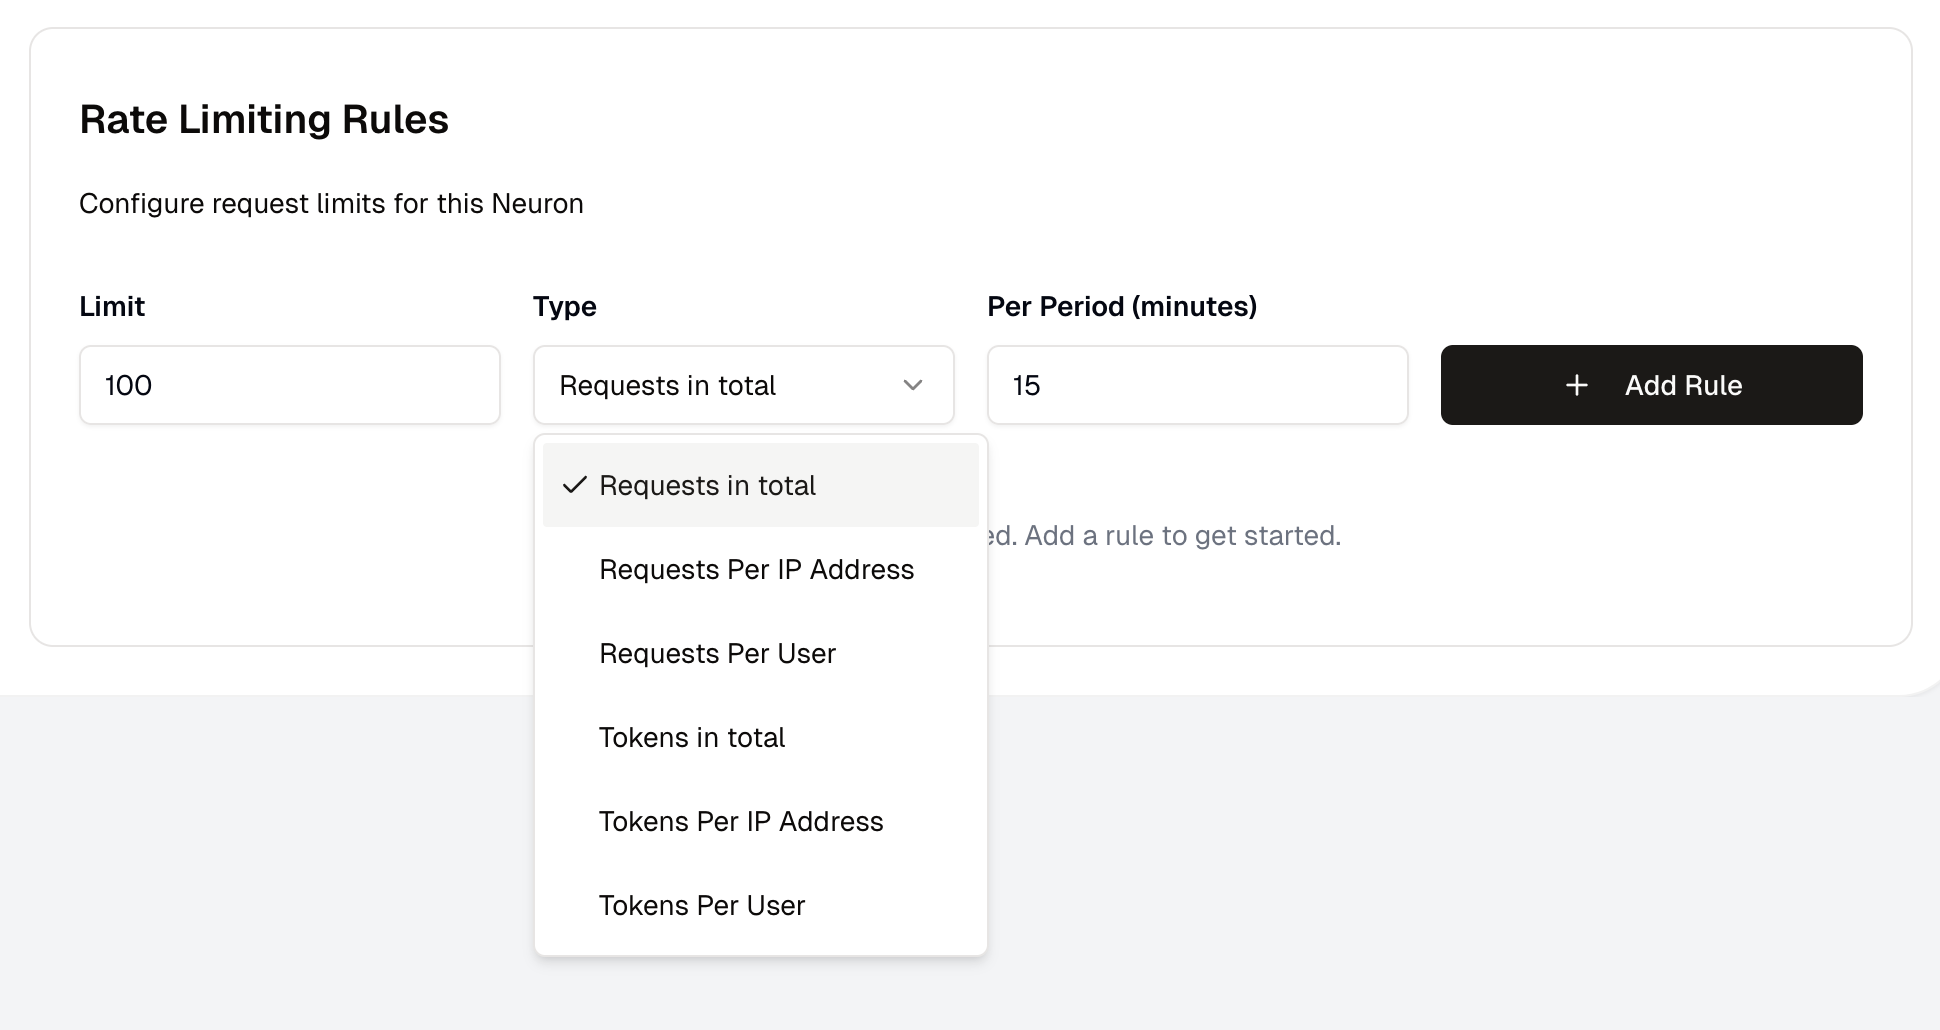 ### Rate Limiting Rules
You can define as many rate limiting rules as you want. Each rule can have a different limit and time period. Rules are executed in order, and the first match blocks the request.
To speed up execution, rate limiting rules are cached for a few minutes. If you need to deploy an immediate change, we recommend [creating and deploying a new version](/neurons/editor/version-management) of your Neuron.
### Metrics and Scopes
Rate limiting rules can be defined using the following metrics:
| Metric | Description |
| -------- | ---------------------------------------------------------------------------- |
| Requests | The number of requests made to the Neuron. |
| Tokens | The number of tokens processed by the Neuron, across all AI providers calls. |
Tokens are mixed across all AI providers calls, and are not specific to a single provider. Each provider counts tokens slightly differently, and is not normalized.
Rate limiting rules are also defined by a scope:
| Scope | Description |
| -------- | ----------------------------------------------- |
| Total | The total number of the chosen Metrics |
| Per IP | The number of the chosen Metrics per IP address |
| Per User | The number of the chosen Metrics per user |
`Per User` is only enforced if you are using JWT Authentication with a username property path defined, otherwise it will be ignored. See [Access Control](/neurons/settings/access-control#jwt-authentication) for more information.
### What happens when a request is being rate limited?
When a request is being rate limited, the Neuron will return a `429` HTTP status code and an error message. Make sure to handle this error in your application.
You can monitor rate limit hits and usage patterns through the [execution logs](/neurons/logging) to fine-tune your rate limiting rules.
# Use Cases: Feature Deep Dive
Source: https://docs.prompteus.com/use-cases
Learn how Prompteus can be used for your use cases
The versatility of Neurons, and the fact that you can design them any way you want through our visual editor, makes them a great fit for a wide range of use cases.
Here are some of the most common use cases that our users have built with Prompteus.
## Testing and Changing AI Models
Prompteus enables rapid adoption of new AI models as they are released. Instead of a lengthy process involving code refactoring, testing with limited user sets, prompt optimization, and retesting, Neurons streamline this to a fraction of the time.
**Key Benefits:**
* **No Code Changes:** Switch models without modifying your application's core code.
* **A/B Testing (Randomized Split):** Direct a percentage of requests to different models (e.g., 50% to GPT-3.5, 50% to Gemini 1.5 Flash). Easily adjust these percentages to perform canary testing, gradually increasing exposure to a new model.
* **Real-time Deployment:** Changes to Neuron configurations (like model assignments or split values) are deployed instantly.
* **Detailed Logs:** Track which model handled each request and review the execution details.
## Handling Sensitive Data (Guardrails)
Prompteus provides guardrails for scenarios where AI processes sensitive information. This is crucial for use cases like summarizing messages or phone conversations, where personal data (e.g., credit card numbers) might be present.
**Key Features:**
* **Redaction:** Use the **Replace Words in Input** node to detect and replace sensitive data before it's sent to the AI provider. The video shows using regular expressions to identify and redact credit card numbers.
* **System Instructions:** Define system instructions to instruct the AI on how to handle the overall task (e.g., "Summarize this bank call...").
## Caching: Saving on Request Costs and Speed
AI inference costs can be significant. Prompteus includes caching mechanisms to reduce these costs and improve response times.
**Key Features:**
* **Semantic Caching:** Prompteus's cache is multilingual and understands the *meaning* of inputs.
* **Configurable Threshold:** You define a similarity threshold. If a new request is semantically similar enough to a previous one (above the threshold), Prompteus returns the cached response, avoiding a new AI inference call.
* **Cost Savings:** The video mentions seeing up to 50% cost reduction in some workflows.
* **Speed Improvement:** Cached responses are delivered much faster than new inferences.
* **Dashboard Tracking:** The Prompteus dashboard shows your savings from caching.
**Example:** The video demonstrates a simple "Jeopardy contestant" Neuron. By asking two similar questions ("European country known for baguette" and "a country in Europe known for baguette"). The second response is served from the cache, even though the wording is slightly different.
## Advanced Neuron Settings and Security Features
Prompteus includes a settings page to access advanced features.
**Key Features:**
* **Structured Output:** Sets output format to Text or Structured Output, allowing for JSON Schema.
* **Access Control:** Configure who can access a Neuron. Options include:
* **Public Access:** Anyone with the Neuron's URL can use it.
* **Referer Restrictions:** Limit requests to specific domains.
* **IP Restrictions:** Allow requests only from specific IP addresses.
* **Authentication:** Require users to authenticate via API Key or JWT.
* **Rate Limiting:** Set limits on Neuron execution (e.g., requests per minute, tokens per IP address) to prevent excessive usage.
* **Request Level Logging:** see cost, payload details, and execution trace per request.
* **Model Fallback:** Switch to another model or provider on model failure or unavailability.
* **Neuron Chaining:** Call one Neuron from another.
* **Tool Calling (Private Beta):** Transform existing APIs into tools callable by supported AI models. This allows mapping your own APIs to tools that LLMs can use.
***
# What is Prompteus?
Source: https://docs.prompteus.com/welcome
Prompteus is a platform that makes it easy for developers to build, deploy, and scale AI workflows — all through a simple web-based editor. It offers multi-LLM orchestration, adaptive caching, and built-in guardrails for cost-effective, compliant, and robust AI ops.
At the heart of Prompteus are [Neurons](/neurons/intro). You build Neurons using a visual workflow editor, and Neurons control how your requests flow to AI models.
It takes less than 2 minutes to [sign-up](https://dashboard.prompteus.com/sign-up) for Prompteus, create your first Neuron, and start sending requests. Right out-of-the-box, you'll get request-level logging, caching, API security and rate limiting.
## Getting Started with Prompteus
Check out this video, where our co-founder Bap explains what Neurons are and how they can supercharge your AI deployments.
## Our docs are LLM-friendly
Simply add `.md` at the end of a documentation page URL to get a markdown version of the page.
You can also get a LLM-friendly index of all the pages:
* LLM-friendly index: [https://docs.prompteus.com/llms.txt](https://docs.prompteus.com/llms.txt)
* LLM-friendly entire docs: [https://docs.prompteus.com/llms-full.txt](https://docs.prompteus.com/llms-full.txt)
### Rate Limiting Rules
You can define as many rate limiting rules as you want. Each rule can have a different limit and time period. Rules are executed in order, and the first match blocks the request.
To speed up execution, rate limiting rules are cached for a few minutes. If you need to deploy an immediate change, we recommend [creating and deploying a new version](/neurons/editor/version-management) of your Neuron.
### Metrics and Scopes
Rate limiting rules can be defined using the following metrics:
| Metric | Description |
| -------- | ---------------------------------------------------------------------------- |
| Requests | The number of requests made to the Neuron. |
| Tokens | The number of tokens processed by the Neuron, across all AI providers calls. |
Tokens are mixed across all AI providers calls, and are not specific to a single provider. Each provider counts tokens slightly differently, and is not normalized.
Rate limiting rules are also defined by a scope:
| Scope | Description |
| -------- | ----------------------------------------------- |
| Total | The total number of the chosen Metrics |
| Per IP | The number of the chosen Metrics per IP address |
| Per User | The number of the chosen Metrics per user |
`Per User` is only enforced if you are using JWT Authentication with a username property path defined, otherwise it will be ignored. See [Access Control](/neurons/settings/access-control#jwt-authentication) for more information.
### What happens when a request is being rate limited?
When a request is being rate limited, the Neuron will return a `429` HTTP status code and an error message. Make sure to handle this error in your application.
You can monitor rate limit hits and usage patterns through the [execution logs](/neurons/logging) to fine-tune your rate limiting rules.
# Use Cases: Feature Deep Dive
Source: https://docs.prompteus.com/use-cases
Learn how Prompteus can be used for your use cases
The versatility of Neurons, and the fact that you can design them any way you want through our visual editor, makes them a great fit for a wide range of use cases.
Here are some of the most common use cases that our users have built with Prompteus.
## Testing and Changing AI Models
Prompteus enables rapid adoption of new AI models as they are released. Instead of a lengthy process involving code refactoring, testing with limited user sets, prompt optimization, and retesting, Neurons streamline this to a fraction of the time.
**Key Benefits:**
* **No Code Changes:** Switch models without modifying your application's core code.
* **A/B Testing (Randomized Split):** Direct a percentage of requests to different models (e.g., 50% to GPT-3.5, 50% to Gemini 1.5 Flash). Easily adjust these percentages to perform canary testing, gradually increasing exposure to a new model.
* **Real-time Deployment:** Changes to Neuron configurations (like model assignments or split values) are deployed instantly.
* **Detailed Logs:** Track which model handled each request and review the execution details.
## Handling Sensitive Data (Guardrails)
Prompteus provides guardrails for scenarios where AI processes sensitive information. This is crucial for use cases like summarizing messages or phone conversations, where personal data (e.g., credit card numbers) might be present.
**Key Features:**
* **Redaction:** Use the **Replace Words in Input** node to detect and replace sensitive data before it's sent to the AI provider. The video shows using regular expressions to identify and redact credit card numbers.
* **System Instructions:** Define system instructions to instruct the AI on how to handle the overall task (e.g., "Summarize this bank call...").
## Caching: Saving on Request Costs and Speed
AI inference costs can be significant. Prompteus includes caching mechanisms to reduce these costs and improve response times.
**Key Features:**
* **Semantic Caching:** Prompteus's cache is multilingual and understands the *meaning* of inputs.
* **Configurable Threshold:** You define a similarity threshold. If a new request is semantically similar enough to a previous one (above the threshold), Prompteus returns the cached response, avoiding a new AI inference call.
* **Cost Savings:** The video mentions seeing up to 50% cost reduction in some workflows.
* **Speed Improvement:** Cached responses are delivered much faster than new inferences.
* **Dashboard Tracking:** The Prompteus dashboard shows your savings from caching.
**Example:** The video demonstrates a simple "Jeopardy contestant" Neuron. By asking two similar questions ("European country known for baguette" and "a country in Europe known for baguette"). The second response is served from the cache, even though the wording is slightly different.
## Advanced Neuron Settings and Security Features
Prompteus includes a settings page to access advanced features.
**Key Features:**
* **Structured Output:** Sets output format to Text or Structured Output, allowing for JSON Schema.
* **Access Control:** Configure who can access a Neuron. Options include:
* **Public Access:** Anyone with the Neuron's URL can use it.
* **Referer Restrictions:** Limit requests to specific domains.
* **IP Restrictions:** Allow requests only from specific IP addresses.
* **Authentication:** Require users to authenticate via API Key or JWT.
* **Rate Limiting:** Set limits on Neuron execution (e.g., requests per minute, tokens per IP address) to prevent excessive usage.
* **Request Level Logging:** see cost, payload details, and execution trace per request.
* **Model Fallback:** Switch to another model or provider on model failure or unavailability.
* **Neuron Chaining:** Call one Neuron from another.
* **Tool Calling (Private Beta):** Transform existing APIs into tools callable by supported AI models. This allows mapping your own APIs to tools that LLMs can use.
***
# What is Prompteus?
Source: https://docs.prompteus.com/welcome
Prompteus is a platform that makes it easy for developers to build, deploy, and scale AI workflows — all through a simple web-based editor. It offers multi-LLM orchestration, adaptive caching, and built-in guardrails for cost-effective, compliant, and robust AI ops.
At the heart of Prompteus are [Neurons](/neurons/intro). You build Neurons using a visual workflow editor, and Neurons control how your requests flow to AI models.
It takes less than 2 minutes to [sign-up](https://dashboard.prompteus.com/sign-up) for Prompteus, create your first Neuron, and start sending requests. Right out-of-the-box, you'll get request-level logging, caching, API security and rate limiting.
## Getting Started with Prompteus
Check out this video, where our co-founder Bap explains what Neurons are and how they can supercharge your AI deployments.
## Our docs are LLM-friendly
Simply add `.md` at the end of a documentation page URL to get a markdown version of the page.
You can also get a LLM-friendly index of all the pages:
* LLM-friendly index: [https://docs.prompteus.com/llms.txt](https://docs.prompteus.com/llms.txt)
* LLM-friendly entire docs: [https://docs.prompteus.com/llms-full.txt](https://docs.prompteus.com/llms-full.txt)